神经网络——Python实现BP神经网络算法(理论+例子+程序)
posted on 2023-06-06 11:24 read(919) comment(0) like(8) collect(5)
1. Multi-layer perceptron model based on BP algorithm
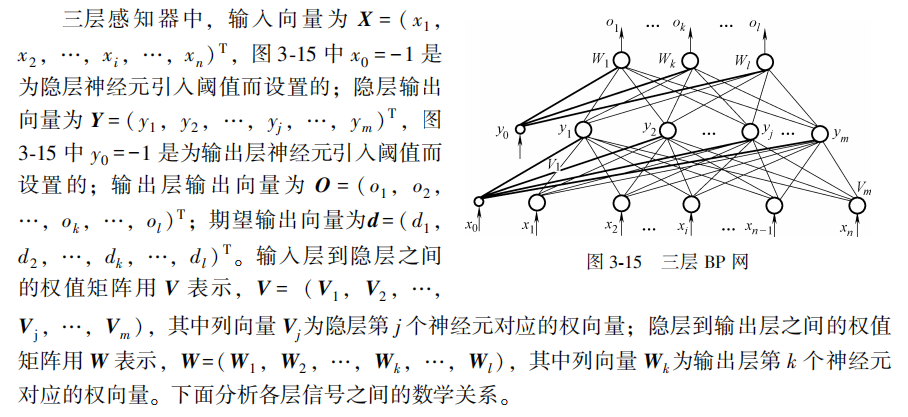
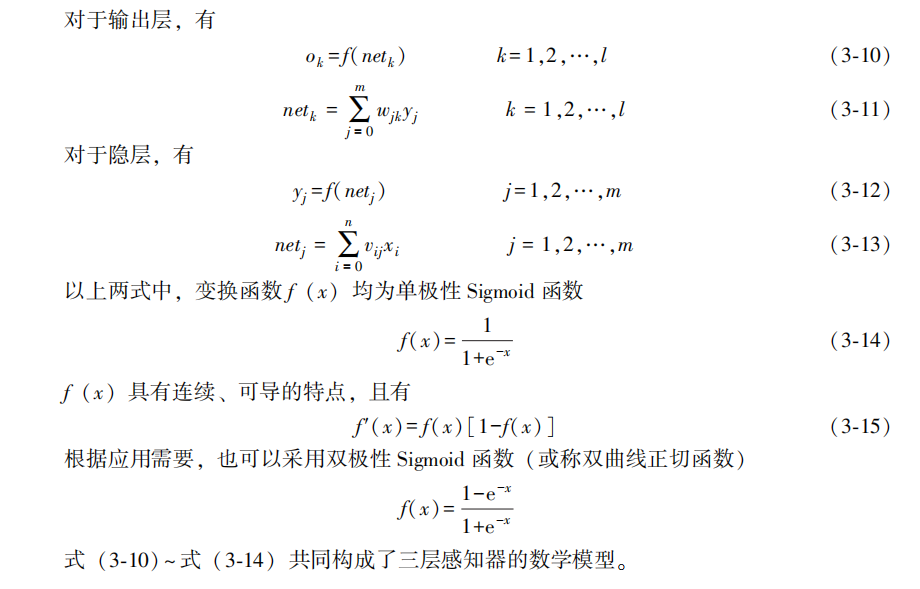
The multi-layer perceptron using BP algorithm is the most widely used neural network so far. In the application of multi-layer perceptron, the application of single hidden layer network shown in Figure 3-15 is the most common. It is generally customary to refer to a single hidden layer feedforward network as a three-layer perceptron. The so-called three layers include the input layer, hidden layer and output layer.
The final result of the algorithm adopts the gradient descent method, and the specific detailed process is omitted here!
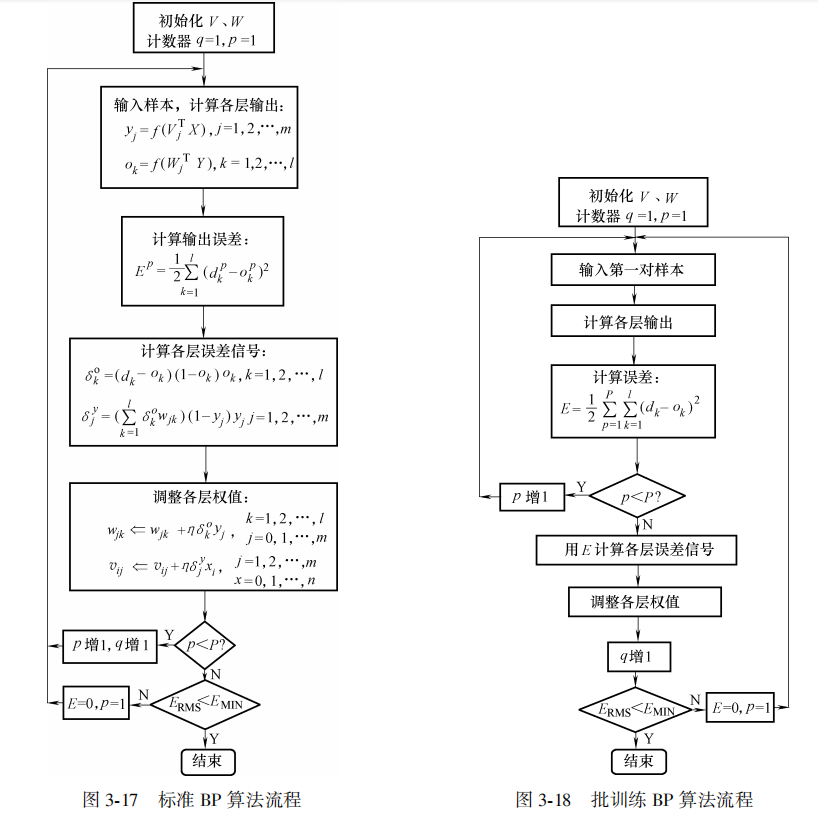
2. The program implementation process of BP algorithm
3. Improvement of standard BP algorithm - adding momentum item
When the standard BP algorithm adjusts the weight, it only adjusts according to the gradient direction of the error at time t, and does not consider the gradient direction before time t, which often makes the training process oscillate and converge slowly. In order to improve the training speed of the network, a momentum term can be added to the weight adjustment formula. If W represents the weight matrix of a certain layer and X represents the input vector of a certain layer, the expression of the weight adjustment vector containing the momentum item is
It can be seen that increasing the momentum item means taking a part from the previous weight adjustment and adding it to the current weight adjustment. α is called the momentum coefficient, and generally has a∈(0,1). The momentum term reflects the previous accumulated adjustment experience and plays a damping role for the adjustment at time t. When there are sudden fluctuations in the error surface, the oscillation tendency can be reduced and the training speed can be improved. At present, the momentum item is added to the BP algorithm, so that the BP algorithm with the momentum item becomes a new standard algorithm.
4. Python implements BP neural network and its learning algorithm
In order to use the algorithm, here is a brief example (an example that does not require normalization or standardization)
Input X=-1:0.1:1;
output D=..... (see the data in the code for details)
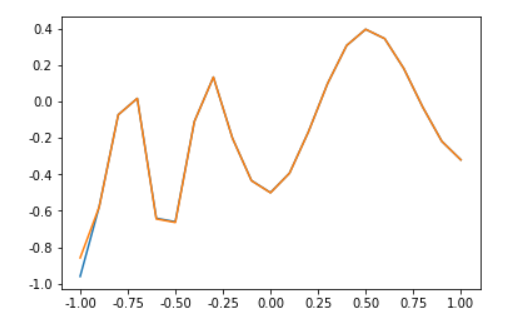
In order to facilitate the viewing of the results, we output and draw the results as graphics, as follows:
The yellow and blue lines represent the output and input after training
5. The procedure is as follows:
- # -*- coding: utf-8 -*-
- import math
- import string
- import matplotlib as mpl
- ############################################调用库(根据自己编程情况修改)
- import numpy.matlib
- import numpy as np
- np.seterr(divide='ignore',invalid='ignore')
- import matplotlib.pyplot as plt
- from matplotlib import font_manager
- import pandas as pd
- import random
-
- #生成区间[a,b]内的随机数
- def random_number(a,b):
- return (b-a)*random.random()+a
-
- #生成一个矩阵,大小为m*n,并且设置默认零矩阵
- def makematrix(m, n, fill=0.0):
- a = []
- for i in range(m):
- a.append([fill]*n)
- return np.array(a)
-
- #函数sigmoid(),两个函数都可以作为激活函数
- def sigmoid(x):
- #return np.tanh(x)
- return (1-np.exp(-1*x))/(1+np.exp(-1*x))
- #函数sigmoid的派生函数
- def derived_sigmoid(x):
- return 1-(np.tanh(x))**2
- #return (2*np.exp((-1)*x)/((1+np.exp(-1*x)**2)))
-
- #构造三层BP网络架构
- class BPNN:
- def __init__(self, num_in, num_hidden, num_out):
- #输入层,隐藏层,输出层的节点数
- self.num_in = num_in + 1 #增加一个偏置结点
- self.num_hidden = num_hidden + 1 #增加一个偏置结点
- self.num_out = num_out
-
- #激活神经网络的所有节点(向量)
- self.active_in = np.array([-1.0]*self.num_in)
- self.active_hidden = np.array([-1.0]*self.num_hidden)
- self.active_out = np.array([1.0]*self.num_out)
-
- #创建权重矩阵
- self.wight_in = makematrix(self.num_in, self.num_hidden)
- self.wight_out = makematrix(self.num_hidden, self.num_out)
-
- #对权值矩阵赋初值
- for i in range(self.num_in):
- for j in range(self.num_hidden):
- self.wight_in[i][j] = random_number(0.1, 0.1)
- for i in range(self.num_hidden):
- for j in range(self.num_out):
- self.wight_out[i][j] = random_number(0.1, 0.1)
- #偏差
- for j in range(self.num_hidden):
- self.wight_in[0][j] = 0.1
- for j in range(self.num_out):
- self.wight_in[0][j] = 0.1
-
-
- #最后建立动量因子(矩阵)
- self.ci = makematrix(self.num_in, self.num_hidden)
- self.co = makematrix(self.num_hidden, self.num_out)
-
-
- #信号正向传播
- def update(self, inputs):
- if len(inputs) != self.num_in-1:
- raise ValueError('与输入层节点数不符')
- #数据输入输入层
- self.active_in[1:self.num_in]=inputs
-
- #数据在隐藏层的处理
- self.sum_hidden=np.dot(self.wight_in.T,self.active_in.reshape(-1,1)) #点乘
- self.active_hidden=sigmoid(self.sum_hidden) #active_hidden[]是处理完输入数据之后存储,作为输出层的输入数据
- self.active_hidden[0]=-1
-
- #数据在输出层的处理
- self.sum_out=np.dot(self.wight_out.T,self.active_hidden) #点乘
- self.active_out = sigmoid(self.sum_out) #与上同理
- return self.active_out
-
-
- #误差反向传播
- def errorbackpropagate(self, targets, lr,m): #lr是学习率
- if self.num_out==1:
- targets=[targets]
- if len(targets) != self.num_out:
- raise ValueError('与输出层节点数不符!')
- #误差
- error=(1/2)*np.dot((targets.reshape(-1,1)-self.active_out).T,(targets.reshape(-1,1)-self.active_out))
-
- #输出误差信号
- self.error_out=(targets.reshape(-1,1)-self.active_out)*derived_sigmoid(self.sum_out)
- #隐层误差信号
- #self.error_hidden=np.dot(self.wight_out.reshape(-1,1),self.error_out.reshape(-1,1))*self.active_hidden*(1-self.active_hidden)
- self.error_hidden=np.dot(self.wight_out,self.error_out)*derived_sigmoid(self.sum_hidden)
-
- #更新权值
- #隐藏
- self.wight_out=self.wight_out+lr*np.dot(self.error_out,self.active_hidden.reshape(1,-1)).T+m*self.co
- self.co=lr*np.dot(self.error_out,self.active_hidden.reshape(1,-1)).T
- #输入
- self.wight_in=self.wight_in+lr*np.dot(self.error_hidden,self.active_in.reshape(1,-1)).T+m*self.ci
- self.ci=lr*np.dot(self.error_hidden,self.active_in.reshape(1,-1)).T
- return error
-
- #测试
- def test(self, patterns):
- for i in patterns:
- print(i[0:self.num_in-1], '->', self.update(i[0:self.num_in-1]))
- return self.update(i[0:self.num_in-1])
-
- #权值
- def weights(self):
- print("输入层权重")
- print(self.wight_in)
- print("输出层权重")
- print(self.wight_out)
-
- def train(self, pattern, itera=100, lr = 0.2, m=0.1):
- for i in range(itera):
- error = 0.0
- for j in pattern:
- inputs = j[0:self.num_in-1]
- targets = j[self.num_in-1:]
- self.update(inputs)
- error = error+self.errorbackpropagate(targets, lr,m)
- if i % 10 == 0:
- print('########################误差 %-.5f######################第%d次迭代' %(error,i))
-
- #实例
- X=list(np.arange(-1,1.1,0.1))
- D=[-0.96, -0.577, -0.0729, 0.017, -0.641, -0.66, -0.11, 0.1336, -0.201, -0.434, -0.5, -0.393, -0.1647, 0.0988, 0.3072, 0.396, 0.3449, 0.1816, -0.0312, -0.2183, -0.3201]
- A=X+D
- patt=np.array([A]*2)
- #创建神经网络,21个输入节点,21个隐藏层节点,1个输出层节点
- n = BPNN(21, 21, 21)
- #训练神经网络
- n.train(patt)
- #测试神经网络
- d=n.test(patt)
- #查阅权重值
- n.weights()
-
- plt.plot(X,D)
- plt.plot(X,d)
- plt.show()

Source: Xiao Ling の Blog—Good Times|A bad blog
[1] Han Liqun, Artificial Neural Network Theory and Application [M]. Beijing: Mechanical Industry Press, 2016.
Category of website: technical article > Blog
Author:evilangel
link:http://www.pythonblackhole.com/blog/article/80182/9ce5360f9ab57f180da7/
source:python black hole net
Please indicate the source for any form of reprinting. If any infringement is discovered, it will be held legally responsible.
name:
Comment content: (supports up to 255 characters)
no articles


