
Anaconda和torch安装(简单快捷的方法)
posted on 2023-06-03 19:41 read(492) comment(0) like(26) collect(2)
know what we're going to do
- Install Anaconda
-
Configure Anaconda 's environment variables
-
Setting up Jupyter Notebook
-
Anaconda virtual environment
-
Install the GPU version of the PyTorch library
First of all, we need to know that when Anaconda is installed, the python interpreter can be installed, so there is no need to install the python interpreter separately.python interpreter: The name of the Python interpreter consists of Python and the version number, such as Python3.9.0. The interpreter is a tool to explain the Python language to
the computer . Only by downloading the interpreter, the computer can use Python programming. Therefore, Python programming can be done in the command prompt (cmd) after downloading Python 3.
Table of contents
1.1 Mirror source installation (fast)
2. Configure environment variables
3.3 Modify the working path of Jupyter
4. Virtual environment (very important)
4.1 Get familiar with the basic commands first
4.2 Virtual environment link Jupter kernel
5. Install the GPU version of the PyTorch library
1. Install Anaconda first
Anaconda has been installed before, no need to uninstall, you can skip this step . It doesn't matter which versions of the python interpreter are installed in the computer, just make sure that Anaconda can also create a virtual environment.
1.1 Mirror source installation (fast)

Considering that the virtual environment will be used later, the version of the Python interpreter in the new environment can be set when creating the virtual environment, so it does not matter which version of Anaconda to download here.
1.2 Install Anaconda
- Just me and All Users , select Just me ;
- Select the largest disk (usually D disk) for the installation path, and place it in the newly created [ D:\Anaconda ];
- For the last fork, uncheck the first box . (Because the environment variable can be configured by itself, the first box does not need to check Add Anaconda3 to the system PATH environment variable)
waiting...
2. Configure environment variables
- Find the environment variable in the system and click "Edit System Environment Variable".
- Click "Environment Variables" in the pop-up "System Properties" window, then select path in the pop-up "Environment Variables" window, and click Edit.
-
Through the "New" button on the right, you can create a new environment variable path, and add [ D:\Anaconda ], [D:\Anaconda\Scripts ] and [ D:\Anaconda\Library\bin ] to the environment variable.
3. Set up Jupyter Notebook
3.1 Add shortcut
method
- Find Jupyter Notebook in the initial menu
- Right click to open the file location
- will
 copy to desktop
3.2 The user name is Chinese
In this case, it is not compatible and needs to be modified
- pip uninstall pyzmq
- pip install pyzmq==19.0.2
3.3 Modify the working path of Jupyter
The initial working path of Jupyter is [ C:\Users\ username], which needs to be corrected and transferred to the newly created [D:\Jupyter ] location.
method
- New D:\Jupyter ;
- Open the Prompt in the desktop shortcut ;
- Enter the jupyter notebook --generate-config command and execute it;
- Open the configuration file address generated in the previous step, that is, C:\Users\ username \.jupyter
3.4 Modify font
Open address: D:\Anaconda\Lib\site-packages\notebook\static\components\codemirror\lib
Search according to your specific address
font-family: 'Fira Code Light','Consolas';
4. Virtual environment (very important)
We install the libraries you need in the virtual environment. There can be many virtual environments, and different libraries can be installed in different virtual environments.
4.1 Get familiar with the basic commands first
- # 清屏
- cls
- # 在base环境中下的操作
- # 列出所有的虚拟环境
- conda env list
- # 创建名为“环境名”的虚拟环境,并指定 Python 解释器的版本
- conda create -n 环境名 python=3.9
- # 删除名为“环境名”的虚拟环境
- conda remove -n 环境名 --all
- # 进入名为“环境名”的虚拟环境
- conda activate 环境名
- # 虚拟环境内的操作
- # 列出当前环境下的所有库
- conda list
- # 安装 NumPy 库,并指定版本 1.12.5
- pip install numpy==1.21.5 -i https://pypi.tuna.tsinghua.edu.cn/simple
- # 安装 Pandas 库,并指定版本 1.2.4
- pip install Pandas==1.2.4 -i https://pypi.tuna.tsinghua.edu.cn/simple
- # 安装 Matplotlib 库,并指定版本 3.5.1
- pip install Matplotlib==3.5.1 -i https://pypi.tuna.tsinghua.edu.cn/simple
- # 查看当前环境下某个库的版本(以 numpy 为例)
- pip show numpy
- # 退出虚拟环境
- conda deactivate

Create a virtual environment DL: conda create -n DL python=3.9
4.2 Virtual environment link Jupter kernel
- # 列出 Jupyter 的内核列表
- jupyter kernelspec list
- # 安装 ipykernel
- pip install -i https://pypi.tuna.tsinghua.edu.cn/simple ipykernel
- # 将虚拟环境导入 Jupyter 的 kernel 中
- python -m ipykernel install --user --name=环境名
- # 删除虚拟环境的 kernel 内核
- jupyter kernelspec remove 环境名
5. Install the GPU version of the PyTorch library
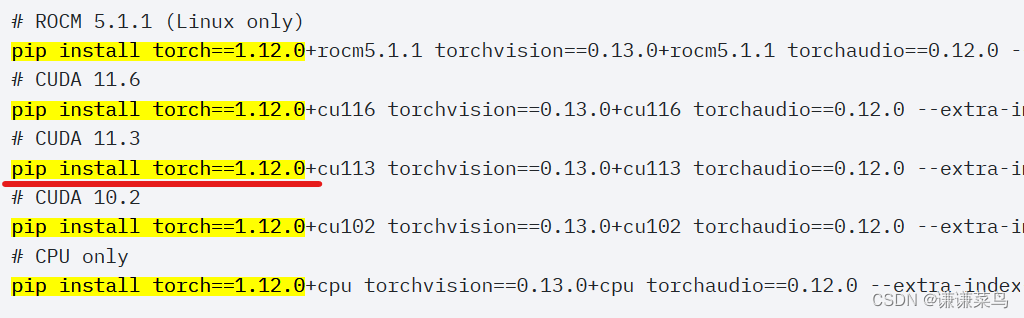
Although PyTorch is a library, the core component during installation is called torch , and there are two additional small components: torchvision and torchaudio .Since the download component of the PyTorch library contains cudatoolkit , which is a subset of CUDA , and the content inside is enough for PyTorch, so this tutorial does not need to install CUDA and CUDNN separately , and does not need to consider the relationship between PyTorch's built-in CUDA and the CUDA version of the computer graphics card.
5.1 Install PyTorch
Copy that code from the web page, that is
pip install torch==1.12.0+cu113 torchvision==0.13.0+cu113 torchaudio==0.12.0 --extra-index-url https://download.pytorch.org/whl/cu113
It is considered successful if you see Successfully installed in the last few lines of code .
If the network speed is not good, you can first download the wheel files ( torch, torchvision, torchaudio ) to the local, and use pip install to install them.
5.2 Inspection
Check in the python interpreter
Enter the DL virtual environment, enter python, and enter import torch to import the torch library. If the installation is successful, no statement will be returned, and " >>> " will appear on the next line.
In the last step, enter torch.cuda.is_available() , and True will appear.
CPU users will display false
Testing in Jupyter
Switch to the DL kernel, enter import torch and enter torch.cuda.is_available()
Category of website: technical article > Blog
Author:evilangel
link:http://www.pythonblackhole.com/blog/article/78480/7ae036a2c9bbee8ed3c0/
source:python black hole net
Please indicate the source for any form of reprinting. If any infringement is discovered, it will be held legally responsible.
name:
Comment content: (supports up to 255 characters)
no articles