
Python打包成exe文件_详细操作
posted on 2023-05-21 18:30 read(1204) comment(0) like(5) collect(1)
Python is packaged into an exe file
foreword
- I originally learned C\C++, this is my first article about python. Please take care of me!
- As for why python is packaged into an exe file, it is because transferring the source file and source code to others requires a certain environment to be compiled before it can be compiled, and the packaged exe file can be opened and run like a computer software, and can also be shared with others. others. However, the packaged exe file is not very convenient to unpack, so it must be tested before packaging and released after packaging.
- In terms of version control, try to choose the python3.6+32-bit version, because the win64-bit system is backward compatible with 32-bit programs. If you don’t consider the 32-bit system, it doesn’t matter. You can directly package the python64-bit version, but it can only run on the win64-bit system. .
- Well, I will start with the installation of pyinstaller, then the packaging tutorial, and finally the command explanation.
-
PS: In this tutorial, we don’t use the small black window of the cmd command;
this tutorial uses: Windows PowerShell (X86),
remember to use: run as an administrator
. It is best to use pictures with the ico suffix, or download a format conversion. convert it yourself
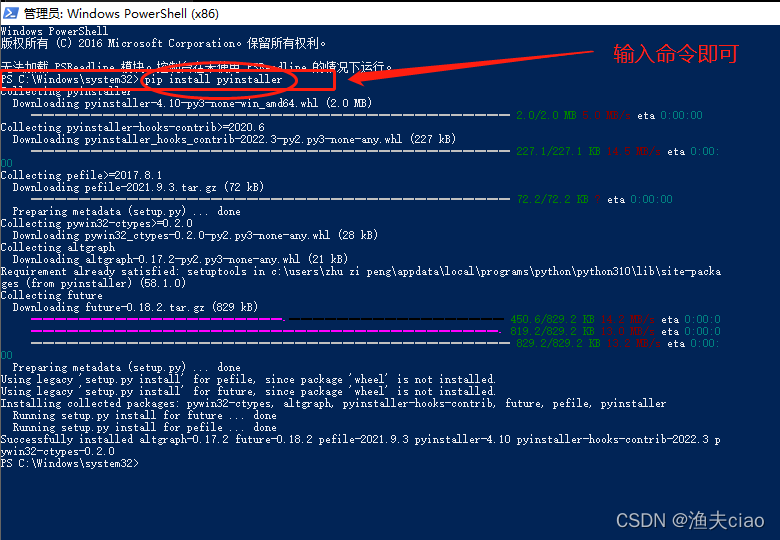
1. Install pyinstaller
1.1 Install pyinstaller, use the installation command:
pip install pyinstaller
1.2 If you need to update the version, please enter:
pip install --upgrade pyinstaller
1.3 Check whether it is installed correctly
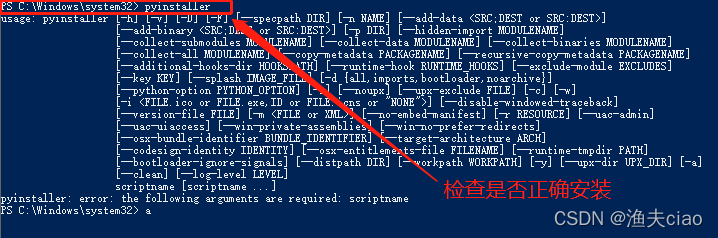
emmmmm seems to be installed,
1.4 Wait a moment, let the water flow;
There are many python packaging tools, and pyinstaller is recommended. This tool supports the use of windows and linux. Under Windows, a source file with a size of tens of kb may be tens of megabytes when packaged into an exe file. The reason is that the library files referenced by the program are also packaged together.
2. Python is packaged into an exe file (packaged with icons)
There are two ways to pack this time, choose according to your diligence!
2.1 The first method: cd to the specified folder to package and store
Step 1: Move to the specified folder where the exe file is stored
cd 文件夹路径
例子:cd C:\FILE2\python_file
Step 2: Pack and you're done (see the code)
pyinstaller -F -w -i 路径一(图标) 路径二(py文件)
例子:pyinstaller -F -w -i  D:\python_file\BindundunDemo\qt-logo.ico  D:\python_file\BindundunDemo\main.py
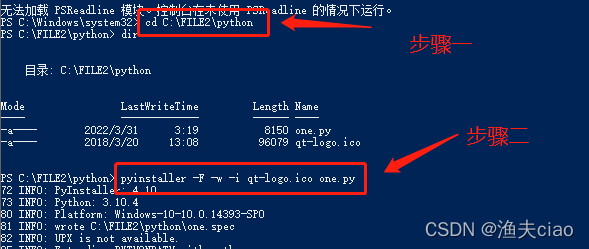
2.2 The second method: cd to the py source folder for packaging and storage
Step 1: Move to the source file
cd 文件夹路径
例子:cd C:\FILE2\python
Step 2: It's still packaged and it's done (see the code)
pyinstaller -F -w -i 图标名.后缀 源文件.py
例子:pyinstaller -F -w -i qt-logo.ico one.py
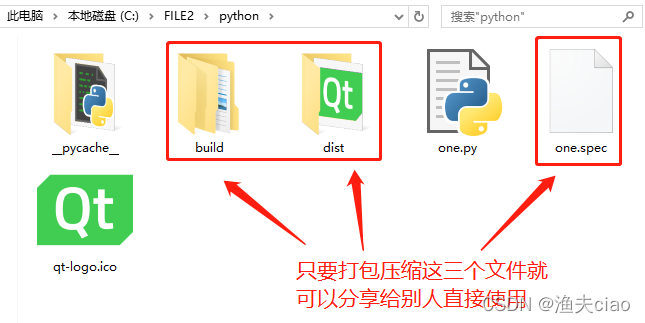
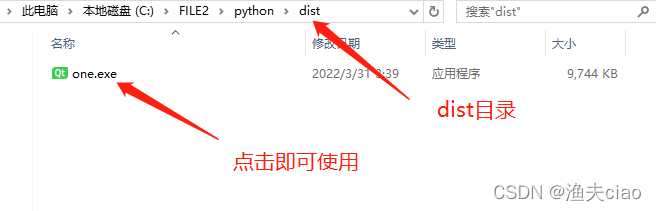
2.3 Final effect
The exe file you generated is stored in the dist file, click to use it.
So far, this tutorial is over!
There are also command explanations below, please taste carefully.
Reference: Command Explanation
| Order | command full name | command explanation |
|---|---|---|
| -F | –onefile | Packaged into a single executable file, if your code is written in one .py file, you can use it, if there are multiple .py files, it is recommended not to use it. |
| -D | –onedir | Package multiple files and generate many dependent files in dist, which is suitable for writing tool code in the form of framework, which is easier to maintain. The default compilation is -D |
| -K | –tk | Include TCL/TK when deploying. |
| -a | –ascii | No encodings included. All encodings are included by default on versions of python that support Unicode. |
| -d | –debug | Generate a debug version of the executable |
| -In | –windowed,–noconsole | Execute using the Windows subsystem. Does not open a command line when the program starts (only works on Windows) |
| -c | –nowindowed,–console | Execute using the console subsystem (default) (only available on Windows) |
| -s | –strip | Executables and shared libraries will run through strip. Note that Cygwin's strip may make common win32 Dlls unusable |
| -X | –upx | If there is UPX installed (detected when executing Configure.py), the executable file will be compressed (as will the DLL in the Windows system). |
| -o DIR | –out=DIR | Specify the generation directory of the spec file. If not specified, and the current directory is the root directory of PyInstaller, a directory for output (spec and generated executable files) will be automatically created. If not specified, and the current directory is not the root of PyInstaller directory, it will output to the current directory. |
| -p DIR | –path=DIR | Set the import path (similar to using PYTHONPATH). You can use a path separator (Windows uses a semicolon, Linux uses a colon) to split and specify multiple directories. You can also use multiple -p parameters to set multiple import paths and let pyinstaller find the resources needed by the program by itself |
| -i <FILE.ICO> | –icon=<FILE.ICO> | Add file.ico as an executable file resource (only valid for Windows systems), change the icon of the program pyinstaller -i ico path xxxxx.py |
| –i <FILE.EXE, N> | –icon=<FILE.EXE, N> | Add the nth icon of file.exe as the resource of the executable file (only valid for Windows system) |
| -v FILE | –version=FILE | Use verfile as the version resource of the executable file (only valid for Windows systems) |
| -n NAME | –name=NAME | Optional project (generated spec's) name. If omitted, the main filename of the first script will be used as the name of the spec |
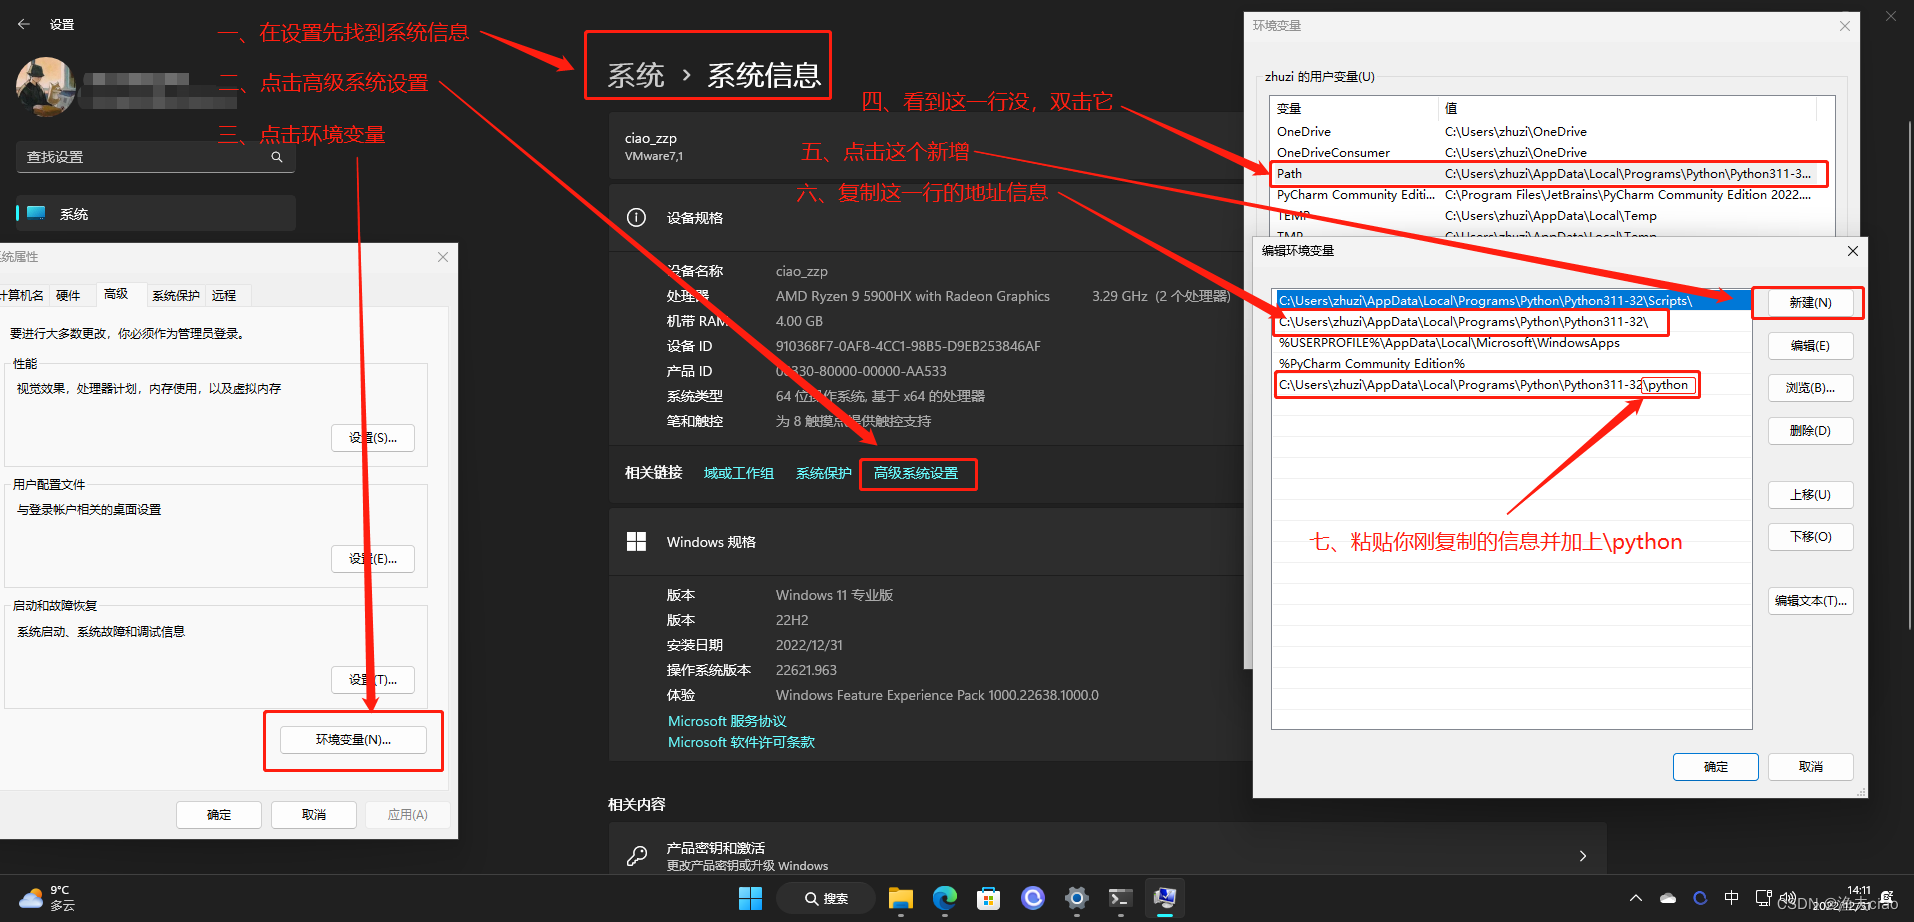
Supplement: pyinstaller part of the installation problem is solved
3.1. Screenshot of the problem

3.2. Solution
The solution is not difficult to operate as shown in the figure: (PS: This operation uses win11, which is roughly the same as the win10 operation method)
Oh yes! There is another problem, mine is the default installation location, I don't know if everyone is. The method should be roughly the same (PS: I haven’t tried it, someone will tell me in the comment area after trying it)
Operation steps: Find Advanced System Settings>Environment Variables>path (PS: Double-click it)>Add> and then operate as shown in the figure!
Category of website: technical article > Blog
Author:evilangel
link:http://www.pythonblackhole.com/blog/article/25351/195609a0dde13d093125/
source:python black hole net
Please indicate the source for any form of reprinting. If any infringement is discovered, it will be held legally responsible.
name:
Comment content: (supports up to 255 characters)
no articles