
最新PyCharm安装详细教程
posted on 2023-06-06 11:42 read(692) comment(0) like(6) collect(5)
Contents
1. PyCharm download website
2. Click Downloads on the website to enter the secondary page, select the corresponding operating system to download PyCharm
3. Installation and configuration of PyCharm installer
(1) Run PyCharm Setup
(2) Installation location setting
( 3) Installation option setting
(4) Folder setting of PyCharm shortcut in the start menu
(5) Installation
(6) After installation, import PyCharm setting file (
7) After installation, activate PyCharm
(8) After installation, start PyCharm before PyCharm settings
(9) After installation, the New Project environment configuration before starting PyCharm
(10) After installation, the configuration of Open project and Python Interpreter error
The latest PyCharm installation detailed tutorial
1. PyCharm download site
PyCharm is a Python IDE (Integrated Development Environment, integrated development environment) created by JetBrains , with a set of tools that can help users improve their efficiency when developing in the Python language. PyCharm is the development environment tool used by Python professional developers and those just starting out. The pycharm download website is shown in Table 1-1.
Table 1-1 pycharm download site
| pycharm download site |
2. Click Downloads on the website to enter the secondary page and select the corresponding operating system to download PyCharm
Open the pycharm download website in Table 1-1 above, as shown in Figure 2-1 below.

Figure 2-1 PyCharm page
Click the Downloads control on the page interface in Figure 2-1 to enter the PyCharm download interface in Figure 2-2, and select the corresponding operating system to download the PyCharm installer .
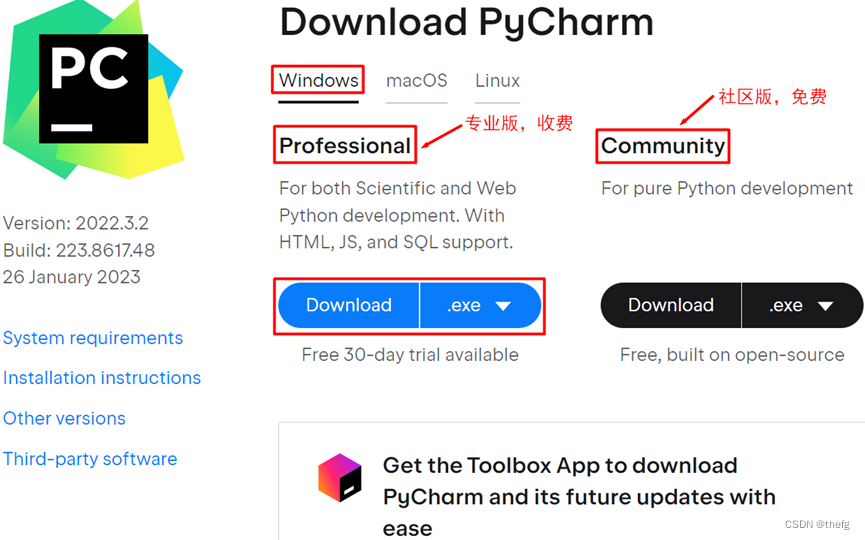
Figure 2-2 PyCharm download
Left side of Figure 2-2:
System requirements
System and hardware requirements for installing PyCharm.
Installation instructions
Installation Notes.
Other versions
Other PyCharm versions.
Third-party software
Third-party software, software that is complementary to PyCharm.
Right side of Figure 2-2:
Professional
PyCharm Professional Edition requires purchase and a 30-day free trial. Compared with the Community Edition, it has relatively complete functions.
Community
PyCharm社区版,免费,与专业版相比,没有Web开发、Python We框架、Python分析器、远程开发、支持数据库与SQL等这些功能。
这里我们下载Windows系统的PyCharm专业版(Professional)。单击图2-2红框的Download下载专业版PyCharm,适合64位操作系统,基于64位处理器,具体要求参见图2-2中的System requirements。
三、PyCharm的安装程序的安装及其配置
(1)运行PyCharm Setup
运行上面下载的专业版PyCharm的安装程序,出现下面图3-1的安装界面。
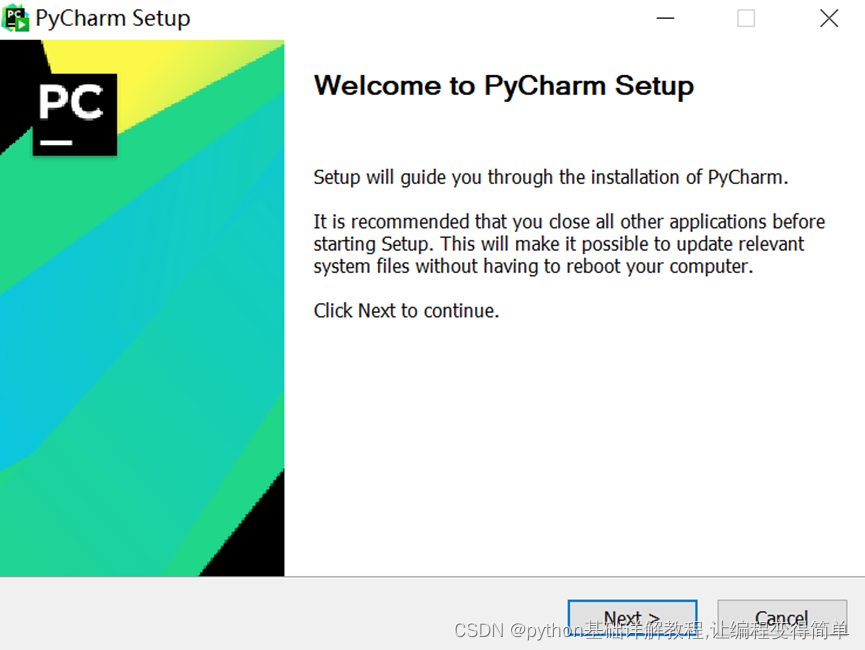
图3-1 PyCharm安装
单击图3-1的Next,进入图3-2所示的PyCharm安装位置设置的界面。
(2)安装位置设置
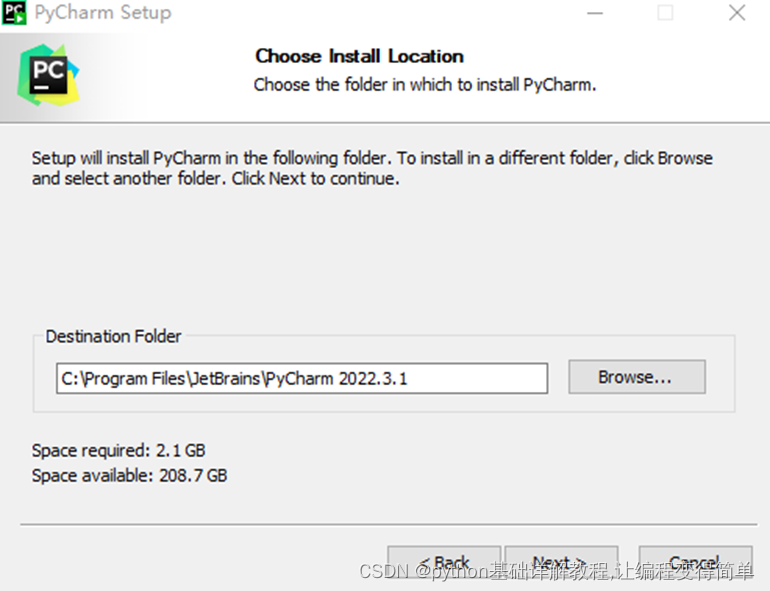
图3-2 PyCharm安装位置
可以自定义PyCharm的安装路径,设置完成后,单击Next,进入图3-3所示的PyCharm安装选项设置的界面。
(3)安装选项设置
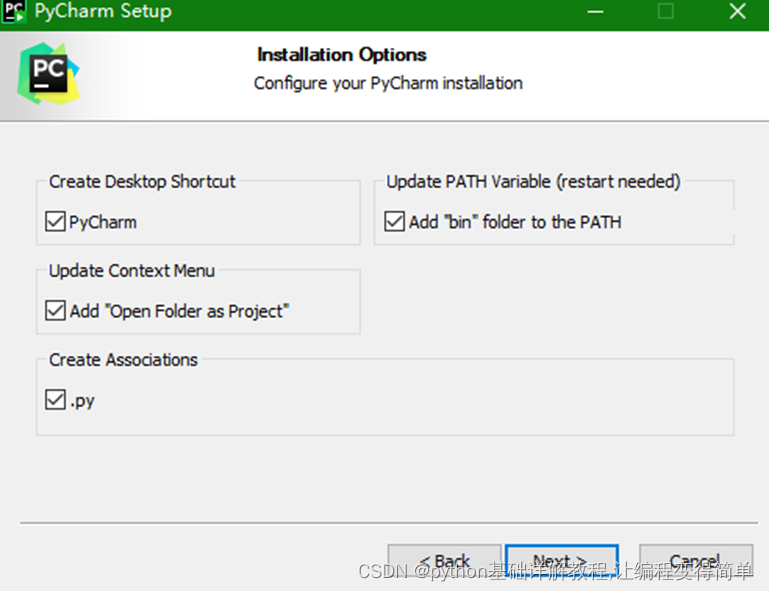
图3-3 PyCharm安装选项
Create Desktop Shortcut
勾选PyCharm后,在桌面创建快捷方式,该项勾选。
Update Path Variable(restart needed)
勾选Add "bin" folder to the PATH(增加bin文件夹到系统路径)后,电脑重启后会更新系统路径变量,该项勾选。
系统路径变量,当要求系统运行一个程序而没有告诉它程序所在的完整路径时,系统除了在当前目录下面寻找此程序外,还会到path中指定的路径去找可运行的变量。
Update Context Menu
勾选Add "Open Folder as Project"后,更新上下文菜单,也即安装后在文件夹中,鼠标右键的菜单中出现Open Folder as PyCharm Project选项,单击该选项即可启动PyCharm,在该文件夹以项目形式启动,若该文件夹是项目所在文件夹,则是打开该项目,若该文件夹不存在项目,则自动建立项目。该项是否勾选可根据需求而定,推荐勾选,方便查看python文件或自动创建项目。
Create Associations
勾选.py后,创建python文件与PyCharm关联,也即.py脚本(script)文件可以用PyCharm方式打开。在计算机中,依据一定的格式编写的可执行文件称为脚本。
图3-3中的选项都可以勾选,点击next,进入图3-4所示的开始菜单中PyCharm快捷方式的文件夹设置界面。
(4)开始菜单中PyCharm快捷方式的文件夹设置

图3-4 开始菜单中PyCharm快捷方式的文件夹
图3-4中默认JetBrains文件夹,电脑开始菜单中JetBrains文件夹会生成PyCharm快捷方式。这里可采用默认JetBrains文件夹,点击Install进行安装,进入图3-5所示的PyCharm安装进度界面。
(5)安装
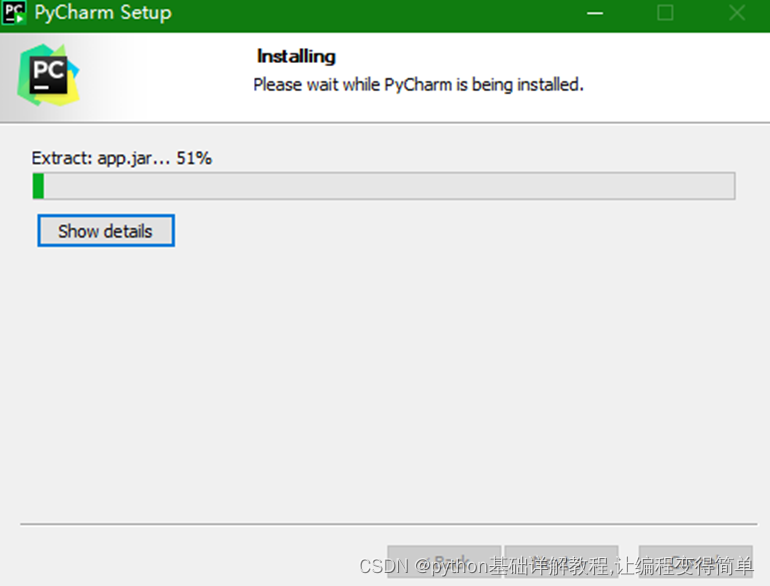
图3-5 PyCharm安装进度
图3-5安装进度完成后,出现图3-6所示的 PyCharm安装完成需要重启电脑的提示界面。
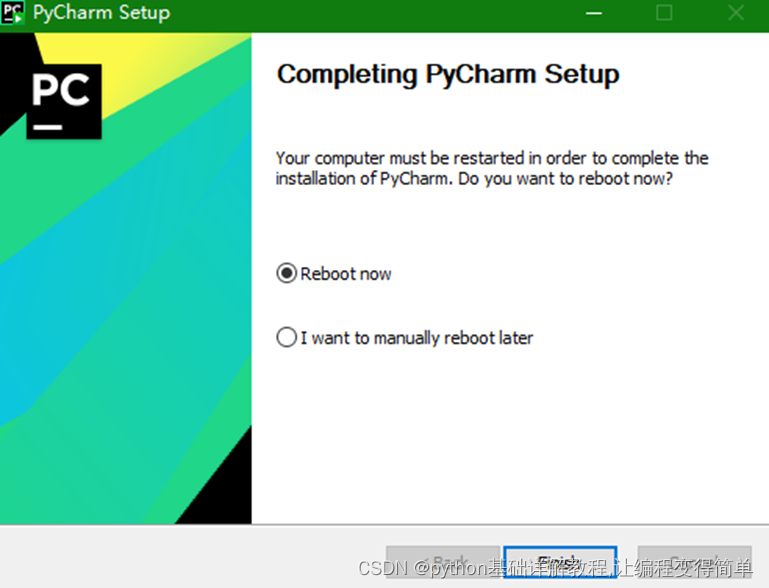
图3-6 PyCharm安装完成
图3-6中可以选择立即重启电脑,也可以稍后手动重启电脑,这里选择立即重启电脑,重启电脑后,双击启动PyCharm时,会出现导入PyCharm设置的提示。
(6)安装后,导入PyCharm设置文件
如果检测到电脑存在过去安装PyCharm版本的设置,会出现图3-7所示的导入PyCharm设置界面,会自动显示过去PyCharm设置文件的路径。
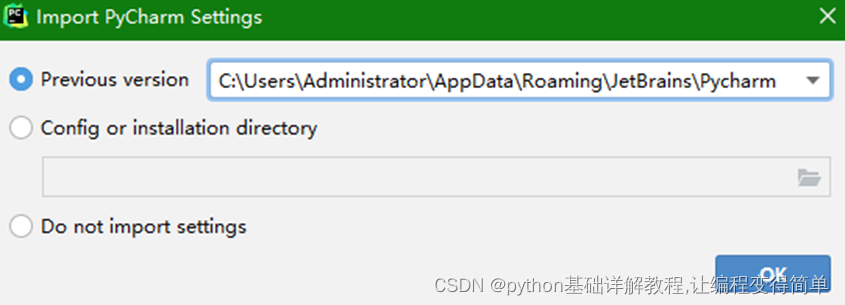
图3-7 导入PyCharm设置
Previous version
默认导入以前PyCharm设置文件,会自动显示以前的PyCharm设置文件的路径。
Config or installation directory
手动导入PyCharm配置或安装设置。
Do not import settings
不导入设置。
如果未检测到电脑存在过去安装PyCharm的设置文件,会出现图3-8所示的导入PyCharm设置界面。
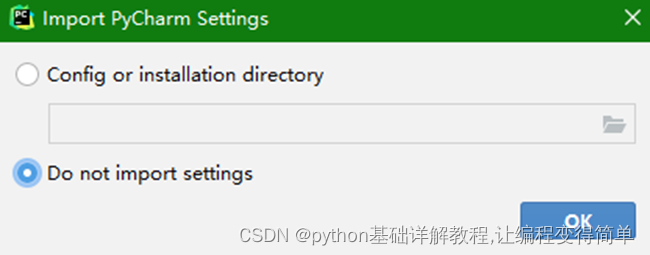
图3-8 导入PyCharm设置
上面界面主要用来导入已有的PyCharm设置,若没有PyCharm设置或不导入已有的PyCharm设置,可以选择不导入。
我们选择Do not import settings(不导入设置),点击OK,出现图3-9所示的PyCharm和插件(Plugins)激活界面。
(7)安装后,激活PyCharm
图3-9中是PyCharm激活和插件(Plugins,Code With Me)激活的界面。这里介绍PyCharm的几种激活方式。
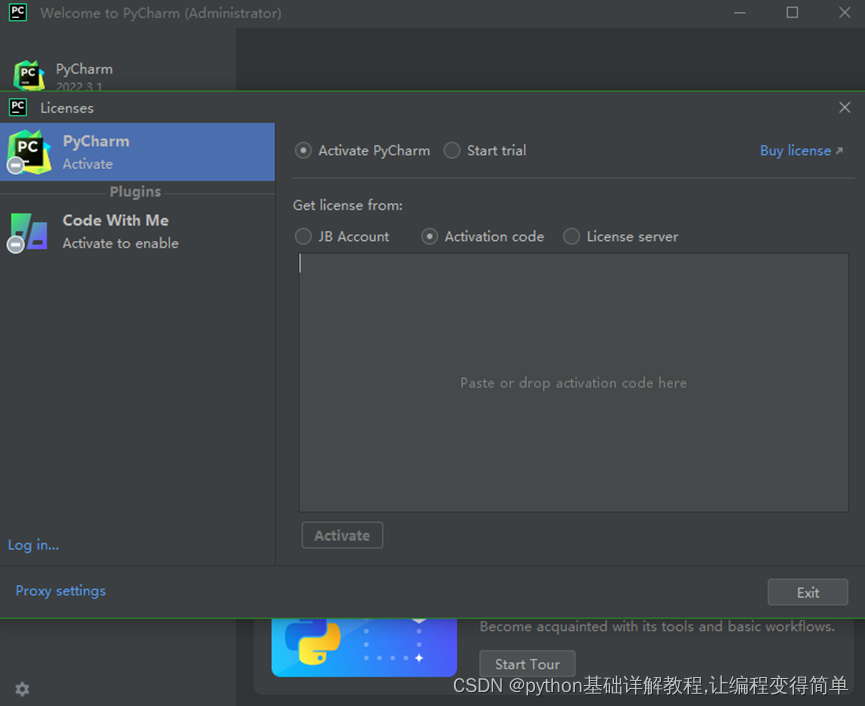
图3-9 PyCharm和插件(Plugins)激活
Activate PyCharm
激活PyCharm,有三种激活方式, JB Account是用JB账号的方式激活, Activation code是激活码方式激活,License server是许可证服务器授权方式激活。
若选择JB Account激活,需要登录JB账号获取许可,若选择Activation code激活,需要输入激活码,若选择License server激活,需要输入服务器地址。
Start trial
选择试用PyCharm,可以通过注册的账号免费试用30天。
图3-9中选择PyCharm的Activation code激活,输入激活码后,单击Activate按钮进行激活。
(8)安装后,启动PyCharm前的PyCharm设置
PyCharm激活后,可以进行PyCharm的初步设置。激活成功后,关闭(Close)激活界面,返回到图3-10的PyCharm设置界面,有Projects(项目)、 Remote Development(远程开发)、Customize (自定义)、 Plugins(插件)、 learn PyCharm(资源学习)选项。

图3-10 PyCharm设置
Projects
New Project (创建新项目),open (在本电脑中打开已有项目),Get from VCS (从其它平台打开已有项目)。
version control(VC)版本控制工具,比如:Git是一款免费、开源的分布式版本控制系统。
Remote Development
远程开发,通过该项设置可以使用SSH实现远程到其它主机上进行项目开发。
Customize
PyCharm的自定义设置,可以设置PyCharm界面外观颜色(Color theme),设置PyCharm窗口字体大小(IDE font),设置PyCharm的快捷键(Keymap)。
PyCharm界面外观默认Darcula,是暗黑色界面,明亮白色界面可选择含有Light单词的选项。
Plugins
安装PyCharm的插件,可以增强PyCharm的功能或效果。若要使用PyCharm窗口的汉化版,可以在该选项的搜索框中输入Chinese,点击Chinese (Sinplified) Language Pack插件的install进行安装。
Learn PyCharm
PyCharm的学习资料
安装PyCharm后,在图3-10界面中可以根据自己的需求,先对Remote Development、Customize 、Plugins选项进行设置,然后再在Projects选项创建或打开项目,也可以不设置,直接选Projects选项创建或打开项目。
(9)安装后,启动PyCharm前的New Project环境配置
首次安装PyCharm后,若没有已有项目,我们需要创建一个新项目,需要对项目的环境进行设置。这里以python项目为例。点击图3-10界面中Projects选项右侧的New Project,进入图3-11所示的PyCharm中python Project环境配置界面。
图3-11中展示了PyCharm支持多种类型项目,比如:Pure Python、Django、FastAPI、Flask等,这里我们选择Pure Python项目类型,用于纯 Python 编程。
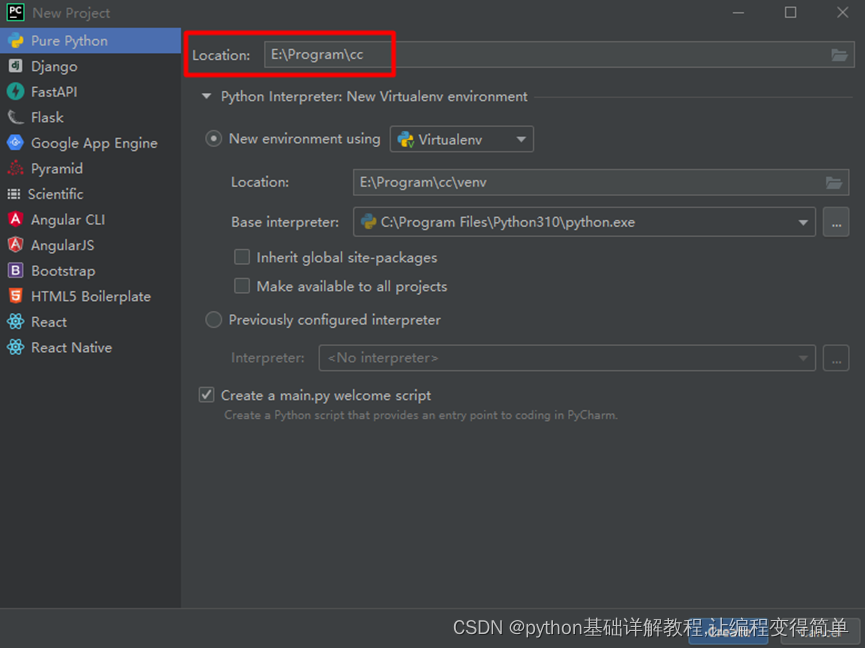
图3-11 PyCharm中python Project环境配置
Python Interpreter(Python解释器)环境有New environment using和Previously configured interpreter两个基本形式。
New environment using
用新环境创建项目,该项可以选择Virtualenv、Pipenv、Poetry、Conda四种虚拟环境,这四种虚拟环境有不同的特点, Virtualenv虚拟环境是Pycharm自带的,其它几种需要先下载再安装,可以根据自己的需求而定。
虚拟环境可以确保项目的相对独立性,减少项目之间或项目与系统环境的干扰。这里选择Pycharm默认的New environment using Virtualenv,会自动生成文件夹venv,venv文件夹用来存放创建项目时构建的Virtualenv虚拟环境,venv文件夹保存python解释器(相当于从安装的python复制过来的)、虚拟环境中安装的第三方库。
在图3-11中红框中location指定路径的cc文件夹是python项目存放的位置,在Pycharm中编写的python程序(.py)是存放在cc文件夹里,自动生成的venv文件夹也是保存在这个项目目录cc文件夹中,另外,创建时,在cc中还会自动是生成一个.idea文件夹,该文件夹存放项目的版本信息、历史记录等,比如:关掉pycharm后,下次再打开,能恢复上次关闭的状态。
Base interpreter是Python Interpreter(解释器)的位置,也即导入安装的python中python.exe所在路径,或导入已经存在的虚拟环境中python.exe的路径。通常是导入安装的python中python.exe所在路径。在PyCharm安装之前最好先安装Python,在该位置会自动导入python的路径,若Python未安装,该处会自动导入Python下载的地址。
勾选Inherit global site-packages,可以继承系统解释器内安装的包,也即可以使用python安装位置中的包,该项是否勾选可根据需求而定。
勾选Make available to all projects,可将此虚拟环境提供给其他项目使用,该项是否勾选可根据需求而定。
注意,图3-11红框中location路径的cc文件夹中不能已存在venv文件夹,否则,与图3-11的New environment using选项的location路径冲突,会显示Environment location directory is not empty,无法单击图3-11的Create创建项目环境。在cc文件夹里若有其它文件,单击图3-11的Create,会提示下面图3-12的目录不为空的对话框。
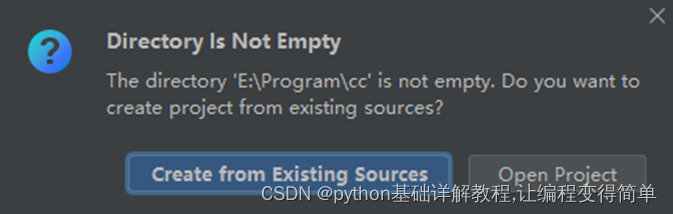
图3-12 提示对话框
这时,单击图3-12的Create from Existing Sources(从存在的资源中创建),即可创建项目。
用win+r打开cmd的命令窗口,在默认路径中输入pip install库名,这个第三方库或模块(library or module,可以统称为包,package),一般是安装到python路径下的Lib→site-packages文件夹中。
若要把第三方库或模块安装到虚拟环境的项目的文件夹中,可以通过pycharm来安装,图3-11创建项目后,启动pycharm(默认打开cc项目),进入File→Settings→Project:cc→Python Interpreter,点击下面图3-13中红箭头指向的+,在弹出的窗口中搜索库名并安装,安装的第三方库或模块会保存到项目文件夹cc→venv→Lib→site-packages文件夹中。
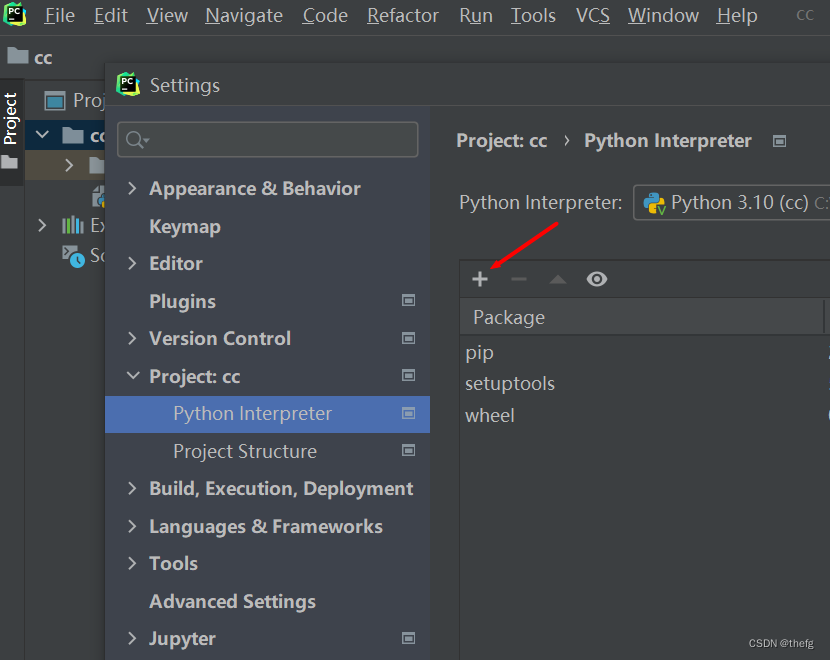
图3-13 pycharm的Settings设置
图3-13右侧红箭头下面显示了当前配置中可用的第三方库或模块。使用图3-13中红箭头指向的+安装第三方库或模块,是默认安装在调用的解释器所在的路径下的site-packages文件夹。
第三方库或模块安装到虚拟环境的项目中,还可以点击Pycharm底部的Terminal按钮,在出现的窗口中输入命令,图3-11创建项目后,启动pycharm,点击图3-14中红箭头指向的Terminal,在出现的窗口中输入pip install 库名,回车即可安装,卸载可以用pip uninstall 库名。
![]()
图3-14 pycharm的底部栏
利用Terminal这种方式安装第三方库或模块的位置与创建项目的环境有关。
Previously configured interpreter
图3-11中,若选择Previously configured interpreter,是从已经存在的解释器的文件夹中导入解释器,也可以用这种方式配置环境。
图3-15选择了Previously configured interpreter创建项目,用这种方式只能手动导入python interpreter(python解释器),也即手动导入安装的python中python.exe所在路径,或导入已经存在的虚拟环境中python.exe的路径。
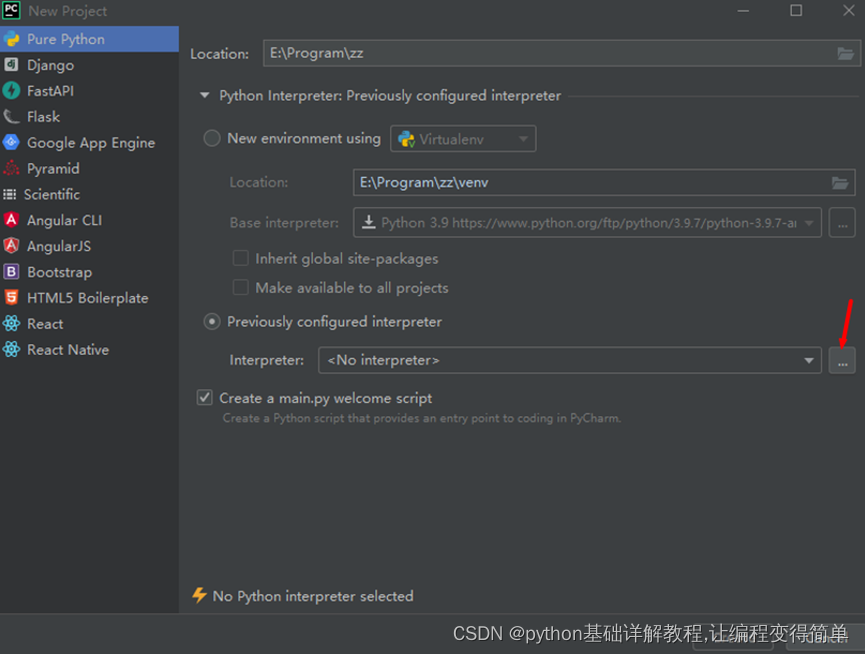
图3-15 PyCharm中python Project环境配置
点击图3-15中红箭头的位置,出现图3-16的导入interpreter界面。
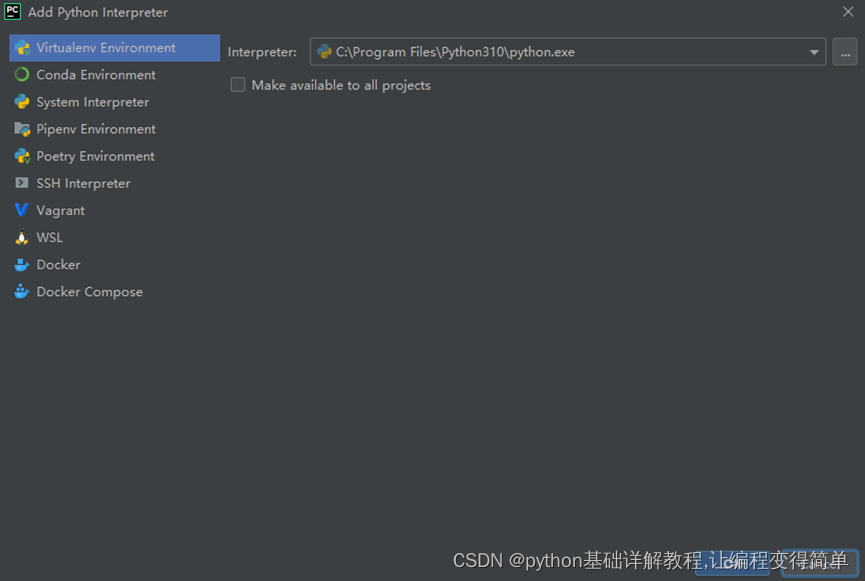
图3-16 Virtualenv Environment导入interpreter
在图3-16中选择Virtualenv Environment,并导入interpreter,也即导入安装的python中python.exe所在路径,或导入已经存在的虚拟环境中python.exe的路径。这里的Virtualenv Environment可以创建python项目的Virtualenv虚拟环境,但在项目文件夹中不会生成像上面的venv文件夹,而是使用python自带的虚拟环境或已经存在项目的虚拟环境,安装第三方库或模块的位置与安装方式有关。
图3-16中导入安装的python中python.exe所在路径。Make available to all projects的用法同上。点击图3-16的OK,即可在zz文件夹创建项目,在zz文件夹中自动生成.idea文件夹,但不生成虚拟环境的venv文件夹,项目的虚拟环境是python自带的虚拟环境,安装的第三方库或模块都是在python路径下的site-packages文件夹,且Pycharm可以调用site-packages的第三方库或模块。在zz文件夹里还可以保存Pycharm中编写的python程序(.py)。
图3-16中也可以导入已存在的虚拟环境的解释器,安装第三方库或模块的位置与安装方式有关,很少使用这种导入,这里不赘述。
图3-17中选择System Interpreter(系统解释器)导入interpreter(解释器)界面。
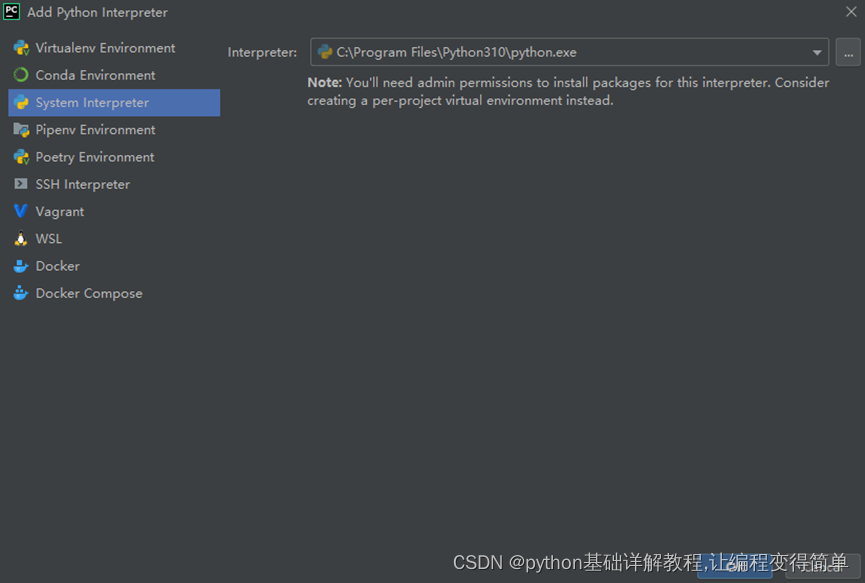
图3-17 System Interpreter导入interpreter
选择System Interpreter导入interpreter,也即导入安装的python中python.exe所在路径,或导入已经存在的虚拟环境中python.exe的路径。System Interpreter可以使用系统环境,可以不用虚拟环境。
选择System Interpreter导入安装的python文件夹中的python.exe的路径,是使用系统环境,安装的第三方库或模块都是在python路径下的site-packages文件夹,且Pycharm可以调用site-packages的第三方库或模块。项目所在的文件夹中有.idea文件夹,还可以保存Pycharm中编写的python程序(.py)。
同样,选择System Interpreter也可以导入已存在的虚拟环境的解释器,安装第三方库或模块的位置与安装方式有关,很少使用这种导入,这里不赘述。
Create a main.py welcome script
图3-11中,默认勾选Create a main.py welcome script,默认创建一个main.py脚本,也即默认生成一个python例子,该项可选,也可不选。
在环境配置里,选择New environment using可以保持项目独立的环境,减少干扰,安装或调用的第三方库或模块是在该项目的文件夹里,但不能调用python路径下的第三方库或模块。选择Previously configured interpreter不一定能保证项目独立的环境,但若导入安装python路径下的解释器,则安装或调用的第三方库或模块是在python路径下的文件夹里。
若对环境独立性要求很高,建议选择New environment using,若对环境独立性要求不高,可以选择Previously configured interpreter,导入安装python路径下的解释器,这样,第三方库或模块是在python路径下的文件夹里,达到多个项目共用第三方库或模块的效果。配置完成后,点击create即可创建新项目。
(10)安装后,Open项目及Python Interpreter错误时的配置
上面(9)中是创建新项目(New Project),我们可以打开(Open)一个已经存在的项目。这里以python项目为例。点击图3-10界面中Projects选项右侧的Open,打开python项目所在文件夹的路径,进入下面图3-18所示的PyCharm打开python项目的界面。
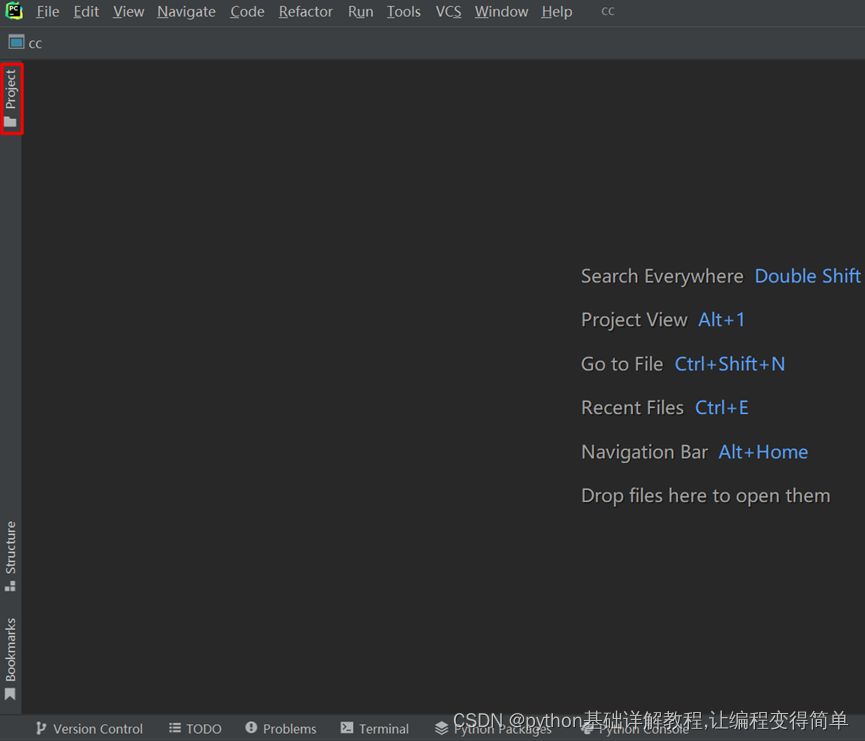
图3-18 pycharm打开项目
点击图3-18红框的按钮,可以展开或隐藏PyCharm窗口左侧项目(Project)的展示栏。下面图3-19是展开了PyCharm窗口左侧项目(Project)的展示栏,PyCharm窗口的右侧是文件展示区域。
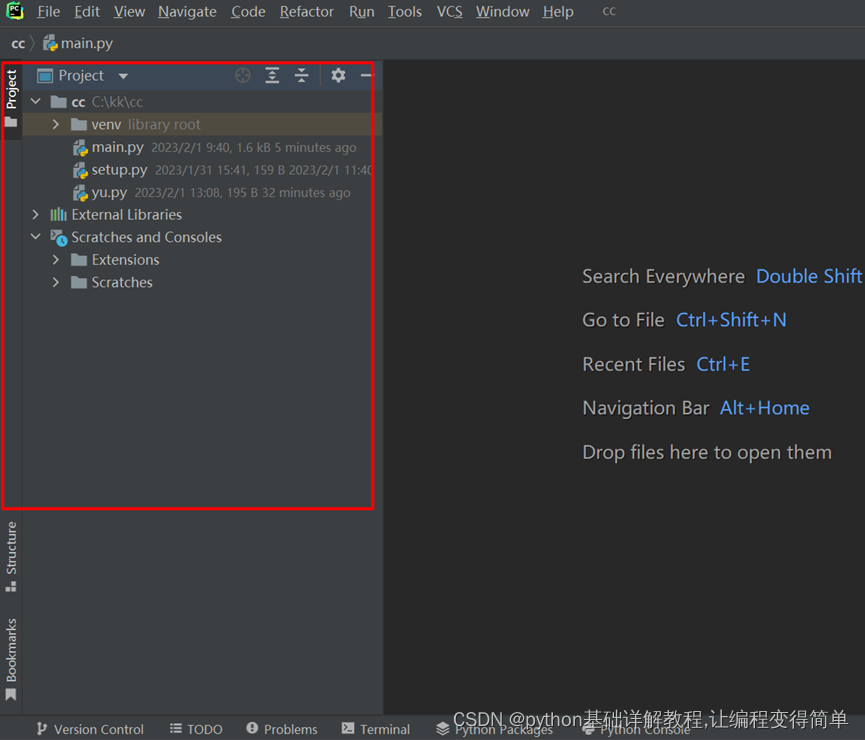
图3-19 PyCharm窗口左侧项目(Project)的展示栏
我们用PyCharm打开项目后,可以根据python interpreter的路径,以及项目所在文件夹生成的文件夹,并依据上面(9)中讲到的环境配置方法,基本上可以判断该项目的环境配置特点。我们可以在PyCharm的标题栏File→Settings→Project:→Python Interpreter中查看python interpreter的路径,或者在运行代码弹出的Run窗口中第一行可以看到python interpreter所处的路径。
若在PyCharm中打开python文件或运行python文件,出现Python Interpreter(python解释器)的异常,一般需要重新配置python interpreter。
打开项目后,如果提示Invalid Python interpreter selected for the project,项目使用的 python interpreter(python解释器)无效,或者提示系统找不到指定文件,或者运行代码程序时在PyCharm底部的Run窗口出现Python path configuration的异常提示信息(一般是项目使用的python版本与当前电脑的版本不一致导致),这些都表示要重新配置python解释器,可以在PyCharm的标题栏File→Settings→Project:→Python Interpreter设置有效的python interpreter(python解释器)。
打开项目后,直接运行某个.py脚本(script)文件,若PyCharm没有检测到python interpreter(python解释器),会弹出下面图3-20所示的Edit Configuration编辑配置提示。
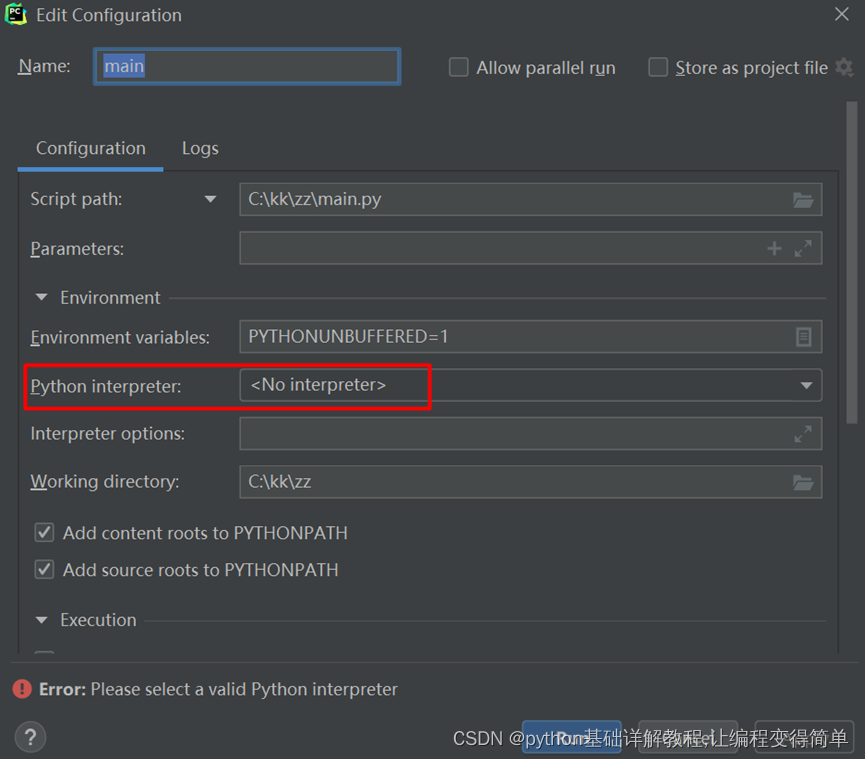
图3-20 编辑配置
在图3-20的红框中的下拉菜单中选择一个有效的python interpreter(python解释器),点击Run即可运行这个.py脚本(script)文件,但这种配置只适合这个.py文件,若要配置适合整个项目,可以在PyCharm的标题栏File→Settings→Project:→Python Interpreter设置有效的python interpreter(python解释器)。
打开项目后,直接运行某个.py脚本(script)文件,若弹出下面图3-21所示的Invalid Python SDK提示,一般是python版本导致的,电脑没有安装这种python版本。SDK全称是Software Development Kit, 软件开发工具包,Python SDK是指python开发语言工具。
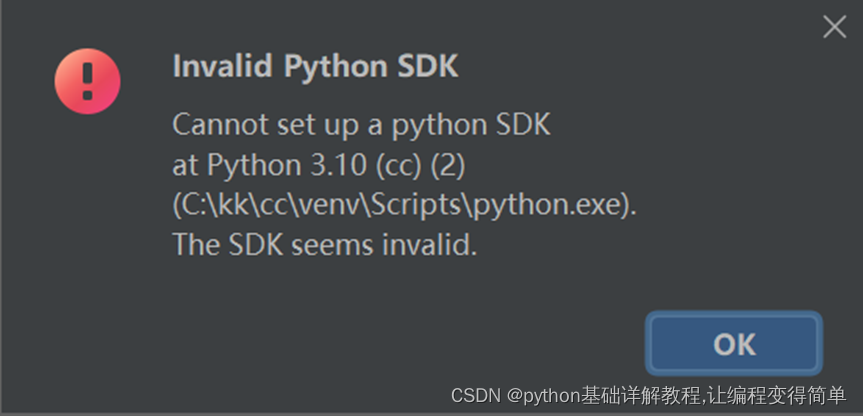
图3-21 无效的python开发工具
When the prompt in Figure 3-21 appears, click OK, and then set a valid python interpreter (python interpreter) in PyCharm's File→Settings→Project:→Python Interpreter, and then you can run this .py script (script) file.
The configuration of the python interpreter (python interpreter) in the title bar of PyCharm File→Settings→Project:→Python Interpreter is basically similar to the method described in (9) above, and the description will not be repeated here.
ps: The latest PyCharm basic use (1)------File (File) settings, management operations:
https://blog.csdn.net/thefg/article/details/128948361
The latest python installation detailed tutorial:
https://blog.csdn.net/thefg/article/details/128601410
Finally, you are welcome to like, bookmark, and follow!
Category of website: technical article > Blog
Author:Abstract
link:http://www.pythonblackhole.com/blog/article/80672/bb55b396763d456debe3/
source:python black hole net
Please indicate the source for any form of reprinting. If any infringement is discovered, it will be held legally responsible.
name:
Comment content: (supports up to 255 characters)
no articles