Pycharm连接SQL Sever(详细教程)
posted on 2023-06-06 12:17 read(1209) comment(0) like(10) collect(4)
How to use pycharm to connect to SQL Sever:
It should be that all errors have been experienced (it has to be said that it is quite broken)
Table of contents
Step 1: First check whether the password function is enabled on your SQL Server
Step 2: Create an empty database and create a dedicated user
Step 5: The server contains garbled Chinese characters and error correction
Import data, add, delete, check operation of SQL Sever in pycharm
Tip: Do not skip operations.
Step 1: First check whether the password function is enabled on your SQL Server
If the password function is not turned on, only the new login name will appear :
Title: CONNECT TO SERVER ------------------------------ Unable to connect to LAPTOP-40O6HVDS. ------------------------------ Additional Information: A successful connection to the server was established, but an error occurred during the login process. (provider: Shared Memory Provider, error: 0 - There is no process on the other end of the pipe.) (Microsoft SQL Server, error: 233)
The specific implementation of the unlock password function is as follows:
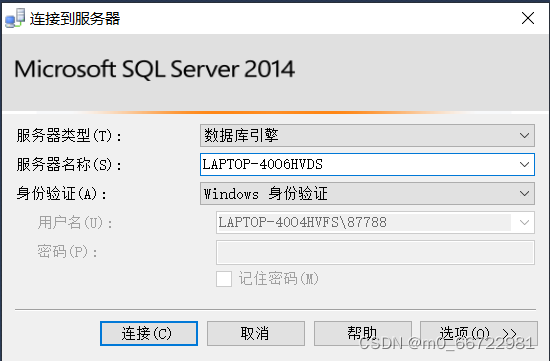
When I downloaded SQL Server, I used computer authentication to log in, and I need to set a password to log in :
Find the first one of the Object Explorer, and the following page appears after clicking the right mouse button:
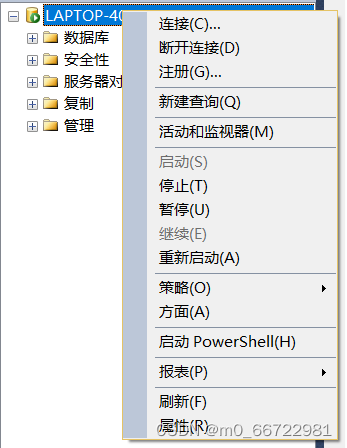
点击属性,进入页面后点击安全性,会出现:
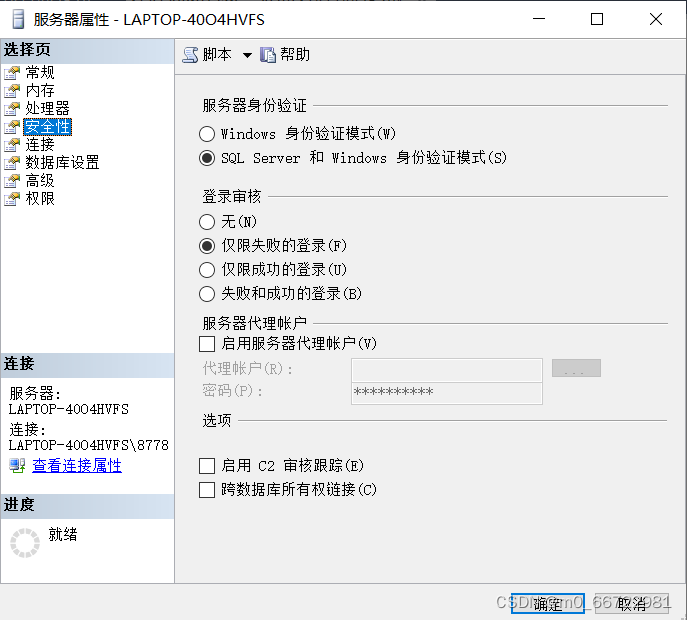
服务器身份验证选中第二个(SQL Sever 和Window 身份验证)模式之后点击确定。
步骤二:建立一个空数据库,并且建立一个专属用户
建立专属用户和空数据库的原因是防止以后对数据库操作失误时影响到其它的数据库。
首先需要点击新建查询并且执行以下操作:
create database soft2104执行会出现一个soft2104的新数据库(soft2104我的数据库名称,后续需要放在pycharm里)
如果你觉得数据库难听可以执行如下操作进行删除数据库:(不过需要新建一个数据库)
- use master --删数据库
- drop database soft2104 --删数据库
建立好数据库后双击安全性:

双击登录名后点击鼠标右键,点击新建登录名:
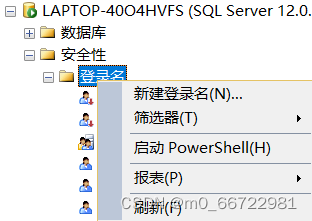
编辑一个登录名(yunmengze这个是我的用户名,后续需要放在pycharm里)
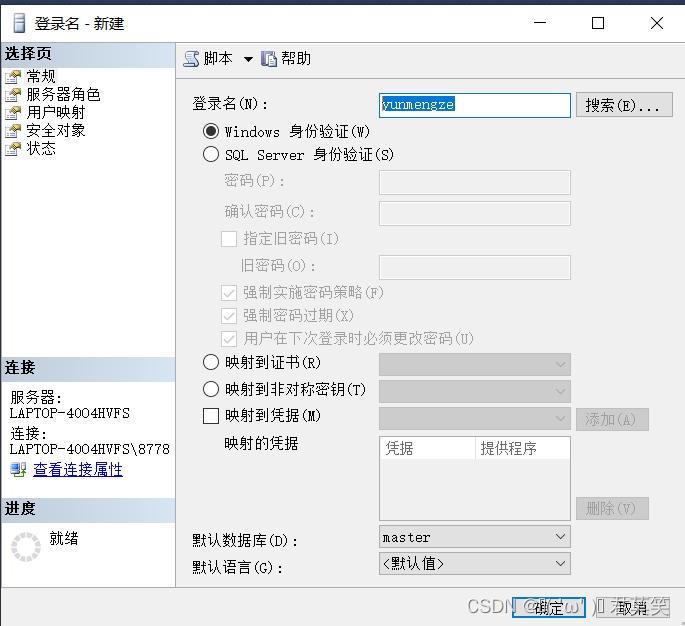
接下来点击SQL Sever 身份验证输入密码,随便起一个密码,忘了可以再更改。在这里我就用123456代替(123456是我的密码,后续需要放在pycharm里)。
接下来把强制实施密码策略的对号给点掉(不然后来会遇到各种登录问题)
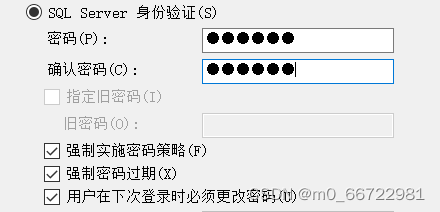
变成这样:

点击用户映射,将你的数据库打勾:
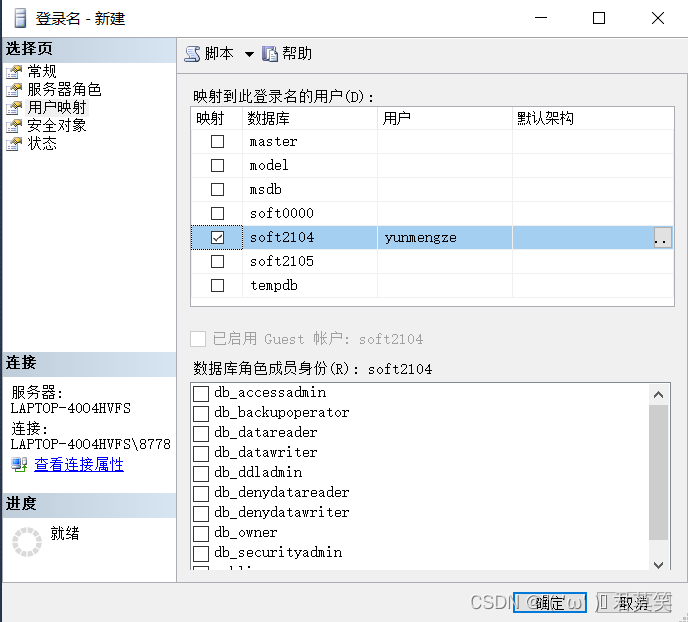
将下边的db_ower对勾选中:
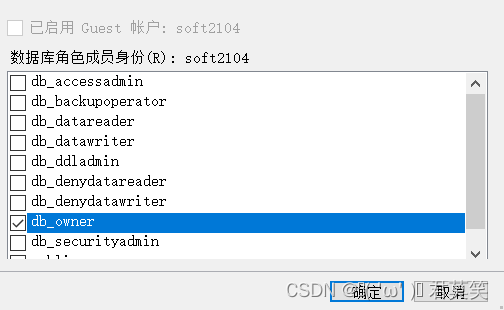
点击确定,之后进行验证:

点击电脑和叉的标志退出服务器断开连接,之后点击电脑和绿线的标志连接服务器

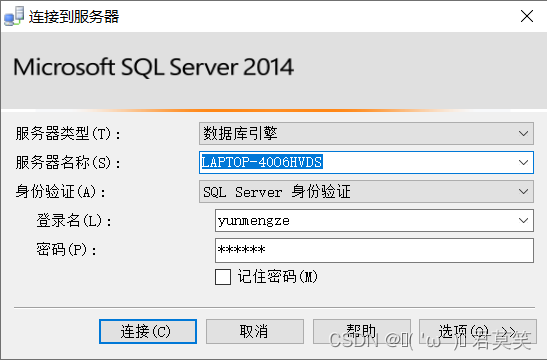
点击SQL Sever 身份验证输入账号密码如果成功的连接,就会进入数据库,你只能对你用户对应下的数据库进行各种操作:

如果你的SQL Sever没有打开密码功能就会出现以下提示:
标题: 连接到服务器 ------------------------------ 无法连接到 LAPTOP-40O6HVDS。 ------------------------------ 其他信息: 已成功与服务器建立连接,但是在登录过程中发生错误。 (provider: Shared Memory Provider, error: 0 - 管道的另一端上无任何进程。) (Microsoft SQL Server,错误: 233)
步骤三:打开1433 端口
首先需要检测自身的 1433 端口是否打开(一般默认的都是关闭的需要自己打开)
1433应该是电脑的一个端口,可以链接电脑的(其实不需要知道是什么)
点击:win和R,输入cmd点击回车出现如下界面:
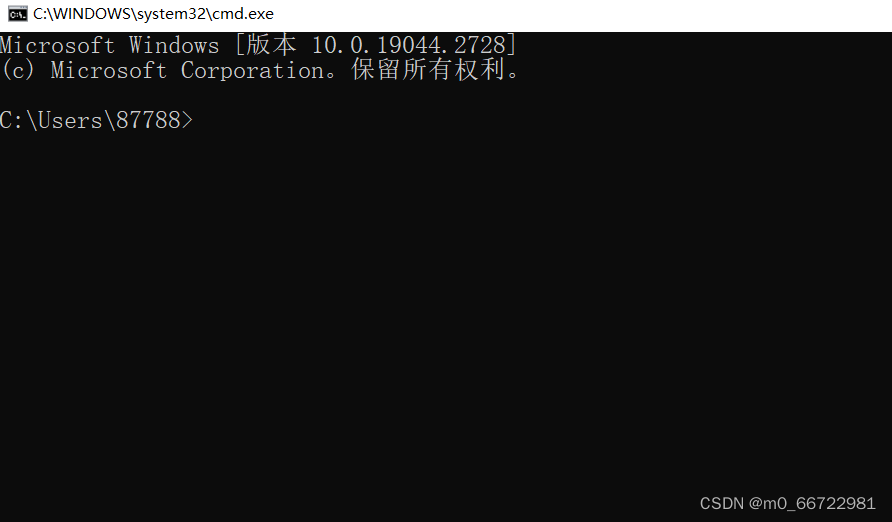
输入telnet localhost 1433并点击回车
一般会出现一下错误:
'telnet' 不是内部或外部命令,也不是可运行的程序
解决办法:
点击:win和R,输入control点击回车出现如下界面:
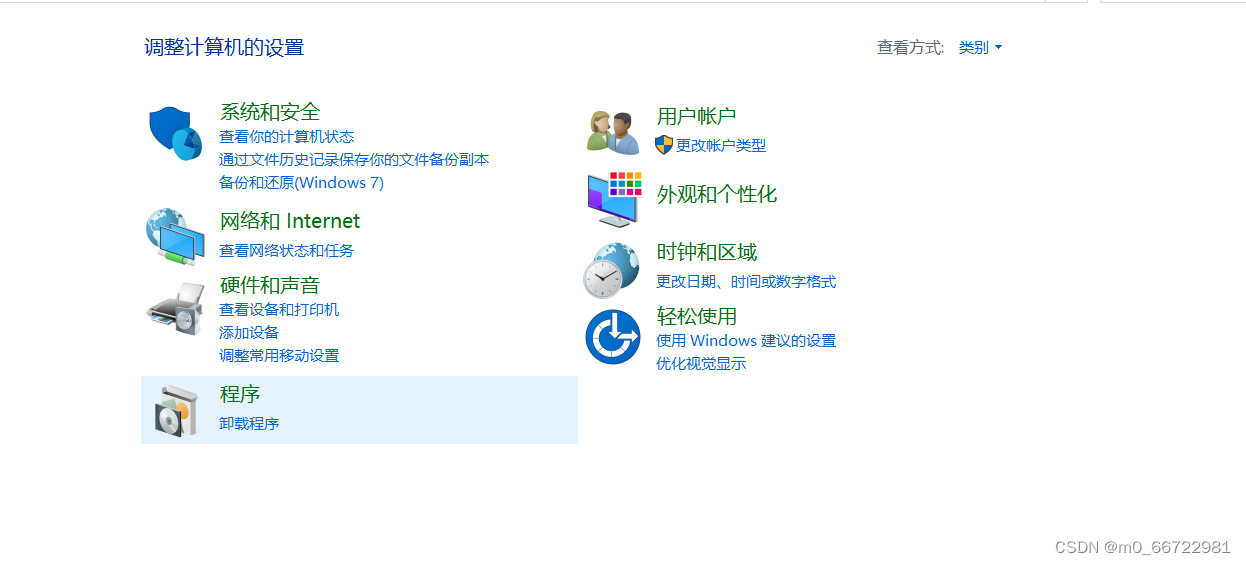
点击程序(不要点到卸载程序)

点击启动或关闭Windows 功能
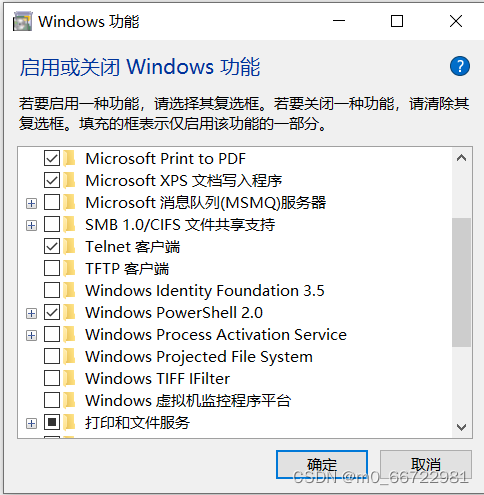
将Telnet客户端对号选中,点击确定,会经过大概1分钟左右的等待页面
再次重复win和R,输入cmd点击,输入telnet localhost 1433并点击回车出现以下错误:
正在连接localhost...无法打开到主机的连接。 在端口 1433: 连接失败
(你已经成功了一半了)
打开以下程序:

找不到就在搜索框里输入sql
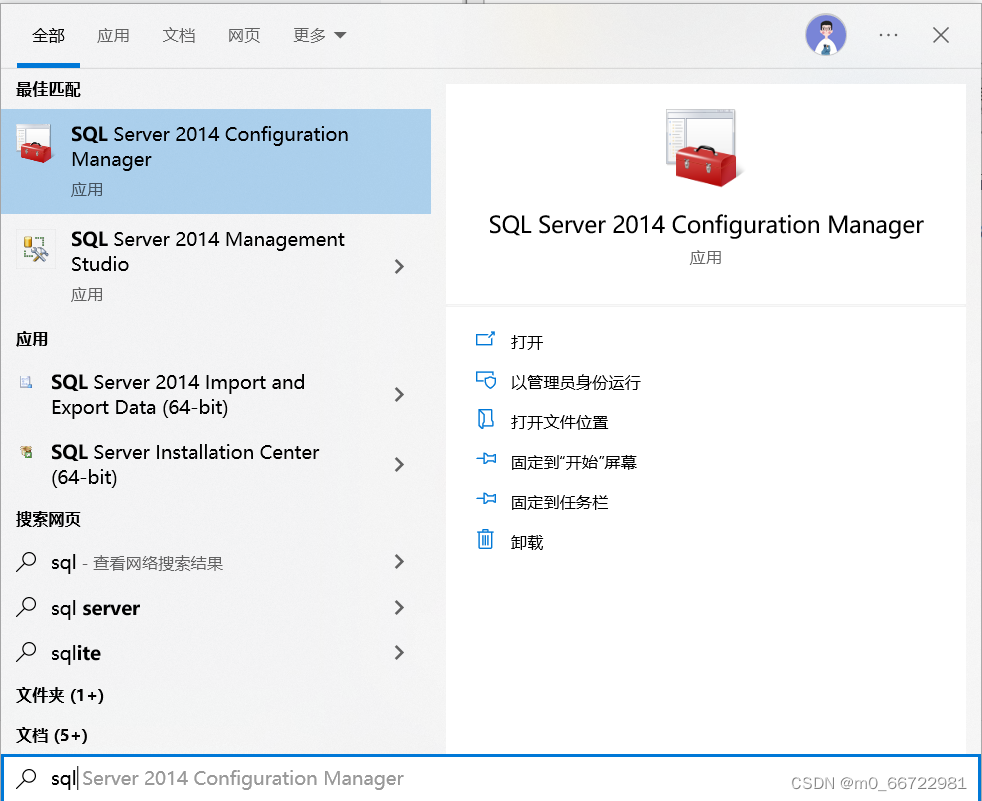
打开之后会出现以下界面:
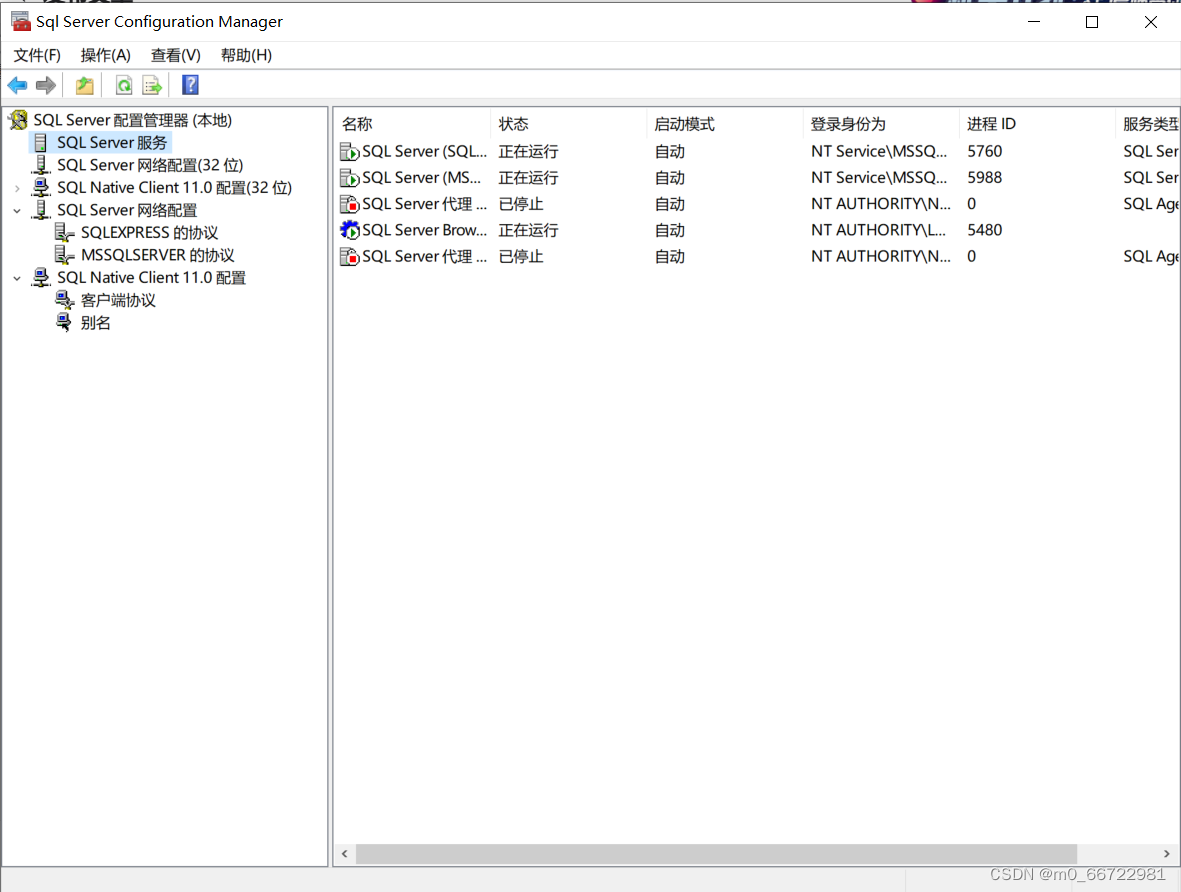
禁用所有上述出现的程序(必须先这么做)
点击SQL Sever网络配置,然后点击MSSQLSEVER的协议:
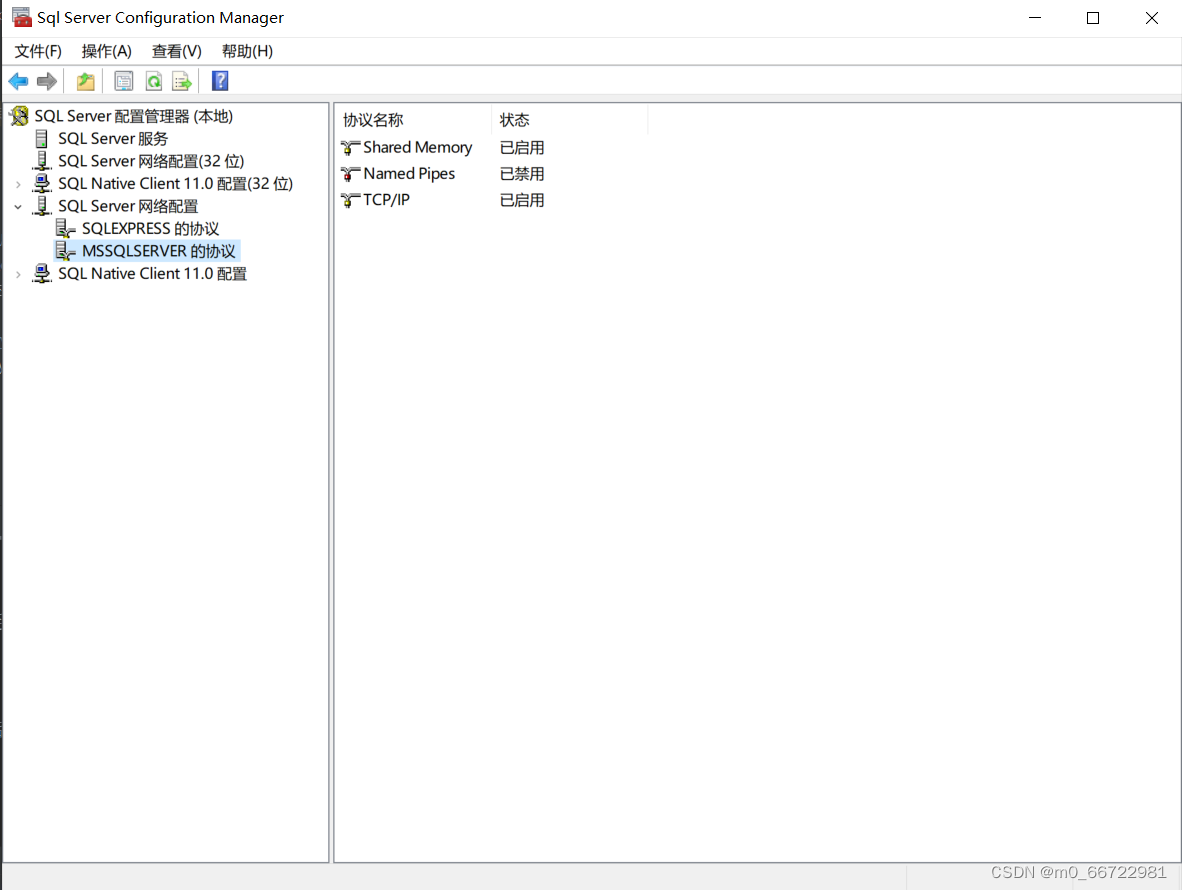
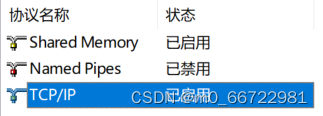
双击这个TCP/IP,进入之后将TCP/IP的启用改为 是
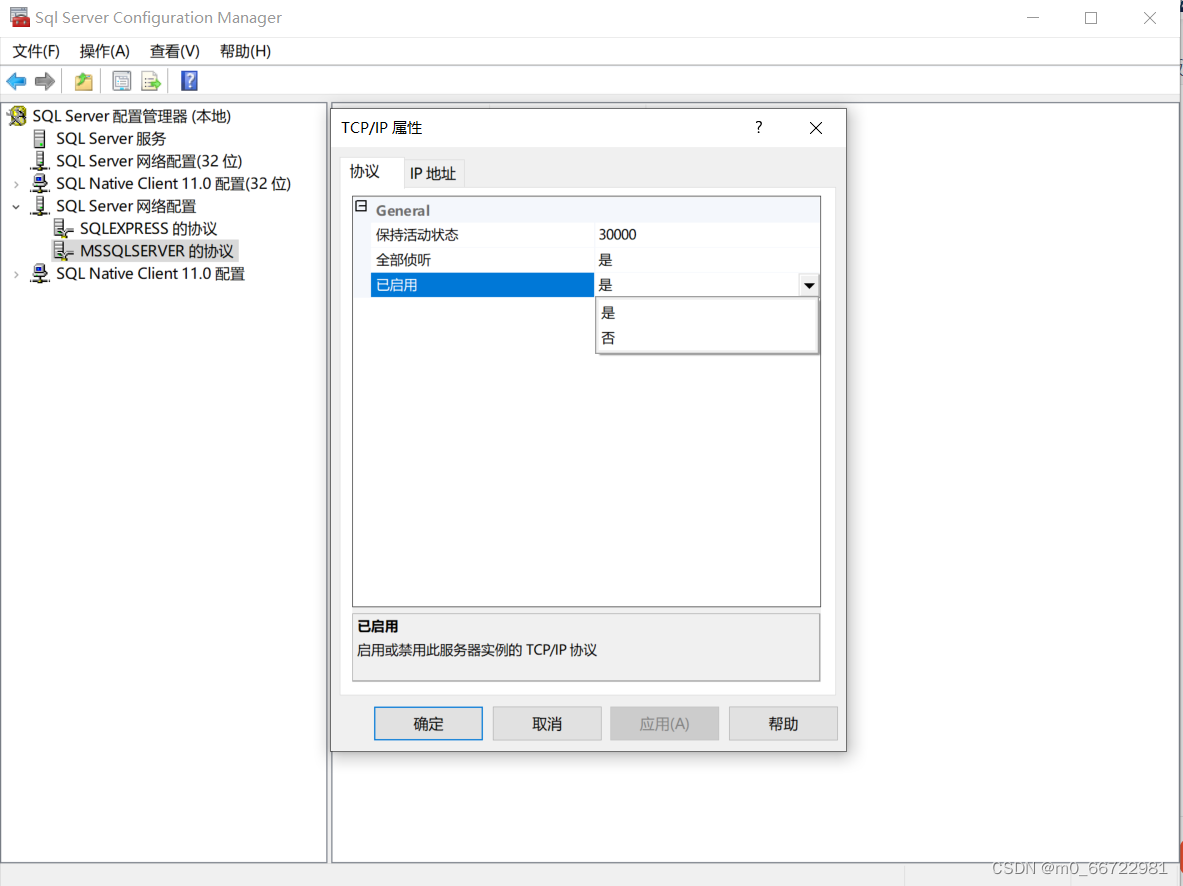
点击IP地址:
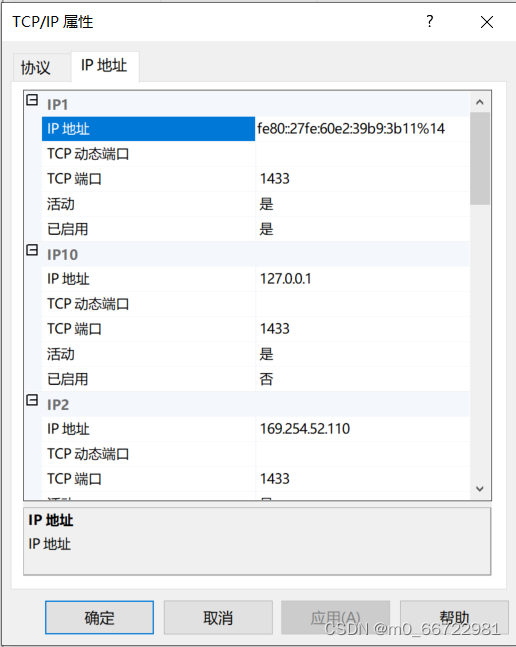
将IP1、IP2的启用改为是,观察TCP端口是不是1433。(一共改两个)

往下滑出现IPAll,观察其TCP端口是不是1433,最后别忘记点应用(不是点击确定)。

经过上述操作后重启电脑,重新打开该软件,然后再将下边的东西改成启动,SQL Sever代理启动失败与否不会影响SQL Sever的使用。:

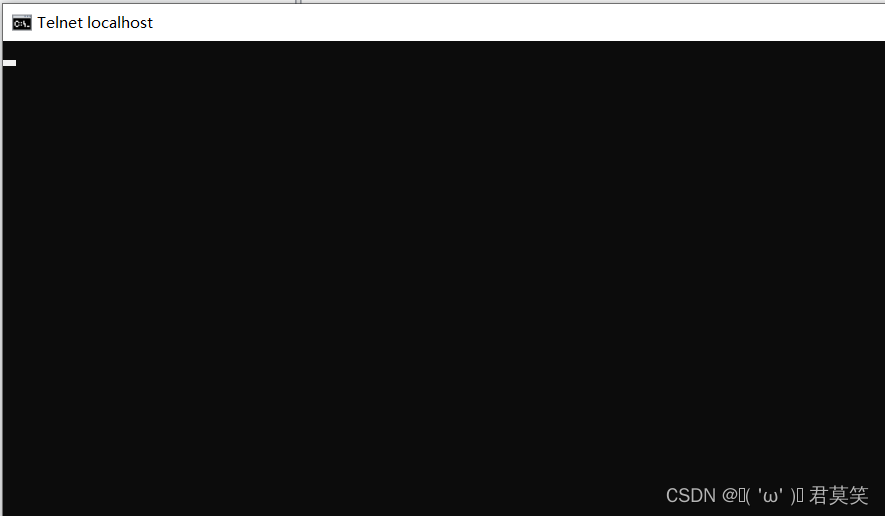
点击:win和R,输入cmd点击回车,并在其中输入telnet localhost 1433 当页面跳转到以下页面则说明你的1433配置成功:
步骤四:在pycharm中测试
经过以上操作之后打开pycharm在终端输入,安装pycharm和SQL Sever链接的库:
pip install pymssqlpymssql库安装成功后建立新的py文件并输入以下代码并执行:
- import pymssql
-
- connect = pymssql.connect(host='localhost',server='LAPTOP-40O6HVDS', port='1433',user='yunmengze', password= '123456', database='soft2104')
- # host不要改其参数,server改成你的服务器名, port不要改其参数,user你的用户名, password你的密码, database你的数据库名
- if connect:
'yunmengze', '123456', 'soft2104'是上述步骤二操作中设置的。
LAPTOP-40O6HVDS是我的服务器名称,在这里你需要打开你的SQL Sever登录界面进行查看。
如果上述的,代码执行失败,失败示例如下(服务器名字是汉语的):

请用以下代码调试,如果这样能够连接成功请利用步骤五修改服务器名称:
- import pymssql
- connect = pymssql.connect(host='localhost',server='LAPTOP-40O6HVDS', port='1433',user='yunmengze', password= '123456', database='soft2104',charset="GBK")
- # host不要改其参数,server改成你的服务器名, port不要改其参数,user你的用户名, password你的密码, database你的数据库名,charset不要改变其参数。
- if connect:
- print("数据库连接成功")
- else:
- print("连接失败")
如果你的运行结果是:数据库连接成功
恭喜你的pycharm和SQL Sever链接成功。
(剩下的就是学习如何以pycharm为媒介来操作SQL Sever了)
SQL Sever在pycharm中的导入数据需要修改用户权限,如果你经过一番波折连接成功建议您往下看……
步骤五:服务器含有汉语的乱码错误修正
下面根据我经历的一下问题做一些补充:
如果你的服务器没有汉语请跳过该步骤。
如果你的服务器是汉语的,登录的时候需要charset="GBK",但是对后续的在数据增加时会因为GBK有乱码的风险,需要做下列一下修改:

点击此电脑的属性

进入后点击重命名这台电脑
重命名后重启电脑(为了教程我也是重命名了,………………)
重启电脑后再打开sql sever点击服务器,就可以对服务器进行选择,选择你命名的电脑名称的服务器,尝试一下就会发现也可以进入。
下面教程一种更改服务器名称在pycharm来隐藏真实的服务器名称的方法:
修改服务器的名称(相当于加一个小名),下列操作是在sql sever里新建查询中执行的,需要根据提示修改其中的oldservername和newservername:
- /*
- select @@SERVERNAME
- --查询当前服务器实际名称,在后续操作过程中不会影响该值,服务器的大名
- select SERVERPROPERTY('ServerName')
- --查看所有定义的服务器
- */
-
-
- sp_helpserver --可以查看服务器的小名
-
-
- --根据查出的小名进行修改oldservername的值
- sp_dropserver 'oldservername'
-
- --newservername是更改后的名称
- sp_addserver 'newservername','local'
-
- --将更改后的名称应用newservername是你需要改的
- sp_serveroption 'newservername', 'data access', 'on'
-
-
-
- --oldservername原来的服务器名,newservername新的服务器名
修改后,用新的服务器名称也能进入服务器,注意不要有汉语
实际服务器如果有汉语请通过上一个方法修改服务器名称先对真实服务器名称修改,增加昵称的方式不会更改原来服务器中包含汉语使服务器无法进入或乱码的错误。
SQL Sever在pycharm中的导入数据,增,删,查操作
如果你想大量导入数据(导入数据前需要在sql sever里建立好表格),使用bulk函数,例如:
- bulk insert soft2110 --txt插入到soft2110表格中
- from 'd:2104.txt' --txt在D盘而且需要其编码为ANSI才行
- with(fieldterminator = '\t',rowterminator = '\n')
- --\t是每行以空格分割,\n是根据换行将表格导入。
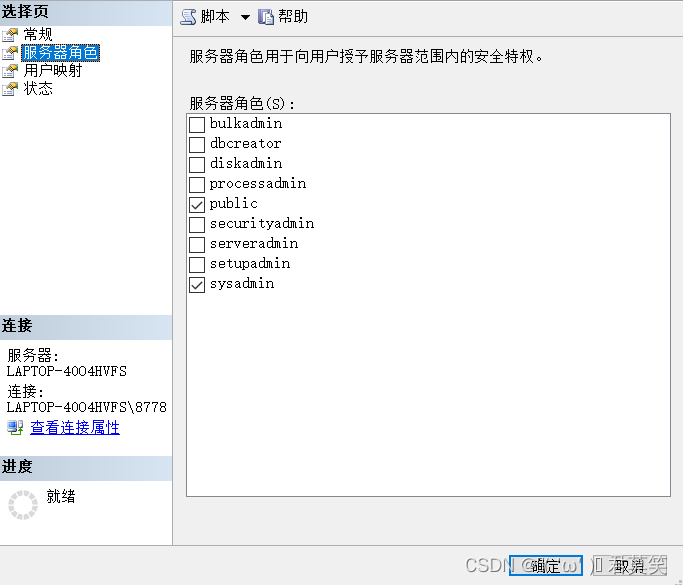
需要更改你的登录名的权限,打开方式如下:
双击安全性;

双击登录名;

找到你的登录名(我的是yunmengze),双击服务器角色,将服务器角色的sysadmin选中:
在sql sever里建立表格时需要以下注意:
在声明表格变量时不要用nvarchar,varchar,因为这两个声名的字符串编码是GBK编码,如果在pycharm里插入数据时会因为pycharm执行过程使用utf-8编码导致插入后乱码。所以在声明table时字符串尽量用nchar(20),这种方式是utf-8编码,其中的数字20是字符串的大小,一个汉字大概能占用2个位置,所以声明的大小不能太大,更不能过小。
示例如下:(先别粘,后续有总的,先看懂是怎么一回事)
- use soft2104
- create table soft2110(xh int,dp nchar(20),pr nchar(20),id nchar(30),
- nm nchar(20))
如果你之前声明过soft2110表格但是使用了GBK编码的nvarchar,varchar,你可以通过以下代码删除表格soft2110:
drop table soft2110以下示例是完整的操作示例(已经给你的用户打开权限,复制完整代码的时间到了):
- use soft2104
- drop table soft2110
- create table soft2110(xh int,dp nchar(20),pr nchar(20),id nchar(30),
- nm nchar(20))
-
- bulk insert soft2110 --txt text
- from 'd:2104.txt'
- with(fieldterminator = '\t',rowterminator = '\n')--\t是空格
- delete from soft2110 where xh=71
示例需要在D盘建立2104.txt文件,示例数据是:
1 软件学院 软件2204 31212121212 云梦泽
2 软件学院 软件2204 31313131313 上林赋
注意,保存后需要另存为D盘的2104.txt文件进行替换,编码变成ANSI
增删改查主要用的是sql sever里的execute函数示例如下:
在你的连接成功后的pycharm里加入以下代码,实现对上述的表格实现查找:
- cur = connect.cursor()
- sqlstr = "select * from soft2110"
- cur.execute(sqlstr)
- data = cur.fetchall()
- cur.close()
- for i in range(len(data)):
- for t in range(len(data[i])):
- print(str(data[i][t]).strip(), end=' ')
- print('\r')
- connect.close()
就会得到以下输出,注意执行之后关闭了游标和连接(如果是带循环的操作可以将connect.close()放在退出循环操作执行,最后再断开与sql sever的连接;断开游标: cur.close() 游标用的时候打开,不用的时候随即关闭):
1 软件学院 软件2204 31212121212 云梦泽
2 软件学院 软件2204 31313131313 上林赋
注意其中data是列表里套用元组的形式,以上两个for循环是打开列表和元组的过程:
[(1,软件学院,软件2204,31212121212,云梦泽),(2,软件学院,软件2204,31313131313,上林赋)]
对数据查询用的是:
cur.execute(sqlstr)
data = cur.fetchall()
对数据增,删用的是:
cur.execute(sqlstr)
connect.commit()
示例如下:
- print("输入案例:“医学院 临床2204 349849848 岳阳城”")
- add = input('请输入‘学院 专业 学号 姓名’:')
- try:
- cur = connect.cursor()
- sqlstr = "select * from soft2110"
- cur.execute(sqlstr)
- data = cur.fetchall()
- sqlstr = f"select * from soft2110 where id = '{add[2]}'"
- cur.execute(sqlstr)
- acc = cur.fetchall()
- if acc:
- print("学号重复,请重新插入")
- return
- try:
- sqlstr =f"insert into soft2110 values ({len(data) + 1},'{add[0]}','{add[1]}','{add[2]}','{add[3]}')"
- # print(sqlstr)
- cur.execute(sqlstr)
- connect.commit()
- print("插入成功")
- except:
- print("插入失败请重试")
- cur.close()
- connect.close()
- except:
- print("输入错误")
Tip:
sqlstr = f"select * from soft2110 where id = '{add[2]}'"
The combination of f and " " and { } is to bring the data in { } into the string to achieve the function of linking. Without adding the add[2] data in { } in f, there is no way to read the data into the string to achieve Calculate the effect of splicing.
For example:
print(f"输出结果为{2*3}")Print: the output result is 6
print("输出结果为{2*3}")Print: the output result is {2*3}
Delete operation (the idea is as follows):
de = input('Please enter the deleted student number:')
sqlstr = f"delete from soft2110 where id = '{de}'"
The complete deletion code is as follows:
- def delete(connect, de):
- cur = connect.cursor()
- sqlstr = f"select * from soft2110 where id = '{de}'"
- cur.execute(sqlstr)
- acc = cur.fetchall()
- if acc:
- sqlstr = f"delete from soft2110 where id = '{de}'"
- cur.execute(sqlstr)
- connect.commit()
- cur.close()
- print("删除成功")
- else:
- print("学号不存在")
- cur.close()
- return
- de = input('请输入删除的学号:')
- try:
- delete(connect, de)
- except Exception as e:
- print(f"Error: {e}")
The specific implementation method is to move the operations in the database to python through the execute() function, first pre-judge the student number of the database, if there is no student number, return the output that the student number does not exist, and return if the student number exists If the deletion is successful, if other errors are found, it will return the deletion failure. The try function is used to increase the fault tolerance of the function. By using the except function, the purpose of outputting errors is achieved, and the code debugging is carried out through the returned error type.
The explanation of this issue ends here, and the next issue will show a complete and simple management system...
Category of website: technical article > Blog
Author:Believesinkinto
link:http://www.pythonblackhole.com/blog/article/80604/fd66eb68c9c77c594736/
source:python black hole net
Please indicate the source for any form of reprinting. If any infringement is discovered, it will be held legally responsible.
name:
Comment content: (supports up to 255 characters)
no articles