Binocular vision target tracking and 3D coordinate acquisition—python (code)
posted on 2023-06-06 11:19 read(305) comment(0) like(29) collect(1)
September 2022 update:
On the original basis, I used yolov5 instead of opencv's target detection algorithm to assist the camera in acquiring three-dimensional coordinates, and successfully used the acquired coordinates to control the robotic arm in real time. If you are interested, you can watch the video in my b station, below the video There is also an open source link: [Soft Core] I developed a robotic arm for binocular vision target detection_哔哩哔哩_bilibili
The following is the original answer:
After studying binocular vision for several days on csdn and station b, I can roughly realize some functions. Record your thoughts here, and record the pits you encountered by the way.
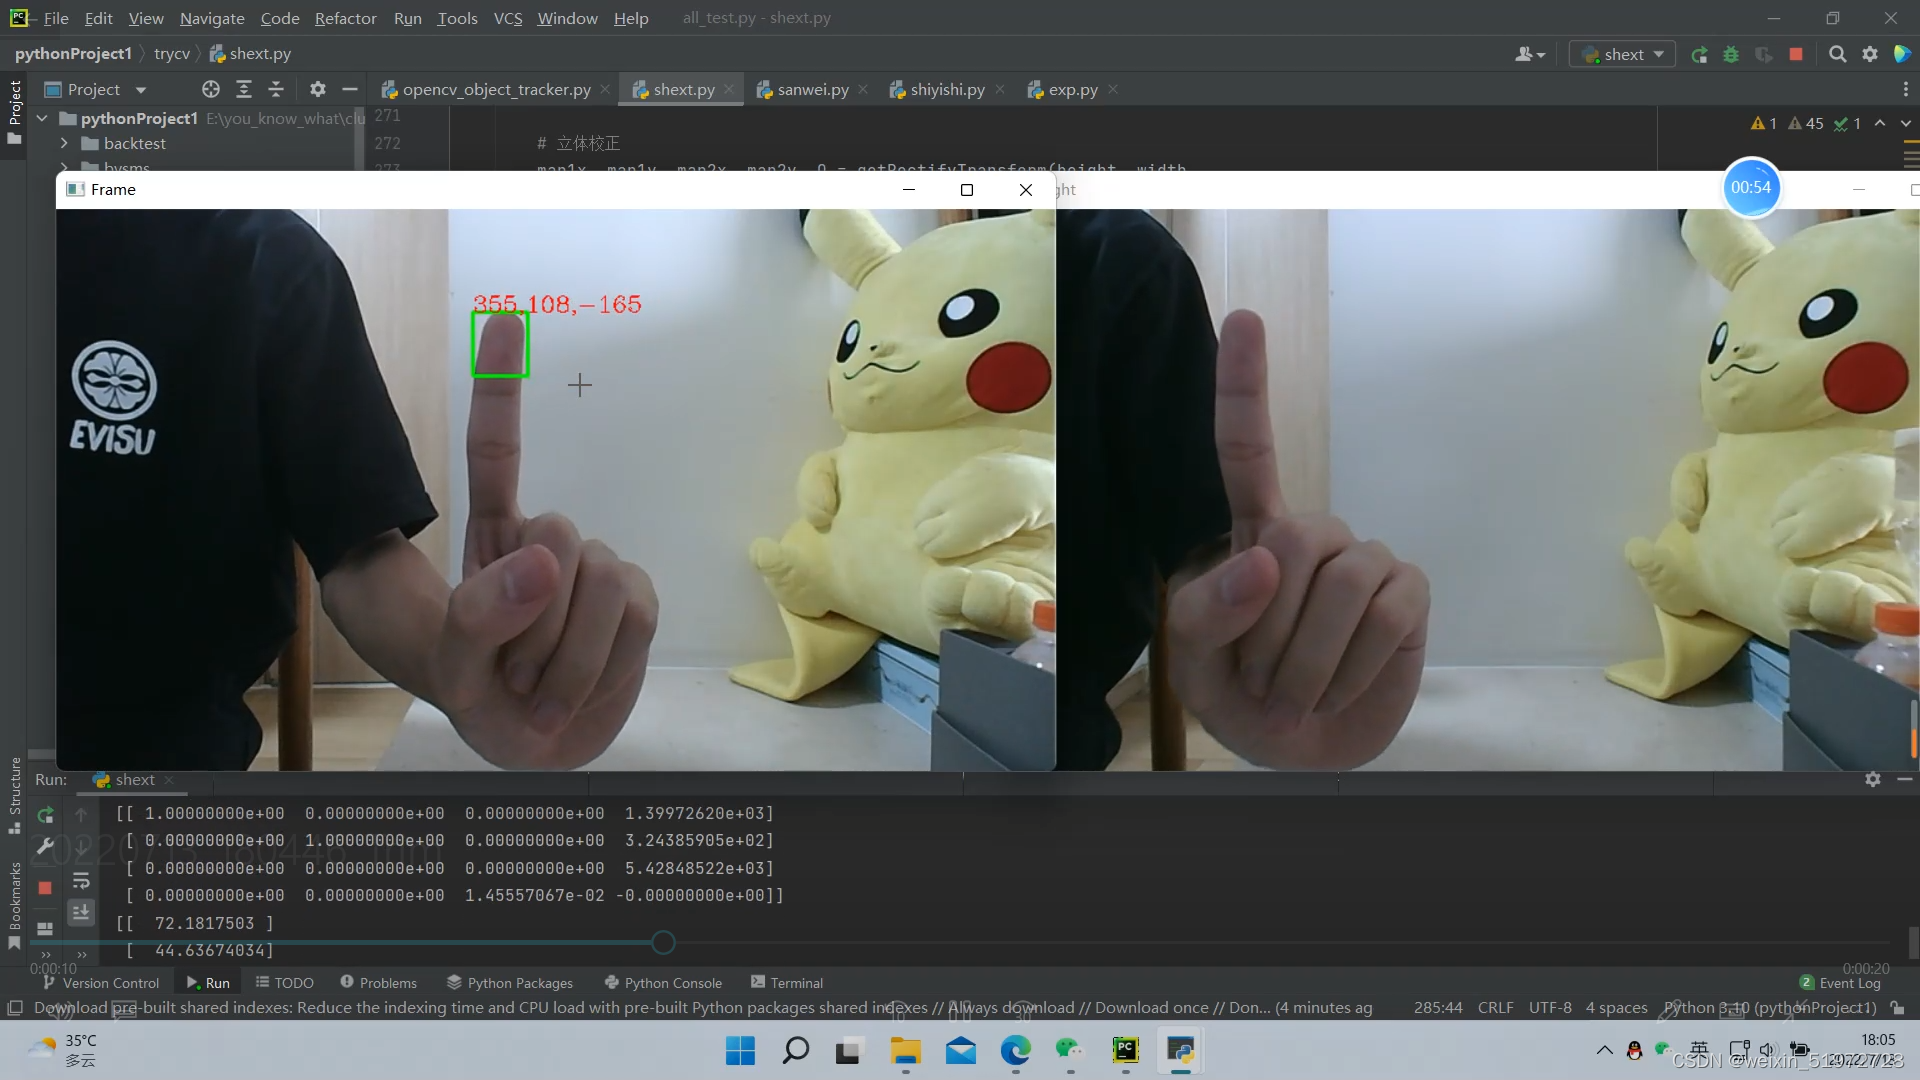
Let's take a look at the final result first, realize the tracking of objects and display the three-dimensional pixel coordinates:

 Let me talk about the specific steps
1. Camera Calibration
The premise of using a binocular camera is to first obtain the internal and external parameters of the camera. Some more expensive cameras will give you these parameters together when they leave the factory. More common cameras need to be calibrated by ourselves. I calibrated it through matlab. For specific steps, you can read this blog: Matlab binocular camera calibration_indigo love's blog-CSDN blog_matlab binocular camera calibration
It is very detailed, and the given code can be run directly, but one detail should be paid attention to. In the matlab calibration interface, this option is for 2 parameters by default, we need to manually check three parameters, otherwise the final output camera parameters will be different
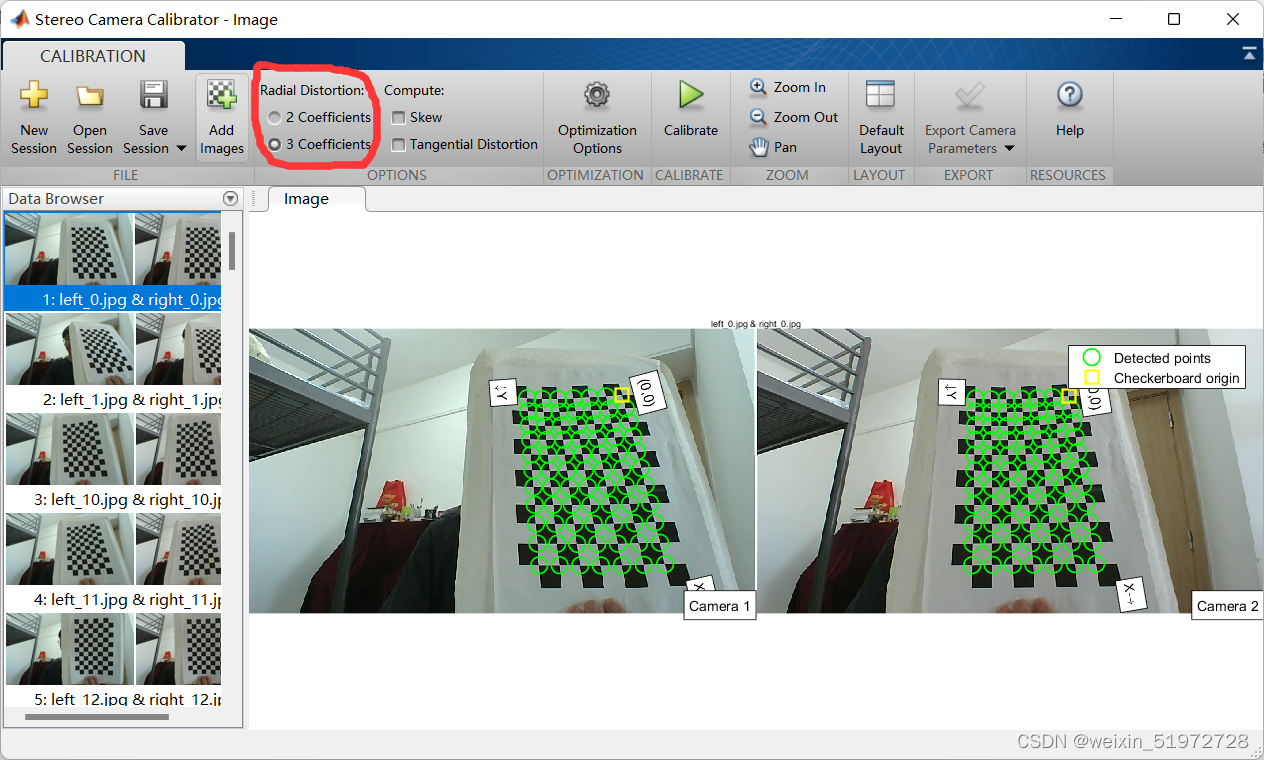
Here we first put the calibration results into a file called stereoconfig.py for later use
- import numpy as np
-
- class stereoCamera(object):
- def __init__(self):
- # 左相机内参
- self.cam_matrix_left = np.array([[684.8165, 0, 637.2704], [0, 685.4432, 320.5347],
- [0, 0, 1]])
- # 右相机内参
- self.cam_matrix_right = np.array([[778.2081, 0, 602.9231], [0, 781.9883, 319.6632],
- [0, 0, 1]])
-
- # 左右相机畸变系数:[k1, k2, p1, p2, k3]
- self.distortion_l = np.array([[0.1342, -0.3101, 0, 0, 0.1673]])
- self.distortion_r = np.array([[0.4604, -2.3963, 0, 0, 5.2266]])
-
- # 旋转矩阵
- self.R = np.array([[0.9993, -0.0038, -0.0364],
- [0.0033, 0.9999, -0.0143],
- [0.0365, 0.0142, 0.9992]])
- # 平移矩阵
- self.T = np.array([[-44.8076], [5.7648], [51.7586]])
-
- # 主点列坐标的差
- self.doffs = 0.0
-
- # 指示上述内外参是否为经过立体校正后的结果
- self.isRectified = False
-
- def setMiddleBurryParams(self):
- self.cam_matrix_left = np.array([[684.8165, 0, 637.2704], [0, 685.4432, 320.5347],
- [0, 0, 1]])
- self.cam_matrix_right = np.array([[778.2081, 0, 602.9231], [0, 781.9883, 319.6632],
- [0, 0, 1]])
- self.distortion_l = np.array([[0.1342, -0.3101, 0, 0, 0.1673]])
- self.distortion_r = np.array([[0.4604, -2.3963, 0, 0, 5.2266]])
- self.R = np.array([[0.9993, -0.0038, -0.0364],
- [0.0033, 0.9999, -0.0143],
- [0.0365, 0.0142, 0.9992]])
- self.T = np.array([[-44.8076], [5.7648], [51.7586]])
- self.doffs = 131.111
- self.isRectified = True
-

2. About how to open two cameras with python
In fact, this should not be the main point, but it really stuck with me for a long time... so let me talk about it.
First of all, although the binocular camera has two cameras, they use the same serial number, that is to say, camera = cv2.VideoCapture(0), and the given id is 0, then it has already opened two cameras. But if you only run this line of code you can only see the left camera, why? In fact, it is not that the other camera is not open, but that your default window size is not large enough, so you can only see one camera. For a 2560×720 camera, use the following code to cut the window, and open two windows to display both cameras. . 1480 camera can refer to this blog, anyway, I mainly copied his OpenCV to open the binocular camera (python version)_一小树x的博客-CSDN Blog_opencv to open the binocular camera
I suggest to open two windows to display the left camera and the right camera respectively. Of course, you can also display the two cameras in one window, just use the corresponding method to cut the window. I won’t go into details.
- # -*- coding: utf-8 -*-
- import cv2
- import time
-
-
- AUTO = False # 自动拍照,或手动按s键拍照
- INTERVAL = 2 # 自动拍照间隔
-
- cv2.namedWindow("left")
- cv2.namedWindow("right")
- camera = cv2.VideoCapture(0)
-
- # 设置分辨率左右摄像机同一频率,同一设备ID;左右摄像机总分辨率2560x720;分割为两个1280x720
- camera.set(cv2.CAP_PROP_FRAME_WIDTH,2560)
- camera.set(cv2.CAP_PROP_FRAME_HEIGHT,720)
-
- counter = 0
- utc = time.time()
- folder = "./SaveImage/" # 拍照文件目录
-
- def shot(pos, frame):
- global counter
- path = folder + pos + "_" + str(counter) + ".jpg"
-
- cv2.imwrite(path, frame)
- print("snapshot saved into: " + path)
-
- while True:
- ret, frame = camera.read()
- print("ret:",ret)
- # 裁剪坐标为[y0:y1, x0:x1] HEIGHT * WIDTH
- left_frame = frame[0:720, 0:1280]
- right_frame = frame[0:720, 1280:2560]
-
- cv2.imshow("left", left_frame)
- cv2.imshow("right", right_frame)
-
- now = time.time()
- if AUTO and now - utc >= INTERVAL:
- shot("left", left_frame)
- shot("right", right_frame)
- counter += 1
- utc = now
-
- key = cv2.waitKey(1)
- if key == ord("q"):
- break
- elif key == ord("s"):
- shot("left", left_frame)
- shot("right", right_frame)
- counter += 1
- camera.release()
- cv2.destroyWindow("left")
- cv2.destroyWindow("right")
3. Realization of target tracking
The idea of this article is to realize the target tracking of the monocular camera (that is, the left camera) first. After the target tracking is realized, the two-dimensional pixel coordinates of the left camera target are obtained, and then the two-dimensional pixel coordinates of the left camera target are added with "parallax ” to get the pixel two-dimensional coordinates of the right camera target. After obtaining the two coordinates, the least square method is used to obtain the pixel coordinates of the third dimension.
In short, first post the target tracking code of the monocular camera:
- import cv2
-
-
- vs = cv2.VideoCapture(0) # 参数0表示第一个摄像头
- cv2.namedWindow("Frame")
-
- # 判断视频是否打开
- if (vs.isOpened()):
- print('camera Opened')
- else:
- print('摄像头未打开')
-
- OPENCV_OBJECT_TRACKERS = {
- "csrt": cv2.TrackerCSRT_create, "kcf": cv2.TrackerKCF_create,
- "boosting": cv2.TrackerBoosting_create, "mil": cv2.TrackerMIL_create,
- "tld": cv2.TrackerTLD_create,
- "medianflow": cv2.TrackerMedianFlow_create, "mosse": cv2.TrackerMOSSE_create
- }
- trackers=cv2.MultiTracker_create()
-
- while True:
- frame=vs.read()
- frame=frame[1]
- if frame is None:
- break
-
- # 设置摄像头尺寸
- (h,w) = frame.shape[:2]
- width = 800
- r = width / float(w)
- dim = (width, int(h * r))
- frame = cv2.resize(frame, dim, interpolation = cv2.INTER_AREA)
-
- # 对做摄像头做目标识别初始化
- (success,boxes)=trackers.update(frame)
-
- # 画图的循环
- for box in boxes:
- (x,y,w,h)=[int(v) for v in box]
- cv2.rectangle(frame, (x, y), (x + w, y + h), (0, 255, 0), 2)
-
- cv2.imshow('Frame', frame)
-
- # 按键判断是否设置了新的目标
- key=cv2.waitKey(10) & 0xFF
- if key == ord('s'):
- box=cv2.selectROI('Frame', frame, fromCenter=False, showCrosshair=True)
- tracker=cv2.TrackerCSRT_create()
- print(type(box),type(box[0]),box[1],box)
- trackers.add(tracker, frame, box)
- elif key == 27:
- break
- vs.release()
- cv2.destroyAllWindows()
After running, a Frame window will pop up, press the button "s" and the image will be still, you can use the mouse to draw a frame, and then press the space to start the target tracking.
Fourth, the acquisition of z-axis coordinates
This should be the core part, and the idea is what I said at the beginning of the third part.
(1) Calculate the parallax
This function returns a value disp, which is disparity. The definition of disparity is disparity=ul-ur, that is, the pixel coordinates of the left image minus the pixel coordinates of the right image. The larger the parallax, the closer the point is to the camera. This is easy to understand. Think of the binocular camera as your eyes. When you keep closing one eye and opening the other, you will find Objects will move, and closer objects will move a greater distance. right?
-
- # 视差计算
- def stereoMatchSGBM(left_image, right_image, down_scale=False):
- # SGBM匹配参数设置
- if left_image.ndim == 2:
- img_channels = 1
- else:
- img_channels = 3
- blockSize = 3
- paraml = {'minDisparity': 0,
- 'numDisparities': 64,
- 'blockSize': blockSize,
- 'P1': 8 * img_channels * blockSize ** 2,
- 'P2': 32 * img_channels * blockSize ** 2,
- 'disp12MaxDiff': 1,
- 'preFilterCap': 63,
- 'uniquenessRatio': 15,
- 'speckleWindowSize': 100,
- 'speckleRange': 1,
- 'mode': cv2.STEREO_SGBM_MODE_SGBM_3WAY
- }
- # 构建SGBM对象
- left_matcher = cv2.StereoSGBM_create(**paraml)
- paramr = paraml
- paramr['minDisparity'] = -paraml['numDisparities']
- right_matcher = cv2.StereoSGBM_create(**paramr)
-
- # 计算视差图
- size = (left_image.shape[1], left_image.shape[0])
- if down_scale == False:
- disparity_left = left_matcher.compute(left_image, right_image)
- disparity_right = right_matcher.compute(right_image, left_image)
- else:
- left_image_down = cv2.pyrDown(left_image)
- right_image_down = cv2.pyrDown(right_image)
- factor = left_image.shape[1] / left_image_down.shape[1]
-
- disparity_left_half = left_matcher.compute(left_image_down, right_image_down)
- disparity_right_half = right_matcher.compute(right_image_down, left_image_down)
- disparity_left = cv2.resize(disparity_left_half, size, interpolation=cv2.INTER_AREA)
- disparity_right = cv2.resize(disparity_right_half, size, interpolation=cv2.INTER_AREA)
- disparity_left = factor * disparity_left
- disparity_right = factor * disparity_right
-
- # 真实视差(因为SGBM算法得到的视差是×16的)
- trueDisp_left = disparity_left.astype(np.float32) / 16.
- trueDisp_right = disparity_right.astype(np.float32) / 16.
-
- return trueDisp_left, trueDisp_right
(2) Calculation of the left and right pixels at the target
After obtaining the parallax size, the coordinates of the pixels on both sides can be calculated according to the parallax. disp is the parameter of the disparity we found before. Note here is disp (yy, xx) instead of disp (xx, yy), you can see the length and width of disp
- # 画图的循环,(x,y)和(x+w,y+h)是你画的框的左上角和右下角的两个坐标哈
- for box in boxes:
- (x, y, w, h)=[int(v) for v in box]
- cv2.rectangle(left_frame, (x, y), (x + w, y + h), (0, 255, 0), 2)
-
- # 转化成框框中点的坐标
- xx = round((2*x+w)/2)
- yy = round((2*y+h)/2)
-
- # xr和yr是右相机相应点的像素坐标
- xr = xx+disp[yy, xx]
- yr = yy
(3) Z-axis coordinate calculation
I just know that the smaller the parallax, the deeper the depth. I don't quite understand the principle of converting parallax into real coordinates. This is someone else's code.
- def getDepthMapWithConfig(config : stereoconfig.stereoCamera) -> np.ndarray:
- fb = config.cam_matrix_left[0, 0] * (-config.T[0])
- doffs = config.doffs
- disparity=dot_disp
- depth = fb/(disparity + doffs)
- return depth
5. Final result
I'll post all the code
- import cv2
- import argparse
- import numpy as np
- import stereoconfig
-
- # 左相机内参
- leftIntrinsic = np.array([[684.8165, 0, 637.2704], [0, 685.4432, 320.5347],
- [0, 0, 1]])
- # 右相机内参
- rightIntrinsic = np.array([[778.2081, 0, 602.9231], [0, 781.9883, 319.6632],
- [0, 0, 1]])
-
-
-
- # 旋转矩阵
- leftRotation = np.array([[1, 0, 0], # 旋转矩阵
- [0, 1, 0],
- [0, 0, 1]])
- rightRotation = np.array([[0.9993, -0.0038, -0.0364],
- [0.0033, 0.9999, -0.0143],
- [0.0365, 0.0142, 0.9992]])
-
- # 平移矩阵
- rightTranslation = np.array([[-44.8076], [5.7648], [51.7586]])
- leftTranslation = np.array([[0], # 平移矩阵
- [0],
- [0]])
-
- def getDepthMapWithConfig(config : stereoconfig.stereoCamera) -> np.ndarray:
- fb = config.cam_matrix_left[0, 0] * (-config.T[0])
- doffs = config.doffs
- disparity=dot_disp
- depth = fb/(disparity + doffs)
- return depth
-
- # 预处理
- def preprocess(img1, img2):
- # 彩色图->灰度图
- if (img1.ndim == 3):
- img1 = cv2.cvtColor(img1, cv2.COLOR_BGR2GRAY) # 通过OpenCV加载的图像通道顺序是BGR
- if (img2.ndim == 3):
- img2 = cv2.cvtColor(img2, cv2.COLOR_BGR2GRAY)
-
- # 直方图均衡
- img1 = cv2.equalizeHist(img1)
- img2 = cv2.equalizeHist(img2)
-
- return img1, img2
-
-
- # 消除畸变
- def undistortion(image, camera_matrix, dist_coeff):
- undistortion_image = cv2.undistort(image, camera_matrix, dist_coeff)
-
- return undistortion_image
-
-
- # 获取畸变校正和立体校正的映射变换矩阵、重投影矩阵
- # @param:config是一个类,存储着双目标定的参数:config = stereoconfig.stereoCamera()
- def getRectifyTransform(height, width, config):
- # 读取内参和外参
- left_K = config.cam_matrix_left
- right_K = config.cam_matrix_right
- left_distortion = config.distortion_l
- right_distortion = config.distortion_r
- R = config.R
- T = config.T
-
- # 计算校正变换
- R1, R2, P1, P2, Q, roi1, roi2 = cv2.stereoRectify(left_K, left_distortion, right_K, right_distortion,
- (width, height), R, T, alpha=0)
-
- map1x, map1y = cv2.initUndistortRectifyMap(left_K, left_distortion, R1, P1, (width, height), cv2.CV_32FC1)
- map2x, map2y = cv2.initUndistortRectifyMap(right_K, right_distortion, R2, P2, (width, height), cv2.CV_32FC1)
-
- return map1x, map1y, map2x, map2y, Q
-
-
- # 畸变校正和立体校正
- def rectifyImage(image1, image2, map1x, map1y, map2x, map2y):
- rectifyed_img1 = cv2.remap(image1, map1x, map1y, cv2.INTER_AREA)
- rectifyed_img2 = cv2.remap(image2, map2x, map2y, cv2.INTER_AREA)
-
- return rectifyed_img1, rectifyed_img2
-
-
-
- # 视差计算
- def stereoMatchSGBM(left_image, right_image, down_scale=False):
- # SGBM匹配参数设置
- if left_image.ndim == 2:
- img_channels = 1
- else:
- img_channels = 3
- blockSize = 3
- paraml = {'minDisparity': 0,
- 'numDisparities': 64,
- 'blockSize': blockSize,
- 'P1': 8 * img_channels * blockSize ** 2,
- 'P2': 32 * img_channels * blockSize ** 2,
- 'disp12MaxDiff': 1,
- 'preFilterCap': 63,
- 'uniquenessRatio': 15,
- 'speckleWindowSize': 100,
- 'speckleRange': 1,
- 'mode': cv2.STEREO_SGBM_MODE_SGBM_3WAY
- }
- # 构建SGBM对象
- left_matcher = cv2.StereoSGBM_create(**paraml)
- paramr = paraml
- paramr['minDisparity'] = -paraml['numDisparities']
- right_matcher = cv2.StereoSGBM_create(**paramr)
-
- # 计算视差图
- size = (left_image.shape[1], left_image.shape[0])
- if down_scale == False:
- disparity_left = left_matcher.compute(left_image, right_image)
- disparity_right = right_matcher.compute(right_image, left_image)
- else:
- left_image_down = cv2.pyrDown(left_image)
- right_image_down = cv2.pyrDown(right_image)
- factor = left_image.shape[1] / left_image_down.shape[1]
-
- disparity_left_half = left_matcher.compute(left_image_down, right_image_down)
- disparity_right_half = right_matcher.compute(right_image_down, left_image_down)
- disparity_left = cv2.resize(disparity_left_half, size, interpolation=cv2.INTER_AREA)
- disparity_right = cv2.resize(disparity_right_half, size, interpolation=cv2.INTER_AREA)
- disparity_left = factor * disparity_left
- disparity_right = factor * disparity_right
-
- # 真实视差(因为SGBM算法得到的视差是×16的)
- trueDisp_left = disparity_left.astype(np.float32) / 16.
- trueDisp_right = disparity_right.astype(np.float32) / 16.
-
- return trueDisp_left, trueDisp_right
-
-
- # 将h×w×3数组转换为N×3的数组
- def hw3ToN3(points):
- height, width = points.shape[0:2]
-
- points_1 = points[:, :, 0].reshape(height * width, 1)
- points_2 = points[:, :, 1].reshape(height * width, 1)
- points_3 = points[:, :, 2].reshape(height * width, 1)
-
- points_ = np.hstack((points_1, points_2, points_3))
-
- return points_
-
-
- def getDepthMapWithQ(disparityMap: np.ndarray, Q: np.ndarray) -> np.ndarray:
- points_3d = cv2.reprojectImageTo3D(disparityMap, Q)
- depthMap = points_3d[:, :, 2]
- reset_index = np.where(np.logical_or(depthMap < 0.0, depthMap > 65535.0))
- depthMap[reset_index] = 0
-
- return depthMap.astype(np.float32)
-
-
- def getDepthMapWithConfig(config : stereoconfig.stereoCamera) -> np.ndarray:
- fb = config.cam_matrix_left[0, 0] * (-config.T[0])
- doffs = config.doffs
- disparity=dot_disp
- depth = fb/(disparity + doffs)
- return depth
-
-
- vs = cv2.VideoCapture(0) # 参数0表示第一个摄像头
- cv2.namedWindow("Frame")
-
- # 分配摄像头分辨率
- vs.set(cv2.CAP_PROP_FRAME_WIDTH, 2560)
- vs.set(cv2.CAP_PROP_FRAME_HEIGHT, 720)
-
-
- # 判断视频是否打开
- if (vs.isOpened()):
- print('camera Opened')
- else:
- print('摄像头未打开')
-
- OPENCV_OBJECT_TRACKERS = {
- "csrt": cv2.TrackerCSRT_create, "kcf": cv2.TrackerKCF_create,
- "boosting": cv2.TrackerBoosting_create, "mil": cv2.TrackerMIL_create,
- "tld": cv2.TrackerTLD_create,
- "medianflow": cv2.TrackerMedianFlow_create, "mosse": cv2.TrackerMOSSE_create
- }
-
- trackers=cv2.MultiTracker_create()
-
- # 读取相机内参和外参
- # 使用之前先将标定得到的内外参数填写到stereoconfig.py中的StereoCamera类中
- config = stereoconfig.stereoCamera()
- config.setMiddleBurryParams()
- print(config.cam_matrix_left)
-
- while True:
- frame=vs.read()
- frame=frame[1]
- if frame is None:
- break
- # 设置右摄像头尺寸
- right_frame = frame[0:720, 1280:2560]
- (h,w) = right_frame.shape[:2]
- width = 800
- r = width / float(w)
- dim = (width, int(h * r))
- right_frame = cv2.resize(right_frame, dim, interpolation = cv2.INTER_AREA)
-
- # 设置左摄像头尺寸
- left_frame = frame[0:720, 0:1280]
- (h,w) = left_frame.shape[:2]
- width = 800
- r = width / float(w)
- dim = (width, int(h * r))
- left_frame = cv2.resize(left_frame, dim, interpolation = cv2.INTER_AREA)
-
- # 对做摄像头做目标识别初始化
- (success,boxes)=trackers.update(left_frame)
-
- # 画图的循环
- for box in boxes:
- (x, y, w, h)=[int(v) for v in box]
- cv2.rectangle(left_frame, (x, y), (x + w, y + h), (0, 255, 0), 2)
-
- # 转化成框框中点的坐标
- xx = round((2*x+w)/2)
- yy = round((2*y+h)/2)
-
- # 读取一帧图片
- iml = left_frame # 左图
- imr = right_frame # 右图
- height, width = iml.shape[0:2]
-
- # 立体校正
- map1x, map1y, map2x, map2y, Q = getRectifyTransform(height, width,
- config) # 获取用于畸变校正和立体校正的映射矩阵以及用于计算像素空间坐标的重投影矩阵
- iml_rectified, imr_rectified = rectifyImage(iml, imr, map1x, map1y, map2x, map2y)
- print(Q)
-
- # 立体匹配
- iml_, imr_ = preprocess(iml, imr) # 预处理,一般可以削弱光照不均的影响,不做也可以
- disp, _ = stereoMatchSGBM(iml, imr, False) # 这里传入的是未经立体校正的图像,因为我们使用的middleburry图片已经是校正过的了
- dot_disp=disp[yy][xx]
- cv2.imwrite('disaprity.jpg', disp * 4)
-
- # xr和yr是右相机相应点的像素坐标
- z=getDepthMapWithConfig(config)
- text = str(xx)+','+str(yy)+','+str(z)
- cv2.putText(left_frame, text, (x, y), cv2.FONT_HERSHEY_COMPLEX, 0.6, (0, 0, 255), 1)
-
- # 显示两个框
- cv2.imshow("right", right_frame)
- cv2.imshow('Frame', left_frame)
-
- # 按键判断是否设置新的目标
- key=cv2.waitKey(10) & 0xFF
- if key == ord('s'):
- box=cv2.selectROI('Frame', left_frame, fromCenter=False, showCrosshair=True)
- tracker=cv2.TrackerCSRT_create()
- print(type(box),type(box[0]),box[1],box)
- trackers.add(tracker, left_frame, box)
- elif key == 27:
- break
- vs.release()
- cv2.destroyAllWindows()
Category of website: technical article > Blog
Author:Fiee
link:http://www.pythonblackhole.com/blog/article/80151/b0c90d97dd7fb928307a/
source:python black hole net
Please indicate the source for any form of reprinting. If any infringement is discovered, it will be held legally responsible.
name:
Comment content: (supports up to 255 characters)
no articles