
tensorflow detailed installation tutorial (Win10, Anaconda, Python3.9)
posted on 2023-05-07 20:58 read(272) comment(0) like(10) collect(2)
tensorflow detailed installation tutorial (Win10, Anaconda, Python3.9)
Article Directory
1. Preparations for the tensorflow version
The difference between the CPU version and the GPU version is mainly in the running speed, and the GPU version runs faster, so if the computer graphics card supports cuda, it is recommended to install the gpu version.
The operation is not complicated. At first I thought it would be troublesome to download so many things, and I didn't want to do it. But for the sake of speed, I finally tried to install it and found that it was not that difficult to do.
1.1 CPU version, no additional preparation required
The CPU version can be installed on general computers, and there is no need to prepare additional graphics card content.
1.2 GPU version, need to download cuda and cudnn in advance
According to the instructions on the webpage to install TensorFlow (juejin.im) on Windows , the following four conditions need to be met.
-
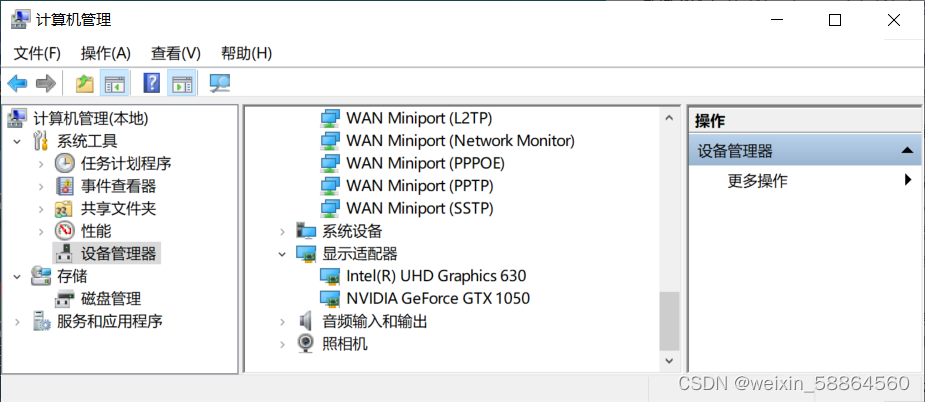
Check the graphics card of the computer, this computer → right click and select management → device manager → display adapter.
The core display UHD Graphics 630 and the independent display GeForce GTX 1050 mainly depend on the independent display GeForce GTX 1050.
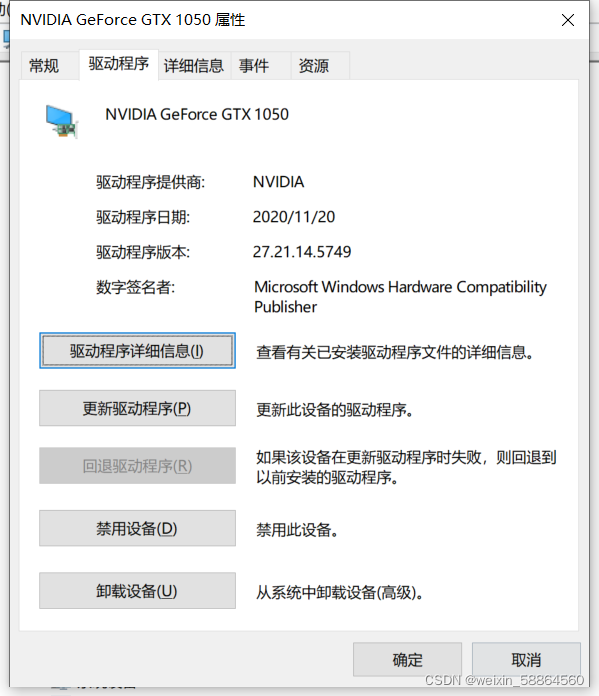
Select NVDIA GeForce GTX 1050, right-click and select Properties →Driver, you can see that the driver has been installed. One of four conditions is met.
-
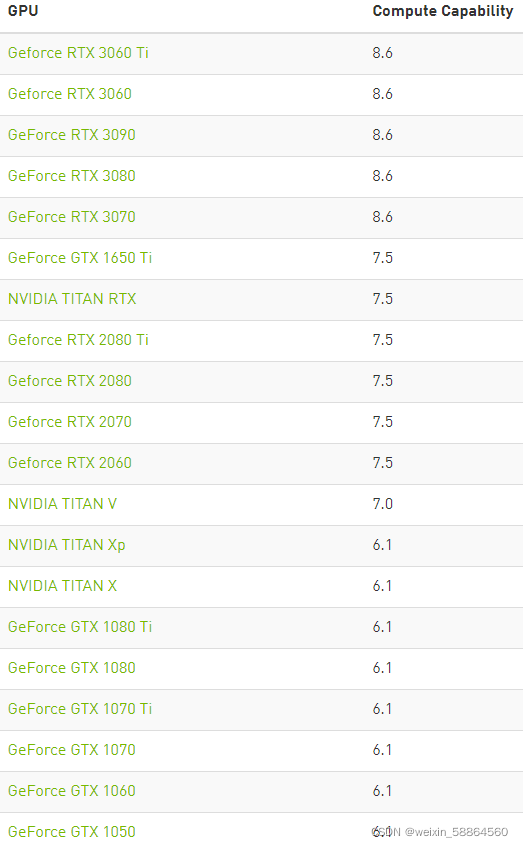
Check out CUDA Compute Capability at CUDA GPUs | NVIDIA Developer . Take a screenshot of some content, you can see that the Compute Capability of GeForce GTX 1050 is 6.1 to meet one of the four conditions.
-
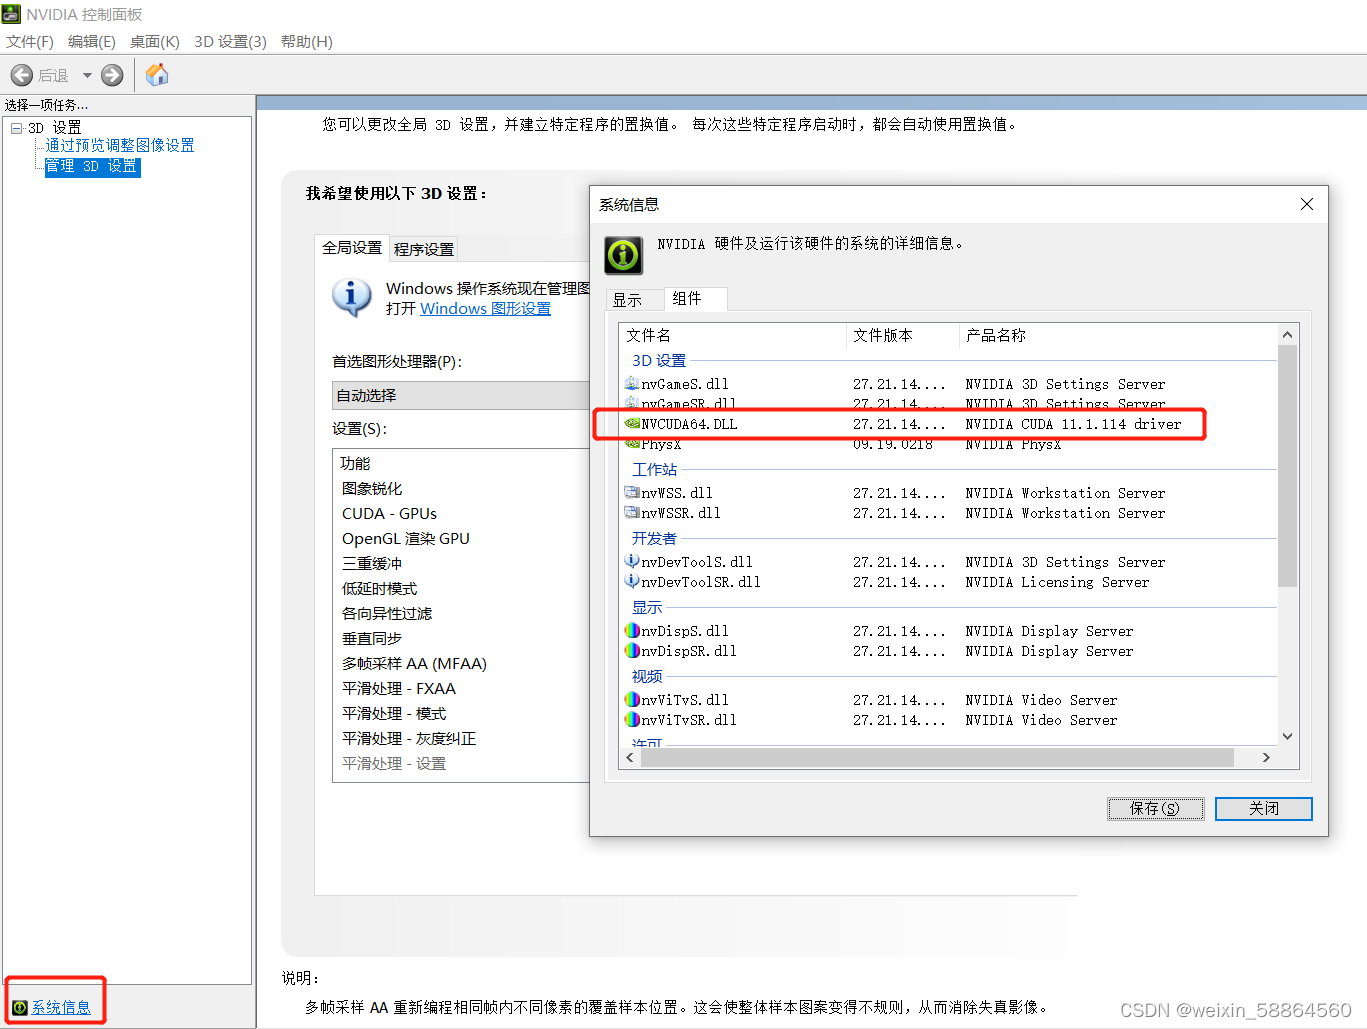
Check the CUDA version of the computer. Right click on the icon NVDIA Control Panel → System Information → Components, in the red box, you can see that the CUDA version is 11.1.
-
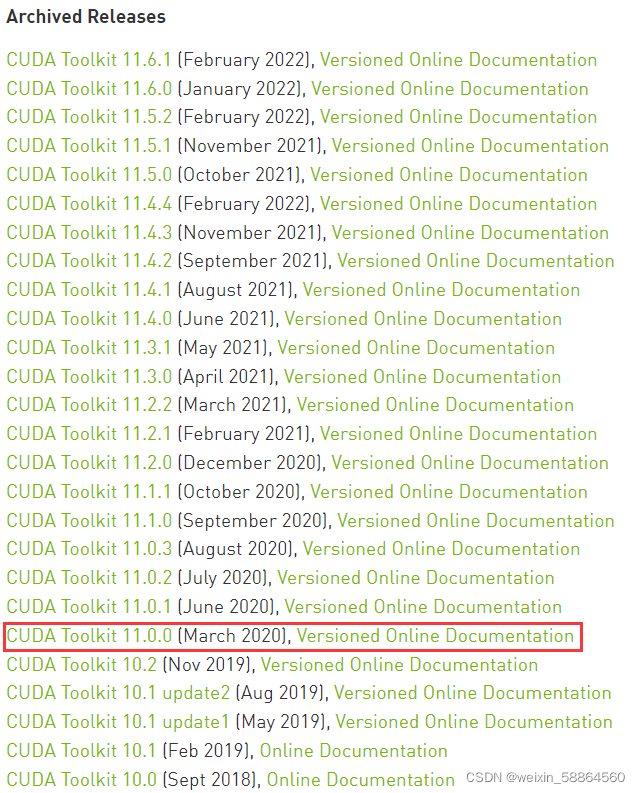
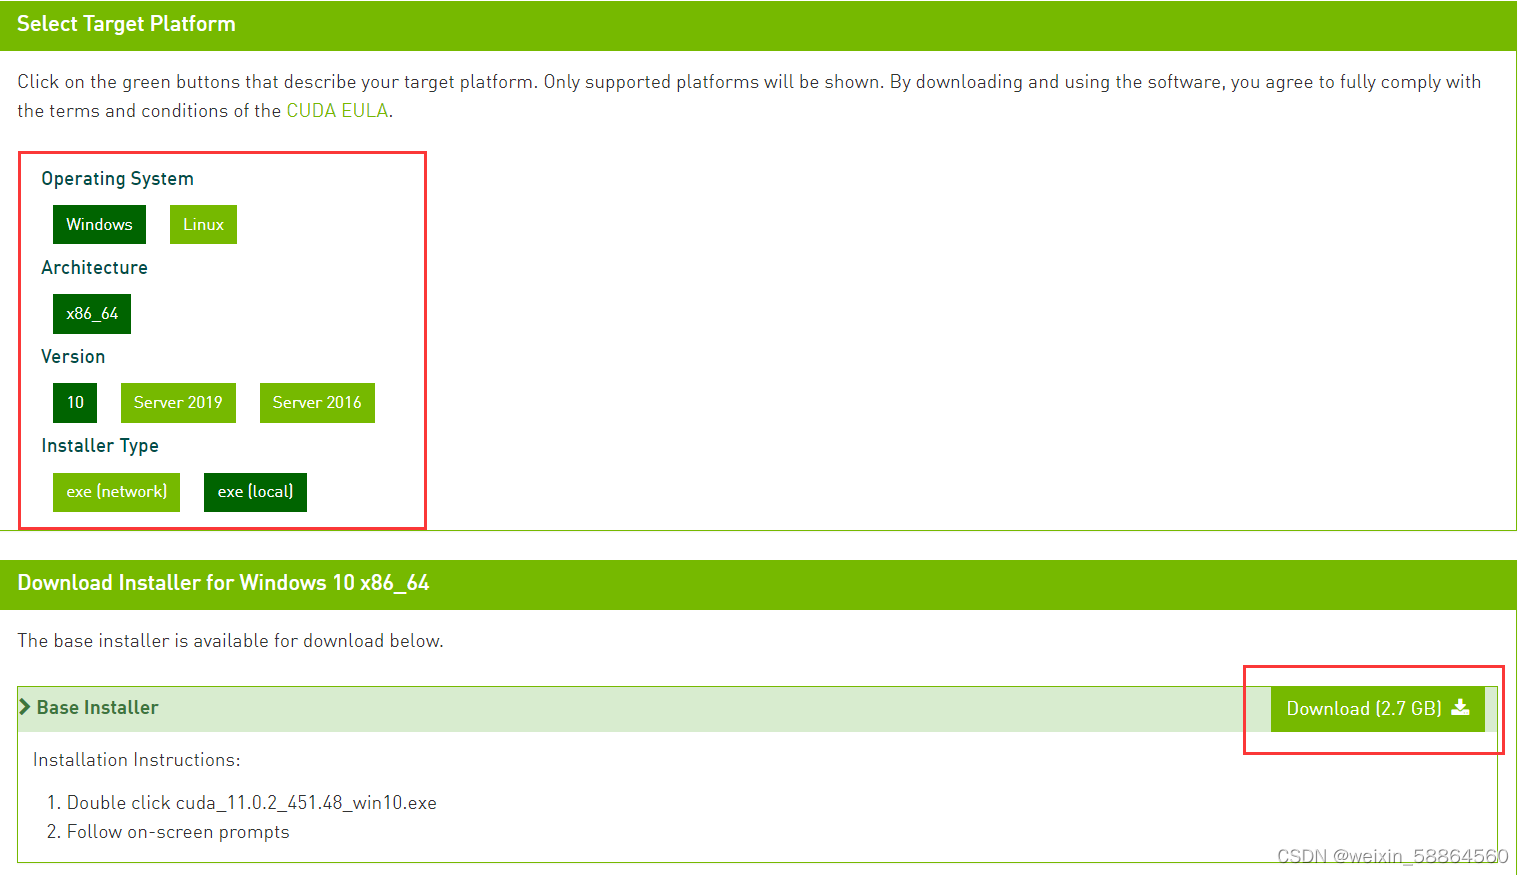
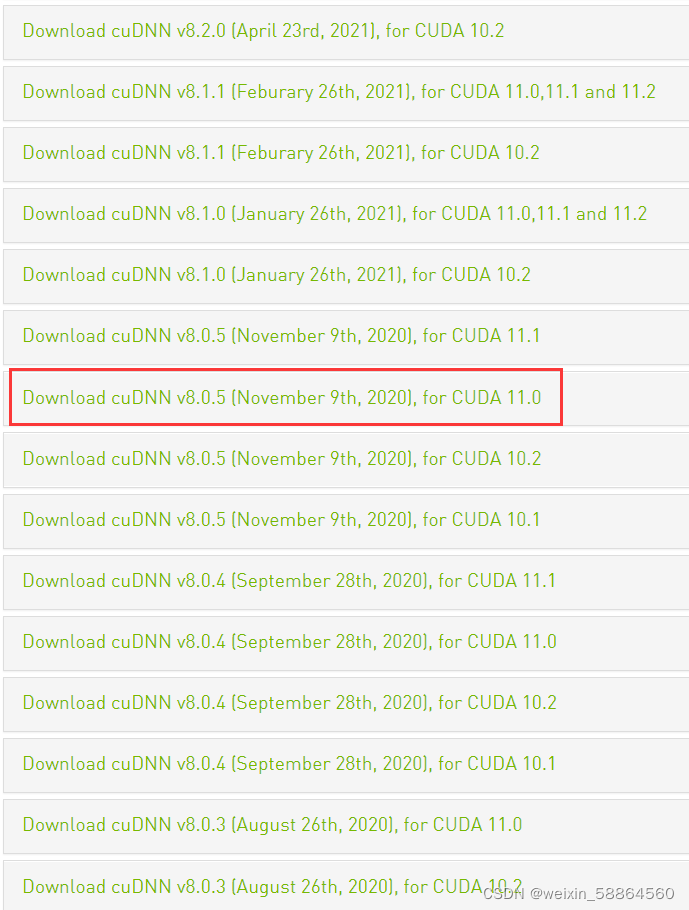
Download cuda and cudnn. Download the corresponding cuda and cudnn from the official website. The version can be lower than but not higher than the version supported by the computer. cuda download address: CUDA Toolkit Archive | NVIDIA Developer , cudnn download address: cuDNN Archive | NVIDIA Developer
I downloaded CUDA Toolkit 11.0.0, select the corresponding system, version and other options, and download the installation package.
Download the corresponding version of cuDNN. The choice here is cuDNN v8.0.5 for CUDA 11.0.
-
CUDA installation: select custom installation → default installation path → installation is complete
After the installation is complete, two system variables are generated by default.
View system variables: This computer→right click to select properties →advanced system settings→environment variables→system variables
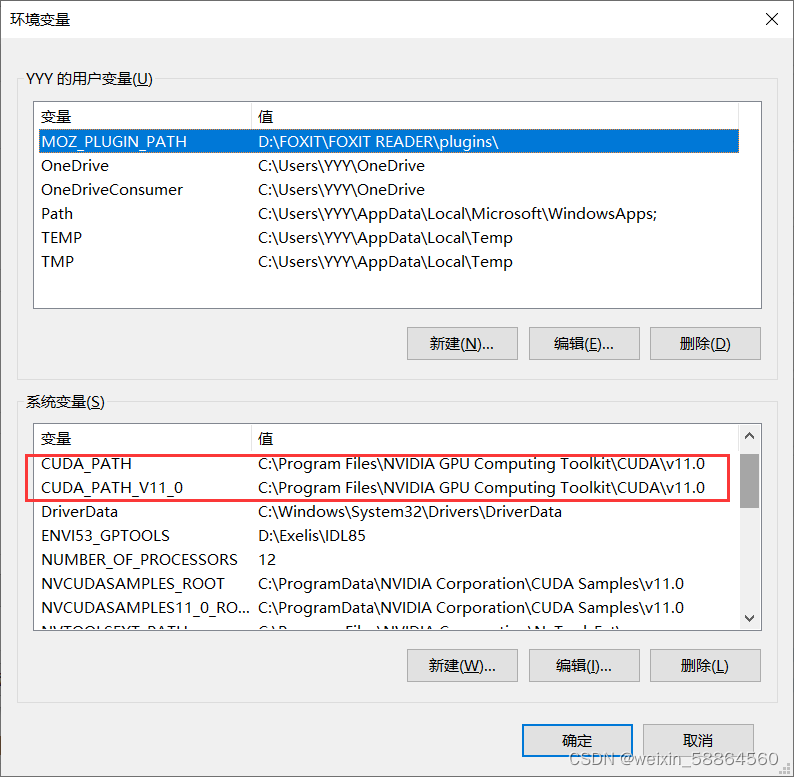
Here you can find the path in the system variables, then edit and add some paths, and finally there are four in total, and add additional paths if necessary in the future , can be added here.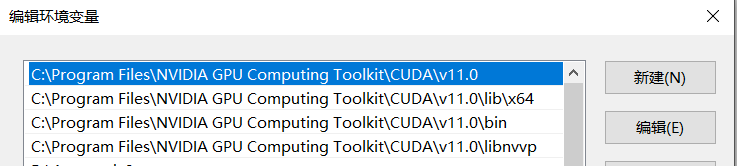
-
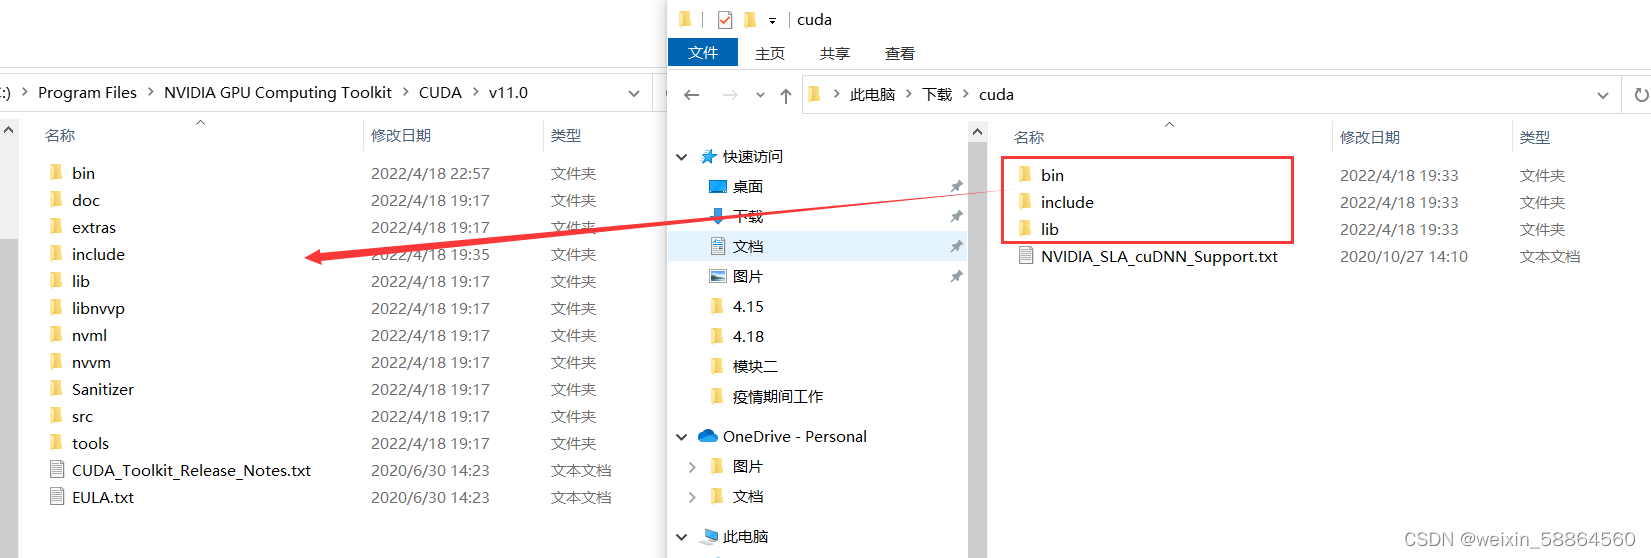
cuDNN installation: unzip → copy the three folders to the cuda installation directory, and just choose to overwrite the file.
After the installation is complete, test the cuda version.
Open cmd and enter the command:
nvcc -V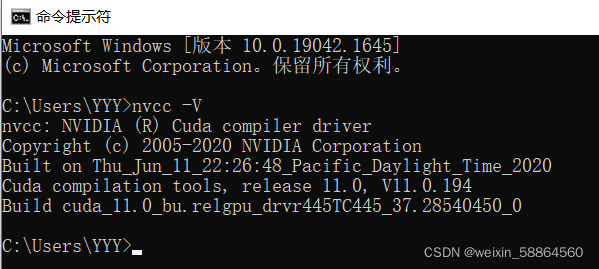
So far, the four conditions have been met.
2. Download Anaconda
2.1 Download and install Anaconda
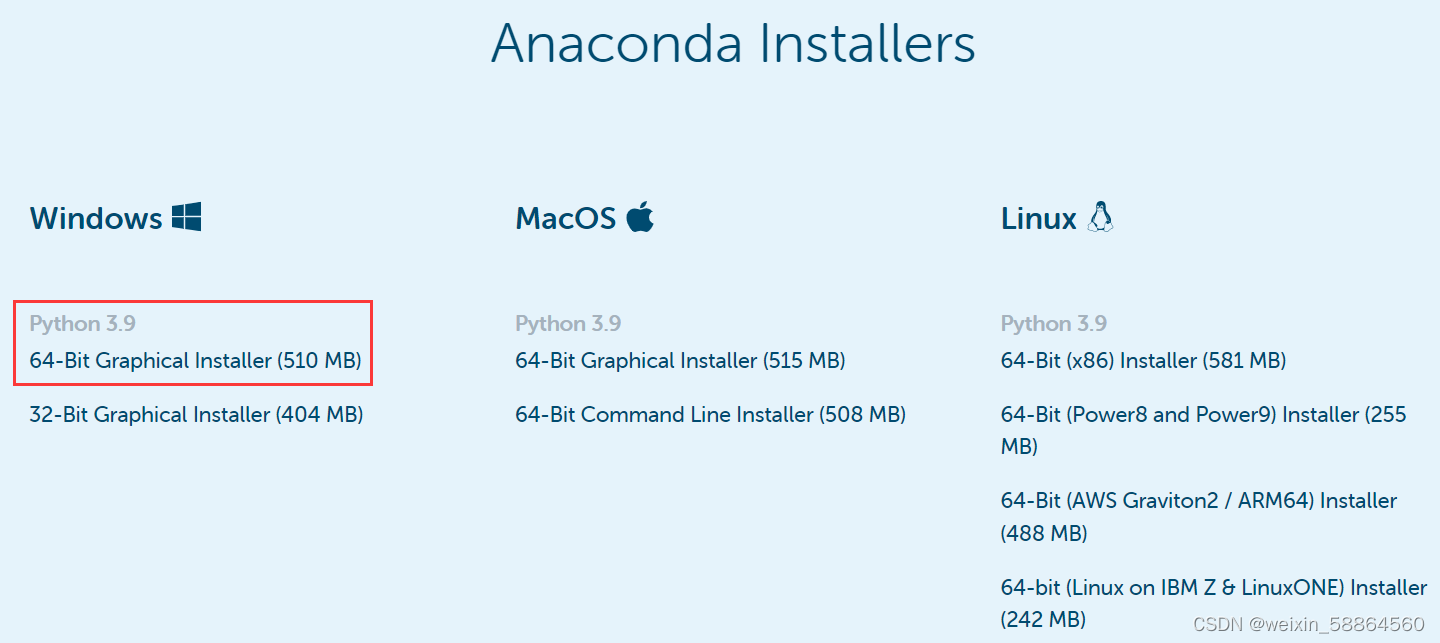
The download address is Anaconda | Anaconda Distribution , the version I installed is Python3.9, remember to choose to automatically configure environment variables during the installation process.
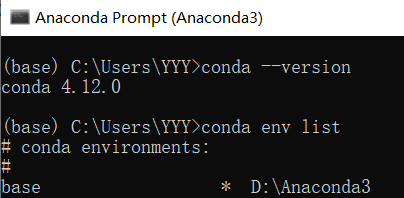
After the installation is complete, open Anaconda Prompt and enter the command:
conda --version查看安装的版本

conda env list查看已经安装的环境,右边“*”表示当前使用的环境
2.2 Create environment
-
To create a tensorflow environment, enter the command: conda create -n tensorflow python=3.9, which means to create an environment named tensorflow. The python version used in this environment is version 3.9

-
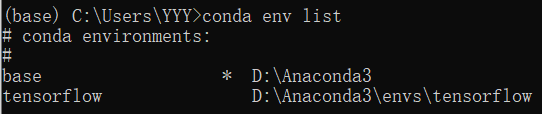
After the creation is successful, enter the command: conda env list, you can see that the tensorflow environment has been created, and the asterisk is the current environment (basic environment base).
-
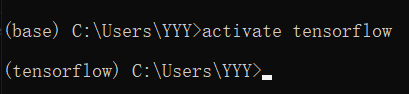
Enter the environment, enter the command: activate tensorflow, you can enter the tensorflow environment.
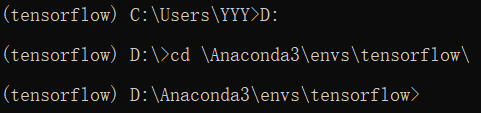
Because my conda environment is in the D drive, I changed the path as follows. If anaconda is installed in the default path, this step is not required.
-
Install the default version of tensorflow-cpu or tensorflow-gpu.
If cuda is not configured and the tensorflow-cpu version is installed, you can enter the command: pip install --ignore-installed --upgrade tensorflow

After configuring cuda and installing the tensorflow-gpu version, you can enter the command: pip install --ignore-installed --upgrade tensorflow-gpu
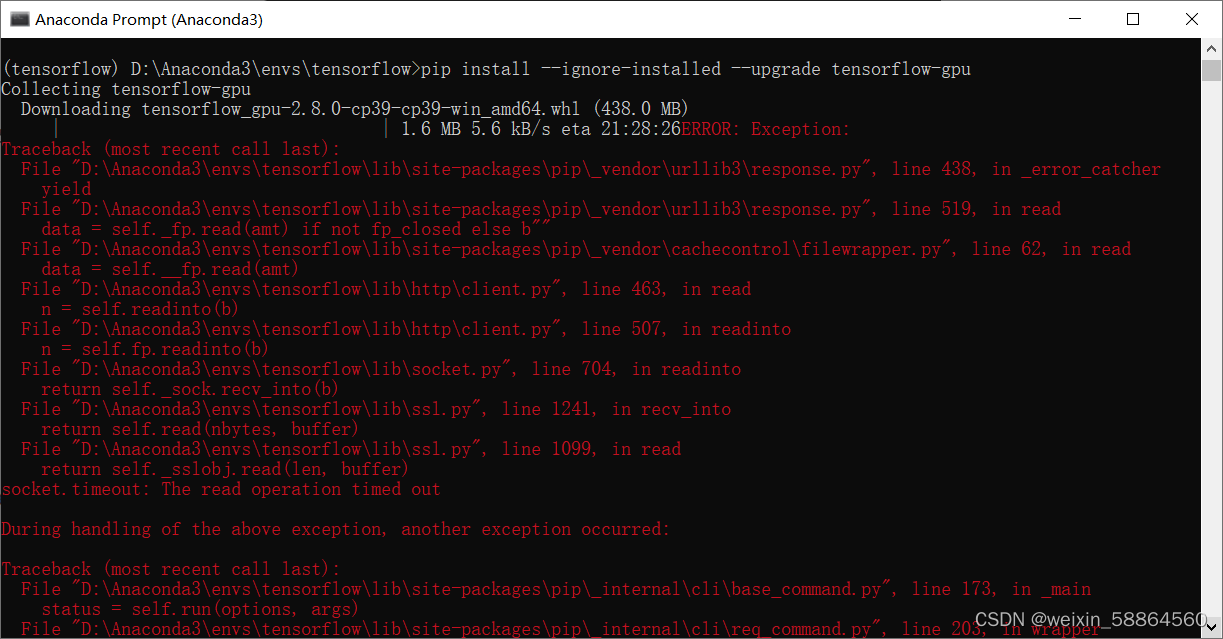
Then after downloading for a while, an error will be reported, which is the reason for the network speed.
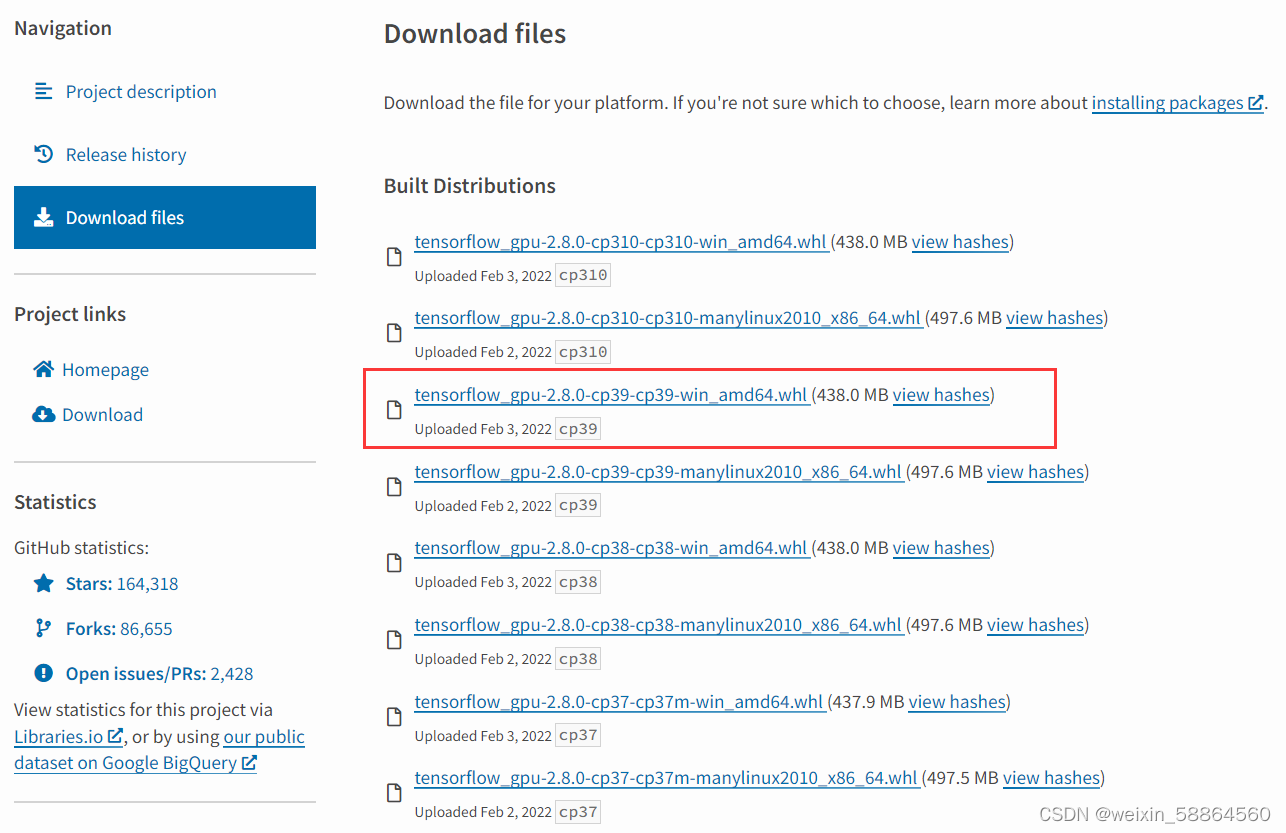
The solution is: find the file tensorflow_gpu-2.8.0-cp39-cp39-win_amd64.whl (438.0 MB).
登录https://pypi.org/,搜索tensorflow_gpu,点击要的包名称。
网址tensorflow-gpu · PyPI,下载文件到D:\Anaconda3\envs\tensorflow\这个目录下。
输入命令:pip install tensorflow_gpu-2.8.0-cp39-cp39-win_amd64.whl


这个时候又报错ERROR: Could not find a version that satisfies the requirement XXX
解决方法:直接选用pip源并且信任它的来源就可以解决这种问题
pip install 库包 -i http://pypi.douban.com/simple/ --trusted-host pypi.douban.com 这里将pip源换成清华源、阿里源等都适用。
-i https://pypi.tuna.tsinghua.edu.cn/simple

pip install tensorflow_gpu-2.8.0-cp39-cp39-win_amd64.whl -i http://pypi.douban.com/simple/ --trusted-host pypi.douban.com
归纳
1.pip install --ignore-installed --upgrade tensorflow-gpu
2.下载tensorflow_gpu-2.8.0-cp39-cp39-win_amd64.whl文件
3.pip install tensorflow_gpu-2.8.0-cp39-cp39-win_amd64.whl -i http://pypi.douban.com/simple/ --trusted-host pypi.douban.com
这样就可以安装成功了。
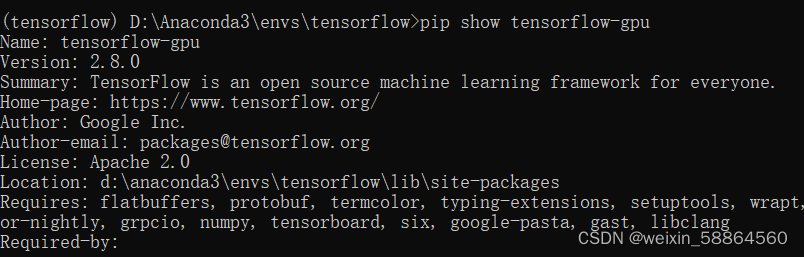
输入命令:pip show tensorflow-gpu,可以查看tensorflow的版本信息
-
退出环境:conda deactivate
3.测试tensorflow-gpu是否安装成功
-
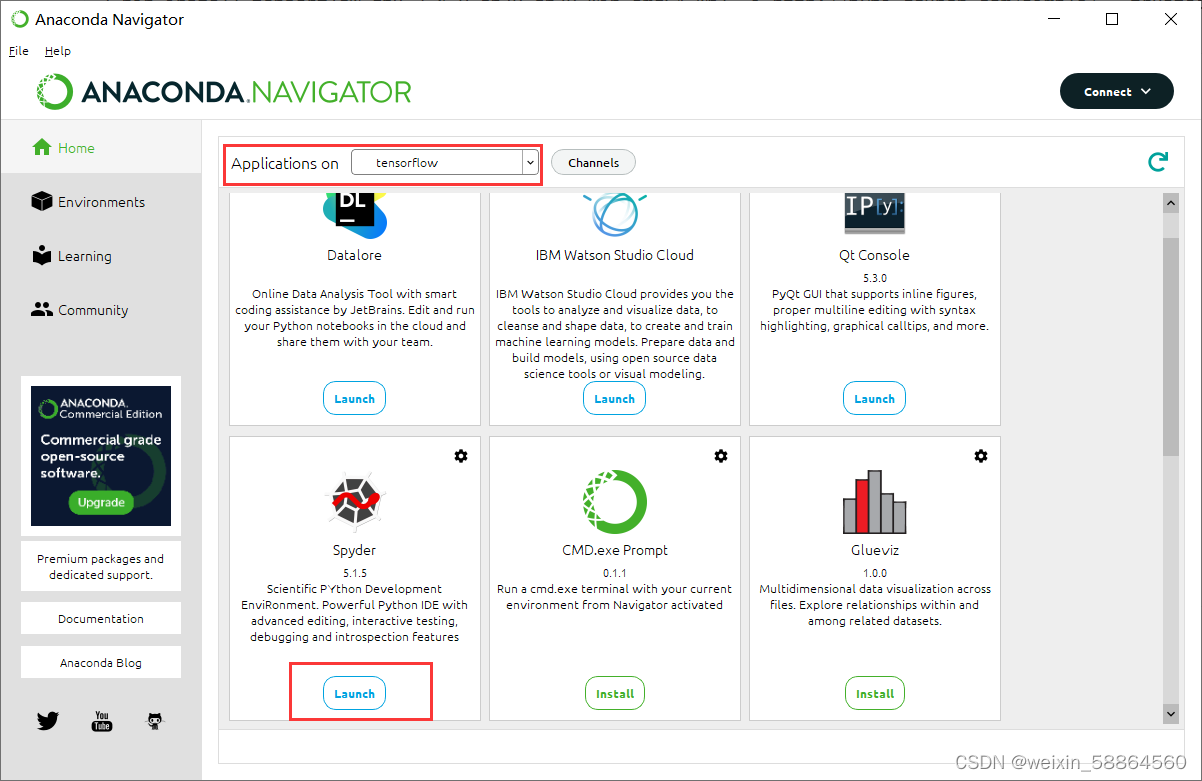
打开Anaconda,选择tensorflow环境,打开spyder,第一次打开需要安装Spyder,直接点下方的install即可。
-
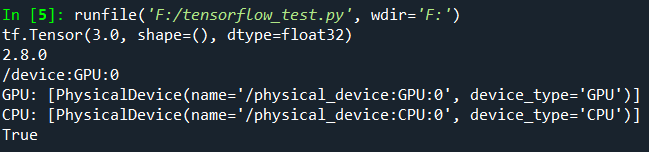
测试代码
import tensorflow as tf
a = tf.constant(1.)
b = tf.constant(2.)
print(a+b)
print(tf.__version__)
print(tf.test.gpu_device_name())
print('GPU:',tf.config.list_physical_devices(device_type='GPU'))
print('CPU:',tf.config.list_physical_devices(device_type='CPU'))
print(tf.test.is_gpu_available())
此时有个报错:
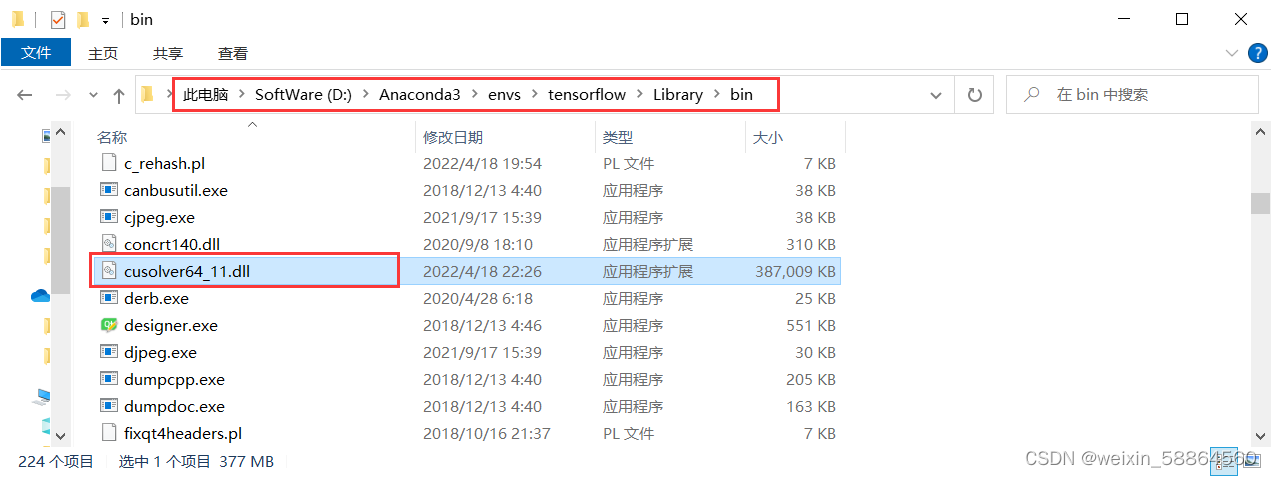
Could not load dynamic library ‘cusolver64_11.dll‘; dlerror: cusolver64_11.dll not found
解决办法:
链接:https://pan.baidu.com/s/1W9fR2N_hoVD-7_ODtOiJhg
提取码:u65i下载文件,把文件cusolver64_11.dll添加到创建的环境\Library\bin中
程序正常运行,输出结果
简单测试一下cpu和gpu运行速度的差别
import tensorflow as tf
import timeit
#指定在cpu上运行
def cpu_run():
    with tf.device('/cpu:0'):
        cpu_a = tf.random.normal([10000, 1000])
        cpu_b = tf.random.normal([1000, 2000])
        cpu_c = tf.matmul(cpu_a, cpu_b)
        # print( "cpu_a: ", cpu_a.device)
        # print( "cpu_b: ", cpu_b.device)
        # print("cpu_c:", cpu_c.device)
    return cpu_c

#指定在gpu上运行

def gpu_run():
    with tf.device( '/gpu:0'):
        gpu_a = tf.random. normal([ 10000,1000])
        gpu_b = tf.random. normal([ 1000, 2000])
        gpu_c = tf.matmul(gpu_a, gpu_b)
        # print( "gpu_a: ", gpu_a.device)
        # print("gpu_b: ", gpu_b.device)
        # print("gpu_c: ", gpu_c.device)
    return gpu_c

cpu_time = timeit.timeit(cpu_run, number = 10)
gpu_time = timeit.timeit(gpu_run, number = 10)
print('cpu:',cpu_time, 'gpu:',gpu_time)
运行速度差距很明显。

参考链接:
Install Anaconda/Python3.9/Tensorflow_Miska_Muska's Blog-CSDN Blog_anaconda install tensorflow
Install and run tensorflow_w_66666 blog in Anaconda - CSDN blog _anaconda how to install tensorflow
Anaconda under conda, pip install tensorflow-gpu_AnnnnnJie's Blog-CSDN Blog
Category of website: technical article > Blog
Author:Believesinkinto
link:http://www.pythonblackhole.com/blog/article/359/4c2012e52cd2f4d7b30c/
source:python black hole net
Please indicate the source for any form of reprinting. If any infringement is discovered, it will be held legally responsible.
name:
Comment content: (supports up to 255 characters)
no articles