Python Apex YOLO V5 6.2 目标检测 全过程记录
posted on 2023-05-07 20:12 read(616) comment(0) like(2) collect(0)
Article Directory
- Show results
- Project source code
- Environmental preparation
- The first stage uses the built-in model to achieve real-time object detection
- The second stage training model and simple try
- The third stage training shooting range dummy special detection model
- The main function code of the fourth stage
- mouse and keyboard monitoring
- Control mouse and keyboard
- For the main function code, see apex.py
- Part of the code description
- For details on FOV, see apex.fov.py (I think FOV is rather tasteless and has been abandoned)
- The relationship between mouse sensitivity, ADS mouse sensitivity bonus, FOV angle of view, and displacement pixels
- How to find the mouse physical horizontal movement pixel corresponding to the mouse jumping from the center to the enemy position
- How to measure the horizontal rotation of 360° in the game and the pixels corresponding to the horizontal movement of the mouse
- In-game mouse sensitivity vs. mouse movement
- About ADS mouse sensitivity bonus
- More precise control over the stability of the mouse design
- Kalman filter predicts target trajectory
- aiming effect
Show results
Effect display Python YOLO V5 real-time screenshot and target detection
Project source code
Environmental preparation
Windows Python PyCharm development environment to build
Windows Python PyTorch CUDA 11.7 TensorRT environment configuration
First create the development environment and virtual environment according to the above two articles, then download the source code of YOLO V5 6.2 or YOLO V5 7.0 (latest) , open it with PyCharm, and select the virtual environment just created
The first stage uses the built-in model to achieve real-time object detection
Screenshot encapsulation is detailed in the Capture class in toolkit.py
Screenshots can be roughly divided into GDI (CPU) screenshots and DXGI (GPU) screenshots. The former uses Win functions to complete screenshots, and the latter uses Dx related functions to complete screenshots
The two screenshot methods have different effects in different scenarios. It is necessary to test the scenario before deciding which method to use. Let’s use a simple CPU screenshot first.
There are two methods of CPU screenshot, Win32 screenshot and MSS screenshot, both of which are similar in efficiency, and the latter requires an additional installation of MSS library, so I recommend using Win32 screenshot
For target detection package details, see the Detector class in toolkit.py
In Yolo v5, detect.py is the official example of reasoning, from which we find the core code and encapsulate it as a public class
For details on real-time target detection, see detect.realtime.py
Effect display Python YOLO V5 real-time screenshot and target detection
Download the weight file yolov5s.pt and put it in the root directory of the project
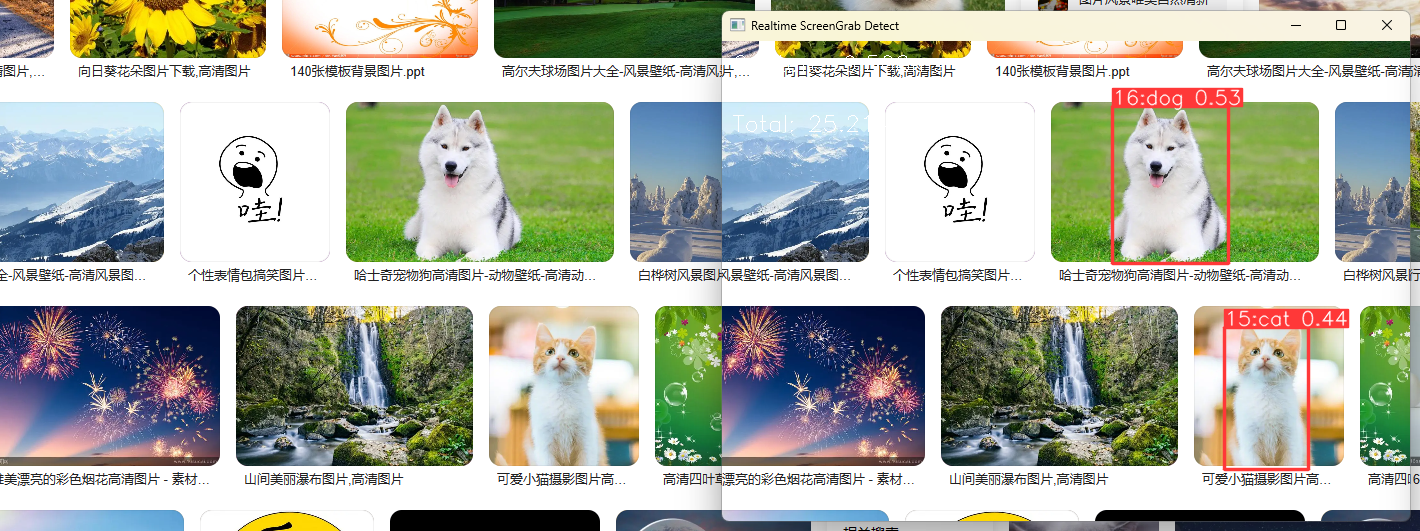
During the development process, you need to use opencv for real-time effect viewing. In PyCharm, if there are problems such as the cv2 method has no prompt/the source code cannot be clicked, you can do the following operations
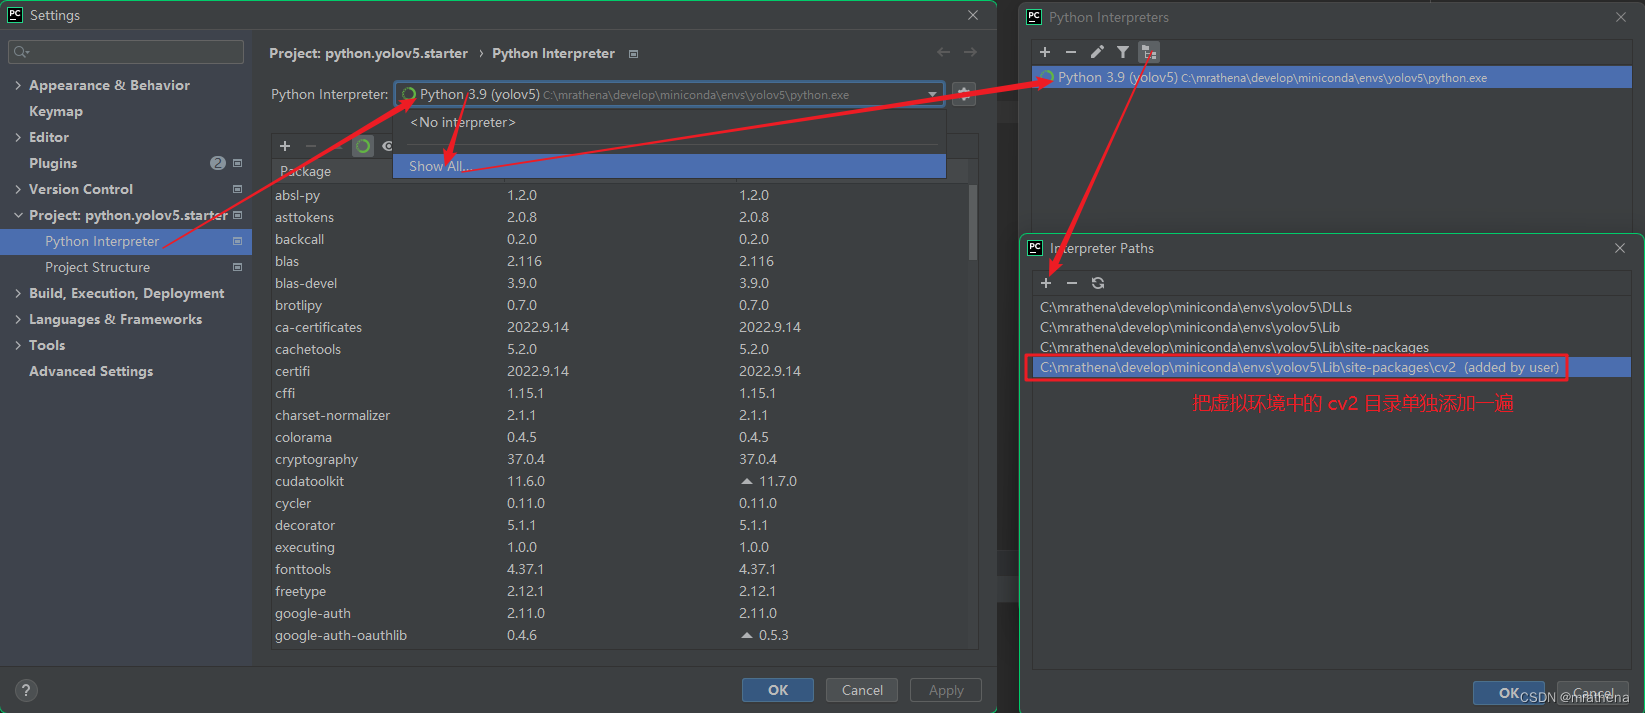
The second stage training model and simple try
Note: You don’t necessarily have to manually mark by yourself. There are many ways to plot, such as pure manual, semi-manual (use a certain model to detect and generate the corresponding plot txt file and then fine-tune), pseudo-real (generate data by splicing pictures), memory Fully automatic (read the memory to find the skeleton data), etc., the following is purely manual
labelimg
labelimg is a tool used to label objects during model training
Install labelimg in the virtual environment for labeling. After the installation is complete, the GUI interface labelimgwill open
pip install labelimg
Save DirIt is recommended to be the same as the image source path, which is more convenient
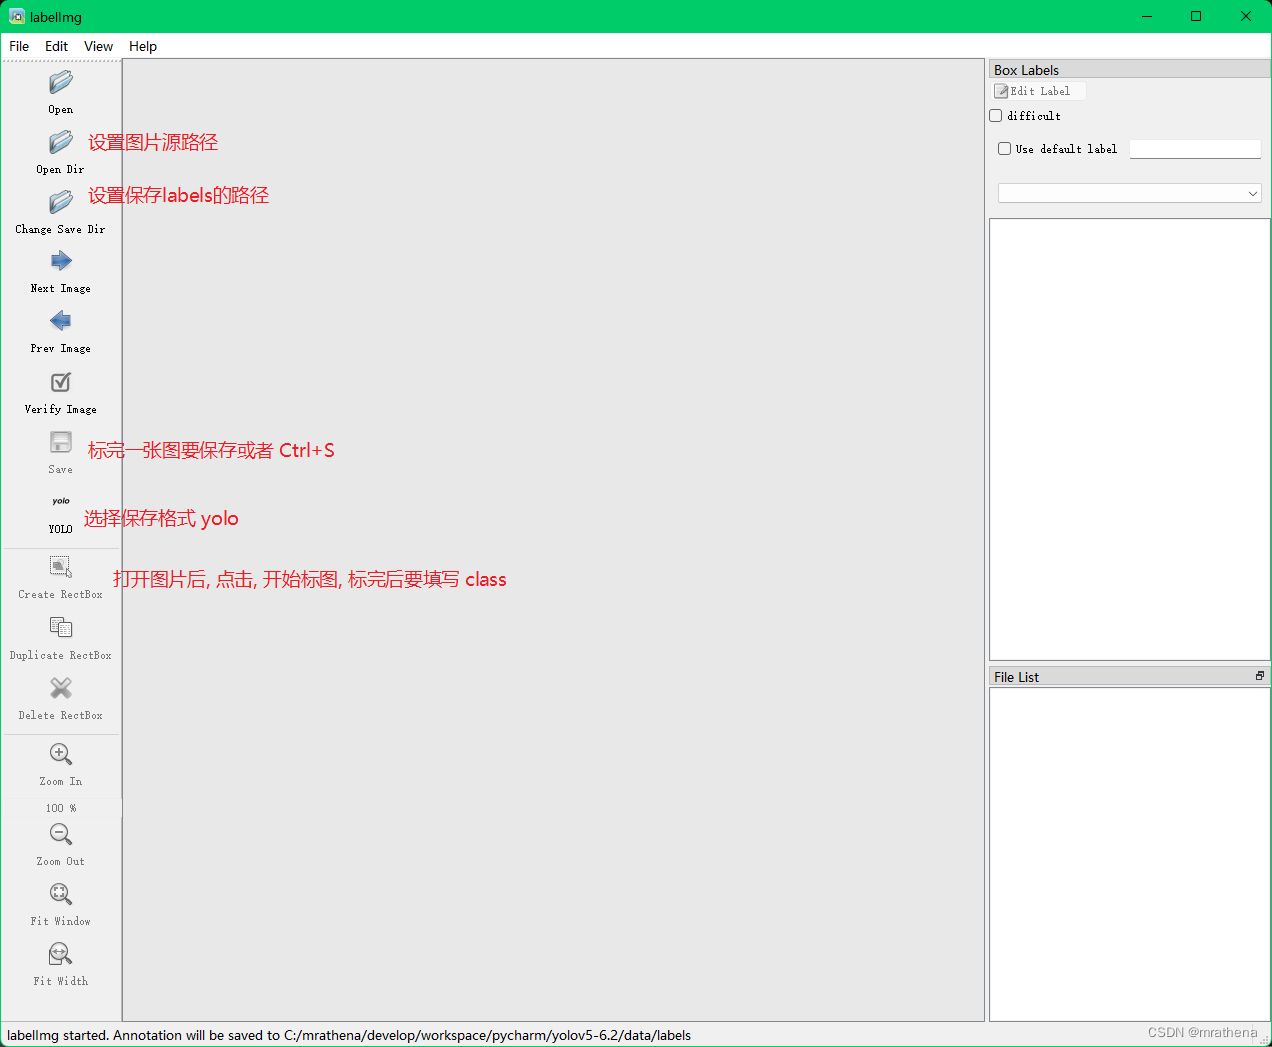
hot key
- W: Create a marked box
- A: The last picture
- D: the next picture
- Ctrl+S: Save the current plot
- Enter: After filling out the class, pressing Enter is equivalent to clicking OK
- I suggest writing a pynput program that detects that the F key is pressed, and triggers Enter and Ctrl+S, so that customizing a shortcut key can save a lot of work
Tried it, didn't work, damn, failed in some inexplicable place
from pynput.keyboard import Key, Controller, Listener, KeyCode
import winsound


def listener():

    keyboard = Controller

    def release(key):
        if key == Key.end:
            winsound.Beep(400, 200)
            return False
        elif key == KeyCode.from_char('s'):
            keyboard.press(Key.enter)
            keyboard.release(Key.enter)
            with keyboard.pressed(Key.ctrl_l):
                keyboard.press('s')
                keyboard.release('s')

    with Listener(on_release=release) as k:
        k.join()


listener()
TypeError: press() missing 1 required positional argument: 'key'
Create a dataset folder, my dataset directory is D:\resource\develop\python\dataset.yolo.v5, this training set is called test, so create a new test directory under the dataset
Create data/images as the original image library under test, and create data/labels as the label information library
Then set the reading path and saving path in labelimg, and start marking
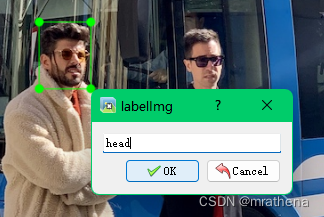
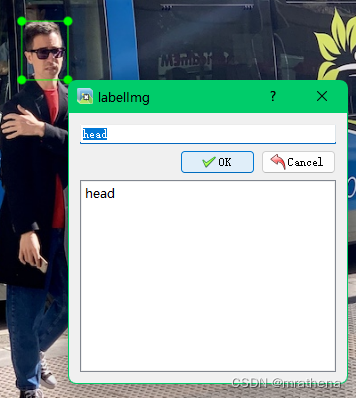

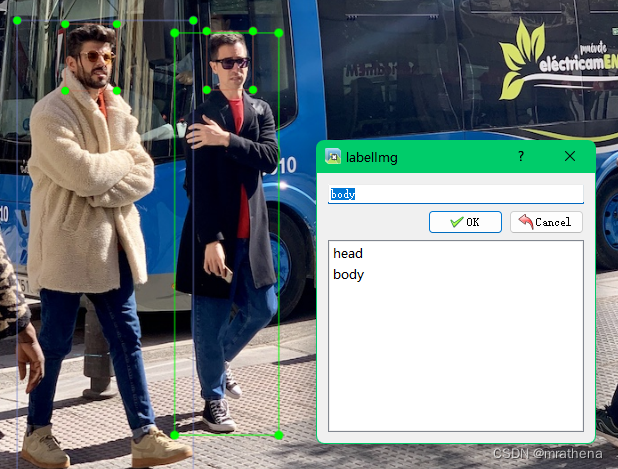
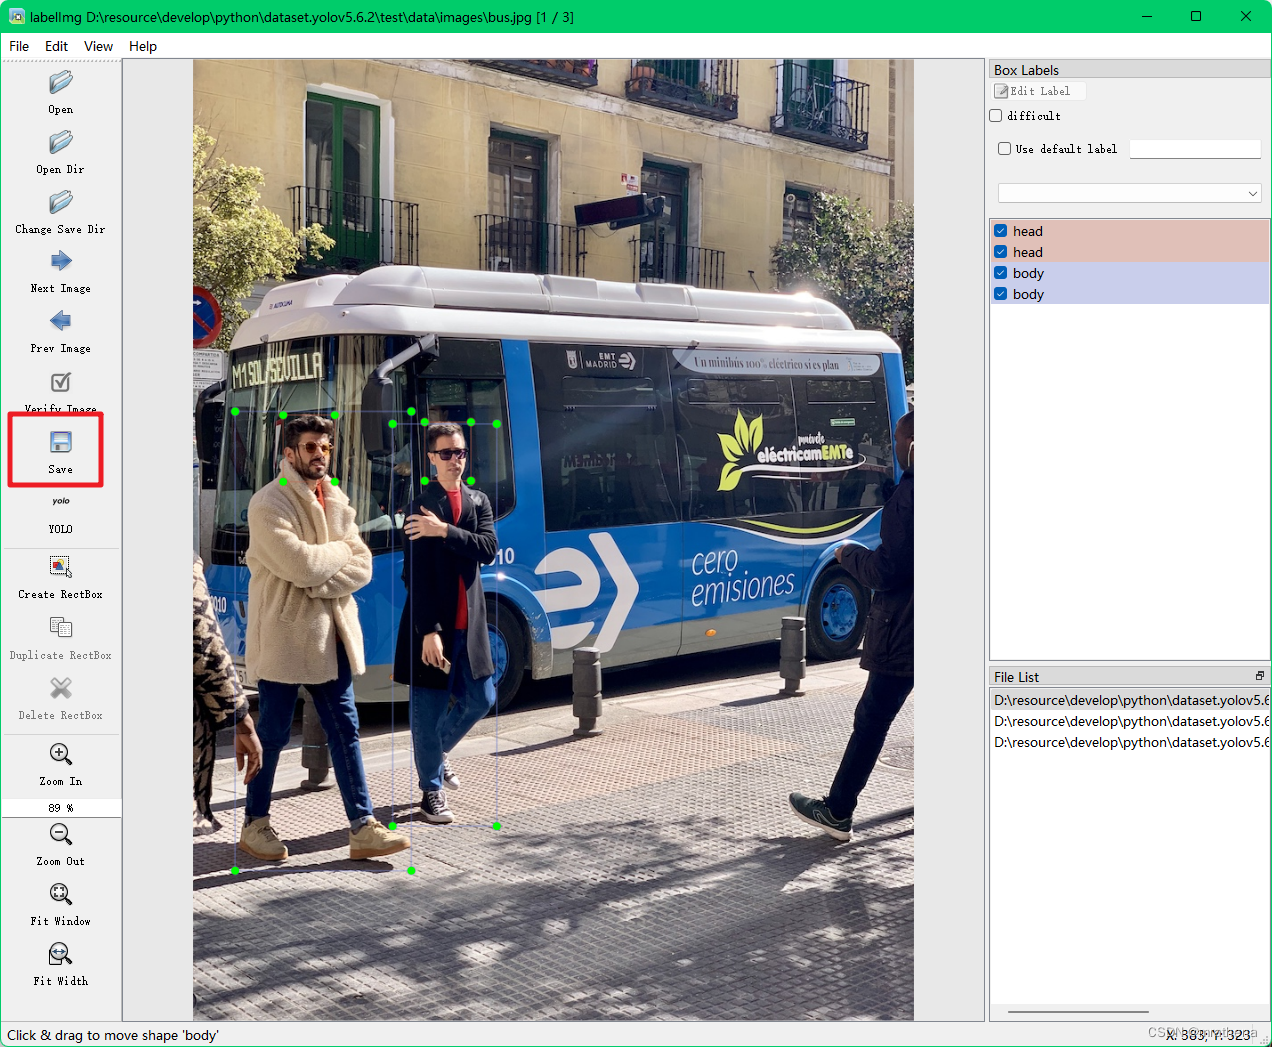
a picture. After marking a picture, remember to save it. The classes.txt file and the label file corresponding to the picture will be automatically generated in the data/labels directory, such as bus.txt

. The other pictures are also marked. The following is the correspondence between the pictures and the marks. Note that it is best not to have Chinese in the picture, just in case
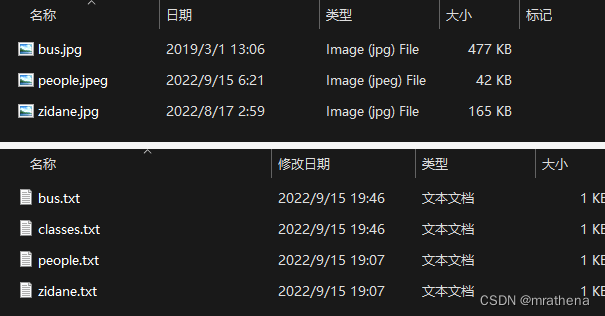
classes.txt and markup file description
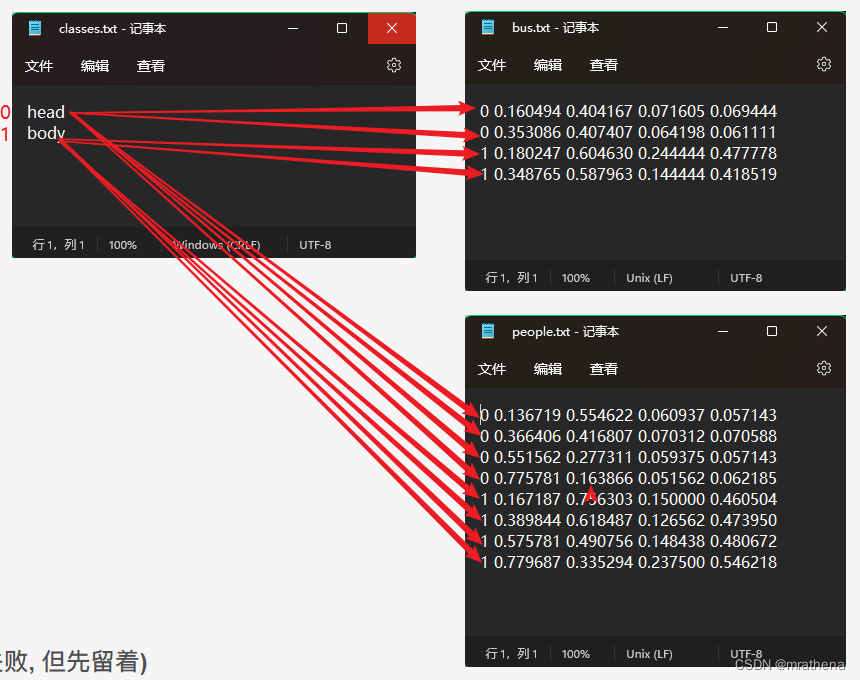
classes.txt is the two categories that are separated when marking, here one is the head and the other is the body, the serial number starts from 0, from top to bottom
One line in the tag file represents a tag on the image, and several lines are several tags
There are 5 data in each line in the tag file, the first is the category index, and the last 4 are normalized (regard the length and width as 1, and the other points are proportionally reduced) xCenter, yCenter, width, height
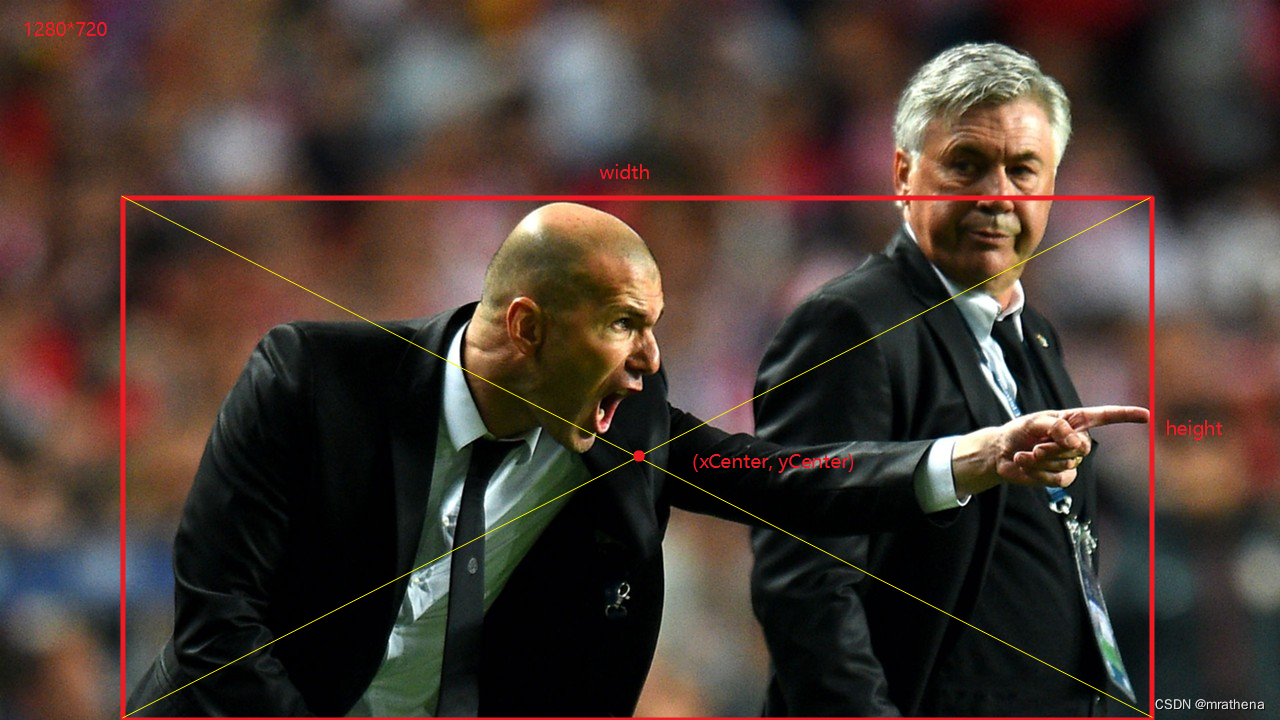
simple try
Write a dataset configuration file
Copy the coco128.yaml under the project and change its name to dataset.for.me.test.yaml and modify the content
path: D:\resource\develop\python\dataset.yolo.v5\test
train: data/images  # train images (relative to 'path') 128 images
val: data/labels  # val images (relative to 'path') 128 images

# Classes
nc: 2  # number of classes
names: ['head', 'body']  # class names
- path: the root directory of the dataset
- train: source image directory (based on the path directory)
- val:
- nc: number of labeled categories
- names:
标记的类别, classes.txt 文件从上到下按顺序一个个写过来, 必须完全一致
Write training file parameters
Copy the train.py under the project and rename it to train.for.me.test.py and modify the content of parse_opt
- –weights: ROOT / 'yolov5s.pt'. You can choose whether to train based on a certain model, and the new training is default=''
- –data: data/dataset.for.me.test.yaml
- –batch-size: In GPU mode, take so many parameters to run each time, if an error is reported, you can change it to a smaller point
- –project: default='D:\resource\develop\python\dataset.yolo.v5\test\runs/train', where the training results are saved
run training file
run error
OMP: Error #15: Initializing libiomp5md.dll, but found libiomp5md.dll already initialized.
OMP: Hint This means that multiple copies of the OpenMP runtime have been linked into the program. That is dangerous, since it can degrade performance or cause incorrect results. The best thing to do is to ensure that only a single OpenMP runtime is linked into the process, e.g. by avoiding static linking of the OpenMP runtime in any library. As an unsafe, unsupported, undocumented workaround you can set the environment variable KMP_DUPLICATE_LIB_OK=TRUE to allow the program to continue to execute, but that may cause crashes or silently produce incorrect results. For more information, please see http://www.intel.com/software/products/support/.

The search found that there are two under miniconda, and three under others, and the others should not be affected, but why there are two under moniconda, I don’t know, how to deal with it, I don’t know, but I think, don’t mess around if you don’t know , so just try it in the way it says it is not recommended
import os
os.environ['KMP_DUPLICATE_LIB_OK']='True'
If run error
RuntimeError: DataLoader worker (pid(s) 20496) exited unexpectedly
--workersChange the start parameter to 0 and try, the reason is that I don’t know and can’t read or understand
operation result
C:\mrathena\develop\miniconda\envs\yolov5\python.exe C:/mrathena/develop/workspace/pycharm/yolov5-6.2/train.for.me.test.py
train.for.me.test: weights=yolov5s.pt, cfg=, data=data\dataset.for.me.test.yaml, hyp=data\hyps\hyp.scratch-low.yaml, epochs=300, batch_size=16, imgsz=640, rect=False, resume=False, nosave=False, noval=False, noautoanchor=False, noplots=False, evolve=None, bucket=, cache=None, image_weights=False, device=, multi_scale=False, single_cls=False, optimizer=SGD, sync_bn=False, workers=8, project=D:\resource\develop\python\dataset.yolov5.6.2\test\runs/train, name=exp, exist_ok=False, quad=False, cos_lr=False, label_smoothing=0.0, patience=100, freeze=[0], save_period=-1, seed=0, local_rank=-1, entity=None, upload_dataset=False, bbox_interval=-1, artifact_alias=latest
github:  YOLOv5 is out of date by 2326 commits. Use `git pull ultralytics master` or `git clone https://github.com/ultralytics/yolov5` to update.
YOLOv5  b899afe Python-3.9.13 torch-1.12.1 CUDA:0 (NVIDIA GeForce RTX 2080, 8192MiB)

hyperparameters: lr0=0.01, lrf=0.01, momentum=0.937, weight_decay=0.0005, warmup_epochs=3.0, warmup_momentum=0.8, warmup_bias_lr=0.1, box=0.05, cls=0.5, cls_pw=1.0, obj=1.0, obj_pw=1.0, iou_t=0.2, anchor_t=4.0, fl_gamma=0.0, hsv_h=0.015, hsv_s=0.7, hsv_v=0.4, degrees=0.0, translate=0.1, scale=0.5, shear=0.0, perspective=0.0, flipud=0.0, fliplr=0.5, mosaic=1.0, mixup=0.0, copy_paste=0.0
Weights & Biases: run 'pip install wandb' to automatically track and visualize YOLOv5  runs in Weights & Biases
ClearML: run 'pip install clearml' to automatically track, visualize and remotely train YOLOv5  in ClearML
TensorBoard: Start with 'tensorboard --logdir D:\resource\develop\python\dataset.yolov5.6.2\test\runs\train', view at http://localhost:6006/
Overriding model.yaml nc=80 with nc=2

                 from  n    params  module                                  arguments
  0                -1  1      3520  models.common.Conv                      [3, 32, 6, 2, 2]
  1                -1  1     18560  models.common.Conv                      [32, 64, 3, 2]
  2                -1  1     18816  models.common.C3                        [64, 64, 1]
  3                -1  1     73984  models.common.Conv                      [64, 128, 3, 2]
  4                -1  2    115712  models.common.C3                        [128, 128, 2]
  5                -1  1    295424  models.common.Conv                      [128, 256, 3, 2]
  6                -1  3    625152  models.common.C3                        [256, 256, 3]
  7                -1  1   1180672  models.common.Conv                      [256, 512, 3, 2]
  8                -1  1   1182720  models.common.C3                        [512, 512, 1]
  9                -1  1    656896  models.common.SPPF                      [512, 512, 5]
 10                -1  1    131584  models.common.Conv                      [512, 256, 1, 1]
 11                -1  1         0  torch.nn.modules.upsampling.Upsample    [None, 2, 'nearest']
 12           [-1, 6]  1         0  models.common.Concat                    [1]
 13                -1  1    361984  models.common.C3                        [512, 256, 1, False]
 14                -1  1     33024  models.common.Conv                      [256, 128, 1, 1]
 15                -1  1         0  torch.nn.modules.upsampling.Upsample    [None, 2, 'nearest']
 16           [-1, 4]  1         0  models.common.Concat                    [1]
 17                -1  1     90880  models.common.C3                        [256, 128, 1, False]
 18                -1  1    147712  models.common.Conv                      [128, 128, 3, 2]
 19          [-1, 14]  1         0  models.common.Concat                    [1]
 20                -1  1    296448  models.common.C3                        [256, 256, 1, False]
 21                -1  1    590336  models.common.Conv                      [256, 256, 3, 2]
 22          [-1, 10]  1         0  models.common.Concat                    [1]
 23                -1  1   1182720  models.common.C3                        [512, 512, 1, False]
 24      [17, 20, 23]  1     18879  models.yolo.Detect                      [2, [[10, 13, 16, 30, 33, 23], [30, 61, 62, 45, 59, 119], [116, 90, 156, 198, 373, 326]], [128, 256, 512]]
Model summary: 270 layers, 7025023 parameters, 7025023 gradients, 16.0 GFLOPs

Transferred 343/349 items from yolov5s.pt
AMP: checks passed
optimizer: SGD(lr=0.01) with parameter groups 57 weight(decay=0.0), 60 weight(decay=0.0005), 60 bias
train: Scanning 'D:\resource\develop\python\dataset.yolov5.6.2\test\data\labels.cache' images and labels... 3 found, 0 missing, 0 empty, 0 corrupt: 100%|██████████| 3/3 [00:00<?, ?it/s]
val: Scanning 'D:\resource\develop\python\dataset.yolov5.6.2\test\data\labels.cache' images and labels... 3 found, 0 missing, 0 empty, 0 corrupt: 100%|██████████| 3/3 [00:00<?, ?it/s]
Plotting labels to D:\resource\develop\python\dataset.yolov5.6.2\test\runs\train\exp\labels.jpg...

AutoAnchor: 4.94 anchors/target, 1.000 Best Possible Recall (BPR). Current anchors are a good fit to dataset
Image sizes 640 train, 640 val
Using 3 dataloader workers
Logging results to D:\resource\develop\python\dataset.yolov5.6.2\test\runs\train\exp
Starting training for 300 epochs...

     Epoch   gpu_mem       box       obj       cls    labels  img_size
     0/299    0.621G    0.1239   0.05093    0.0282        24       640: 100%|██████████| 1/1 [00:02<00:00,  2.47s/it]
               Class     Images     Labels          P          R     mAP@.5 mAP@.5:.95: 100%|██████████| 1/1 [00:00<00:00,  6.26it/s]
                 all          3         16    0.00131     0.0625    0.00074    0.00037

     Epoch   gpu_mem       box       obj       cls    labels  img_size
     1/299    0.774G    0.1243   0.04956   0.02861        22       640: 100%|██████████| 1/1 [00:00<00:00,  5.85it/s]
               Class     Images     Labels          P          R     mAP@.5 mAP@.5:.95: 100%|██████████| 1/1 [00:00<00:00,  6.07it/s]
                 all          3         16    0.00342      0.188    0.00261    0.00032

...
...
...

     Epoch   gpu_mem       box       obj       cls    labels  img_size
   298/299     0.83G   0.04905   0.04686  0.006326        26       640: 100%|██████████| 1/1 [00:00<00:00,  8.85it/s]
               Class     Images     Labels          P          R     mAP@.5 mAP@.5:.95: 100%|██████████| 1/1 [00:00<00:00, 12.50it/s]
                 all          3         16      0.942      0.956      0.981      0.603

     Epoch   gpu_mem       box       obj       cls    labels  img_size
   299/299     0.83G   0.05362   0.05724   0.01014        39       640: 100%|██████████| 1/1 [00:00<00:00,  4.93it/s]
               Class     Images     Labels          P          R     mAP@.5 mAP@.5:.95: 100%|██████████| 1/1 [00:00<00:00, 12.50it/s]
                 all          3         16      0.942      0.951      0.981      0.631

300 epochs completed in 0.054 hours.
Optimizer stripped from D:\resource\develop\python\dataset.yolov5.6.2\test\runs\train\exp\weights\last.pt, 14.5MB
Optimizer stripped from D:\resource\develop\python\dataset.yolov5.6.2\test\runs\train\exp\weights\best.pt, 14.5MB

Validating D:\resource\develop\python\dataset.yolov5.6.2\test\runs\train\exp\weights\best.pt...
Fusing layers...
Model summary: 213 layers, 7015519 parameters, 0 gradients, 15.8 GFLOPs
               Class     Images     Labels          P          R     mAP@.5 mAP@.5:.95: 100%|██████████| 1/1 [00:00<00:00,  9.34it/s]
                 all          3         16      0.942      0.952      0.981      0.624
                head          3          8      0.884       0.96      0.967      0.504
                body          3          8          1      0.945      0.995      0.743
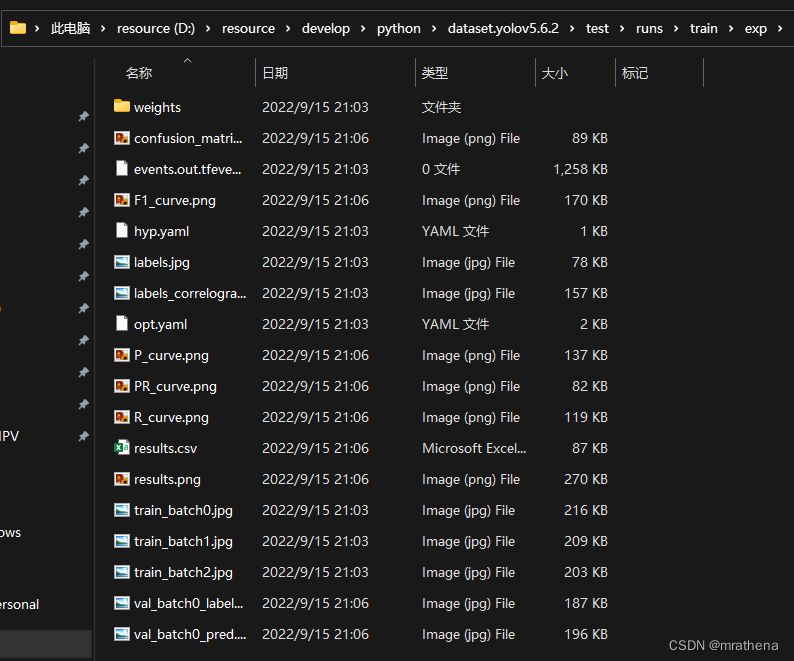
Results saved to D:\resource\develop\python\dataset.yolov5.6.2\test\runs\train\exp

测试训练结果
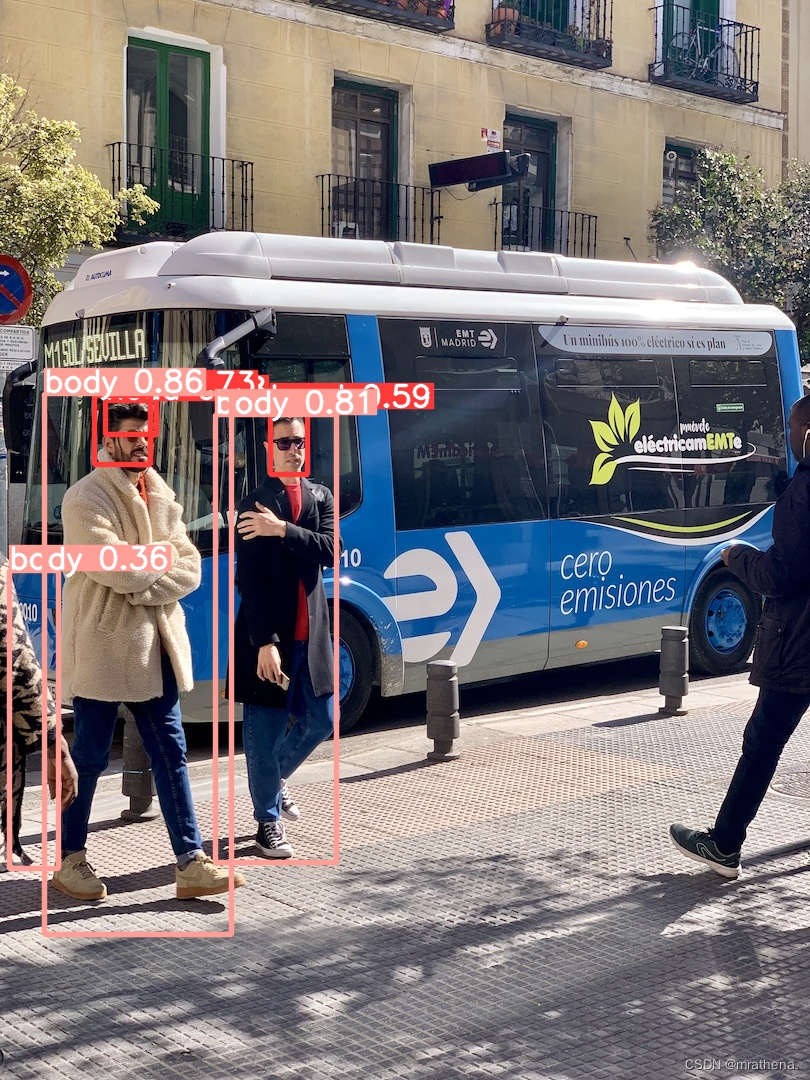
weights 里面的 best.pt 就是本次训练出来的模型了, 测试一下
拷贝项目中的 detect.py 为 detect.for.me.test.py, 修改部分参数, 运行查看效果
- –weights: ‘D:\resource\develop\python\dataset.yolo.v5\test\runs\train\exp\weights\best.pt’
训练有效果
如何取得最好的训练效果
官方推荐, 先使用默认参数来一轮训练, 通常这样就已经能够获得比较好的效果了. 如果效果不太好, 再尝试修改部分参数
对数据集的要求如下
- 每种类型的图片要超过1500张 (如: 至少有1500张图片中包含head)
- 每种类型标记出来的实例要超过10000个 (如: 1500张图片中包含head, 但是标记的head总数要达到10000个)
- 图片要足够多样 (如: 对于现实世界的用例,我们推荐来自一天中不同时间、不同季节、不同天气、不同照明、不同角度、不同来源(在线抓取、本地收集、不同相机)等的图像。)
- 必须标记所有图像中所有类的所有实例, 部分标记将不起作用 (每张图片中的所有目标必须全部标出来, 少了会影响效果)
- 标签必须紧紧地包围每个对象, 对象与其边界框之间不应存在空间 (标记要准确, 不要多了, 也不要少了)
- 最好是搞一些背景图片和目标对象在一起的图片一起训练(没有也没关系), 背景图像是没有添加到数据集以减少误报 (FP) 的对象的图像。我猜测类似路边广告牌上的人的照片, 用于让模型能识别真人假人
对参数的一些解释
- 训练次数, 300次, 如果不到300次就达到了拟合(我猜是效果较好的一种状态, 再训练也不会有明显提升了), 可以适当减小, 反之则翻倍增加
- 图片尺寸, 默认是用640训练的, 如果图片中有太多的小目标, 可以尝试使用1280的, 对小目标可能会更友好, 效果可能会更好
- 批量大小, 使用硬件允许的最大 --batch-size. 小批量会产生较差的批量标准统计数据, 应避免使用(没明白, 反正尽量最大就是了)
- 超参数, 先使用默认超参数训练, …
第三阶段 训练射击场假人专用检测模型
训练规划
针对假人在各种情况下的截图做标记与训练
类别标签只设 body 即可, 因为 head 不容易检测, 且根据 body 可推测 head 位置 (注: 初期我用的是 body 和 head 两个标签)
训练距离, 5-50米, 再远假人基本就是一条线了, 基本要使用倍镜了
截图范围, 屏幕中心 400×400, 已经足以把 5米开外的目标包括进来了
训练尺寸, 640
训练假人
截图 详见 grab.for.apex.dummy.py
各个角度, 各个距离, 先截100张图, 看看效果行不行, 类似下面这样的图片

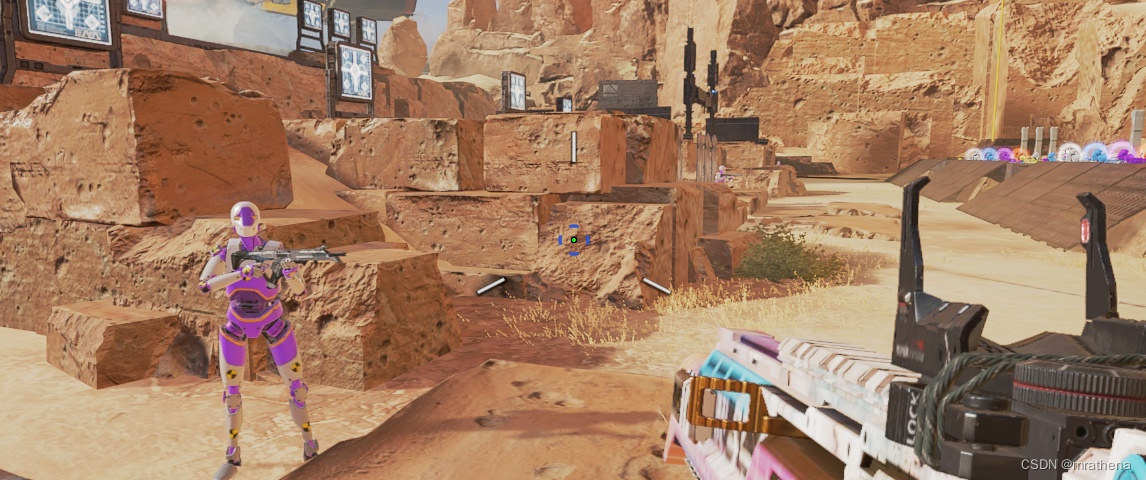
标记
可以先标 100 张, 然后训练一个模型出来, 然后用该模型去检测剩余的数据集, 并生成格式正确的对应图片的 txt 标记文件, 完了再精修
标记
参数
拷贝 data/coco128.yaml 为 dataset.for.apex.dummy.yaml
path: D:\resource\develop\python\dataset.yolo.v5\apex\dummy
train: data/images  # train images (relative to 'path') 128 images
val: data/images  # val images (relative to 'path') 128 images

# Classes
nc: 1  # number of classes
names: ['body']  # class names
这里 classes 中的 names 直接把 classes.txt 中的内容按顺序拷贝过来即可, 保证顺序一致
拷贝项目下的 train.py 更名为 train.for.apex.dummy.py 并修改 parse_opt 的内容
- –weights: ROOT / ‘yolov5s.pt’ , 以 yolov5s.pt 作为基础模型, 在此基础上训练自己的模型
- –data: data/dataset.for.apex.dummy.yaml
- –imgsz: 640,
注意要和 weights 对应 - –batch-size: 16,
先试默认的16, 如果报显存不足, 则改成8 - –project: default=‘D:\resource\develop\python\dataset.yolo.v5\apex\dummy\runs\train’
保存训练结果的位置
训练
OSError: [WinError 1455] 页面文件太小,无法完成操作。 Error loading "C:\mrathena\develop\miniconda\envs\yolo\lib\site-packages\torch\lib\cudnn_cnn_train64_8.dll" or one of its dependencies.
如果报错类似如上, 需要调整硬盘的虚拟内存
Win11 的修改入口应该在这里

我固态C盘剩余70多G, 改成10G后还是报错, 改成40G还是报错, 改成50G才能跑, 但中途还是报了内存不足申请失败的错, 这尼玛假的吧, 最后改成60G虚拟内存才能正常跑
我们看看过程中的内存和显存使用情况
- 内存: 内存加虚拟内存共 108G, 但看起来像是内存还剩 30G 空余, 放着内存不用非要用硬盘?
- 显存: 每周期训练需要约 2.3G (每个 Epoch 的 gpu_mem)
     Epoch   gpu_mem       box       obj       cls    labels  img_size
   100/299     2.29G   0.02161   0.00893  0.001984        21       640: 100%|██████████| 15/15 [00:01<00:00,  8.19it/s]
               Class     Images     Labels          P          R     mAP@.5 mAP@.5:.95: 100%|██████████| 8/8 [00:01<00:00,  6.30it/s]
                 all        116        228      0.998      0.989      0.995      0.845
查看输出文件夹中的内容, weights 文件夹里面的 best.pt 就是训练好的模型
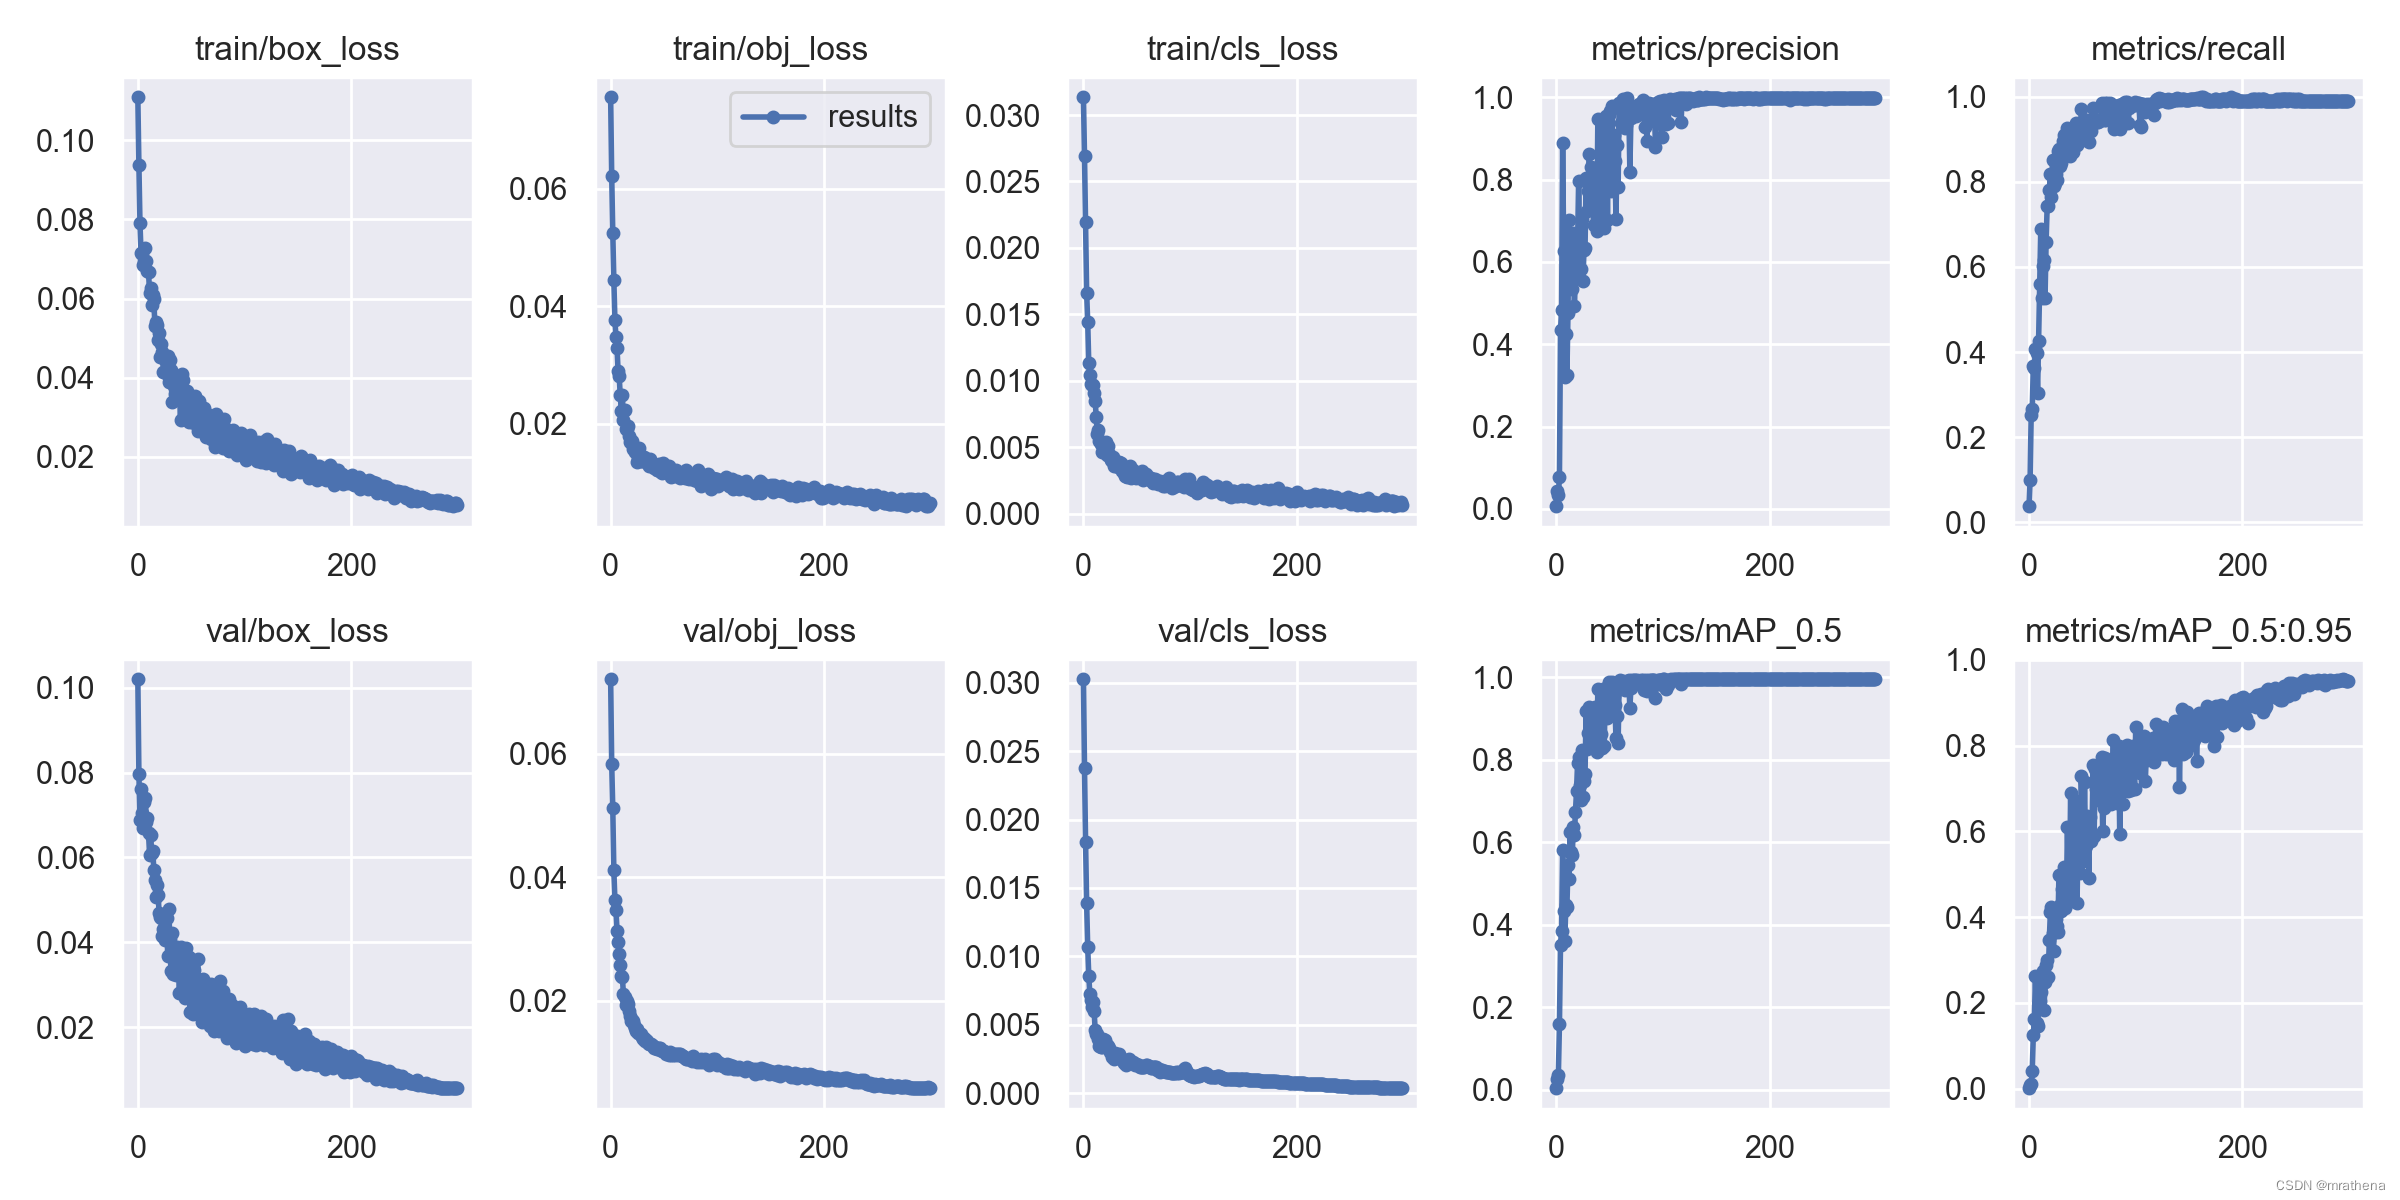
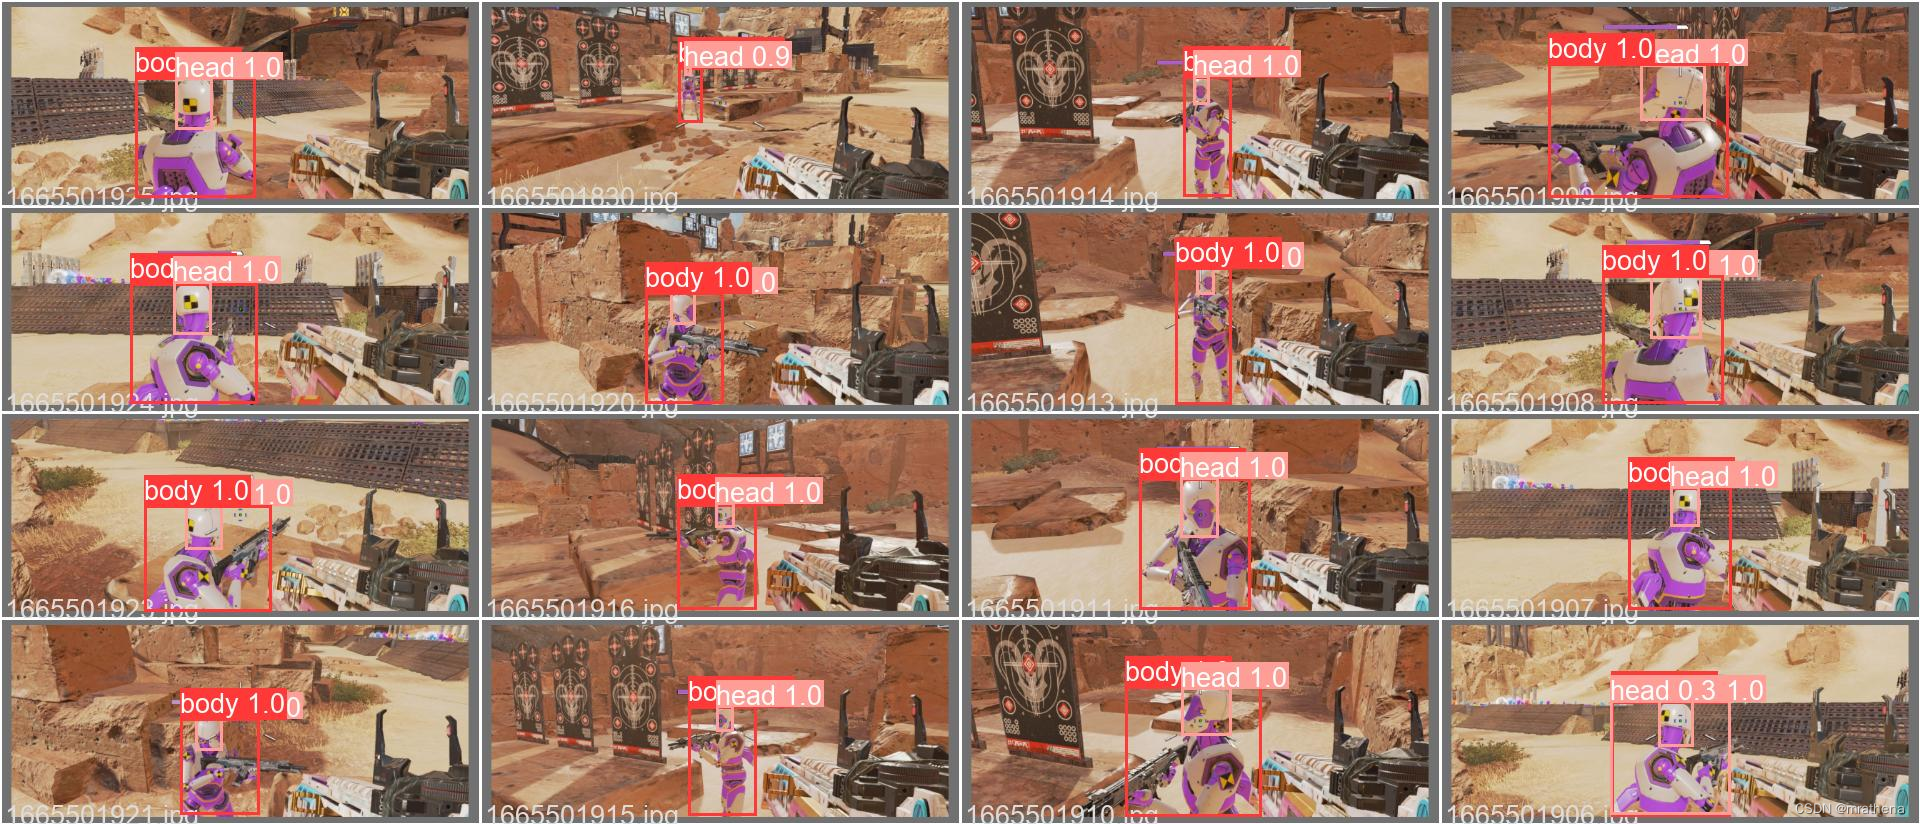
测试
使用 detect.realtime.py, 将其中的 weights 替换为自己训练出来的 best.pt 即可
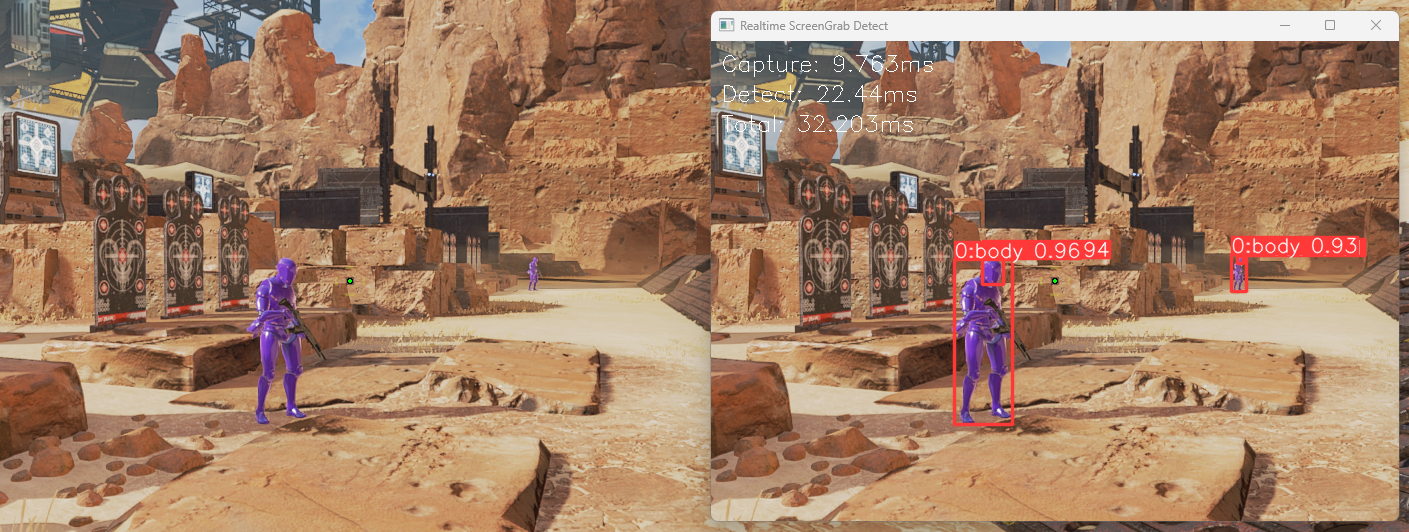
通过 steam 参数 +fps_max unlimited 不锁帧, 显卡全力工作, 在射击场, 帧数可以达到140左右, 通过参数 +fps_max 60 锁帧, 减少 GPU 占用, 为目标检测腾出资源, 推理耗时大约在 20-40ms
粗浅的优化方案
可能的优化方案, 目标是截图加检测的一个循环耗时10ms左右
- TensorRT 部署加速
- 半精度
- 剪枝
- paddleslim 压缩
- 降低游戏占用
- 游戏锁帧数 (因为我的显卡性能还行, 所以锁帧 60 后, 空余算力足够做目标检测了, 效果显著)
- 游戏特效调低
- 提升截图效率 (有大佬说截图能做到 250 张每秒, 不知道怎么弄的, 我暂时做不到)
- 缩小截图范围, 屏幕中心 400×400 就可以了
- 双显卡, 一个用来玩游戏, 一个用来跑 AI
- 上 4090
模型层面的优化
训练模型要考虑到各种尽可能多的情况. 通常在测试过程中, 发现模型的缺陷, 然后再做针对性的训练, 会有很大的提升
- 常规数据集
- 距离影响, 截图时的不同距离, 最远 100 米左右应该就足够了
- 假背景影响, 比如说地图里某些位置展示捍卫者的旗
- 瞄准镜影响, 数据集要包含各种倍数的瞄准镜瞄准效果, 比如 4-10 倍金镜, 中心有两条大绿线, 会影响推理结果
- 攻击特效影响, 被击中时, 受害者身上会泛光, 滋崩尤其严重, 打中人时全是光, 受害者都看不到了. 数据集要包含各种被攻击的特效
- 半身位影响, 有没有掩体也有很大的影响
以上影响因素, 做笛卡尔积, 相互混合做出来的数据集, 训练的效果才会更好
部署 TensorRT 推理加速
将 pt 权重文件转换为 TensorRT 专用的 engine 模型
YOLO v5 从 v6.0 起, 官方自带 export.py 工具可以将 .pt 权重文件转换成其他格式, 包括 TensorRT 的 .engine. 不再需要使用 C++ 构建生成
python export.py --weights weights.apex.public.dummy.pt --device 0 --include engine
输入 weights.apex.public.dummy.pt, 生成 weights.apex.public.dummy.engine, 需要注意的是, 转换过程涉及文件的序列化与反序列化, 即我的 .engine 在其他电脑是无法运行的, 会报反序列化失败. 所以需要自行尝试将 .pt 转换为 .engine
将 detect.realtime.py 中的 weights 替换为自己训练出来的 weights.apex.public.dummy.engine 即可
推理耗时大约在 10-30ms, 提升不算很大, 没有官方宣称的最大 5 倍提升这么明显
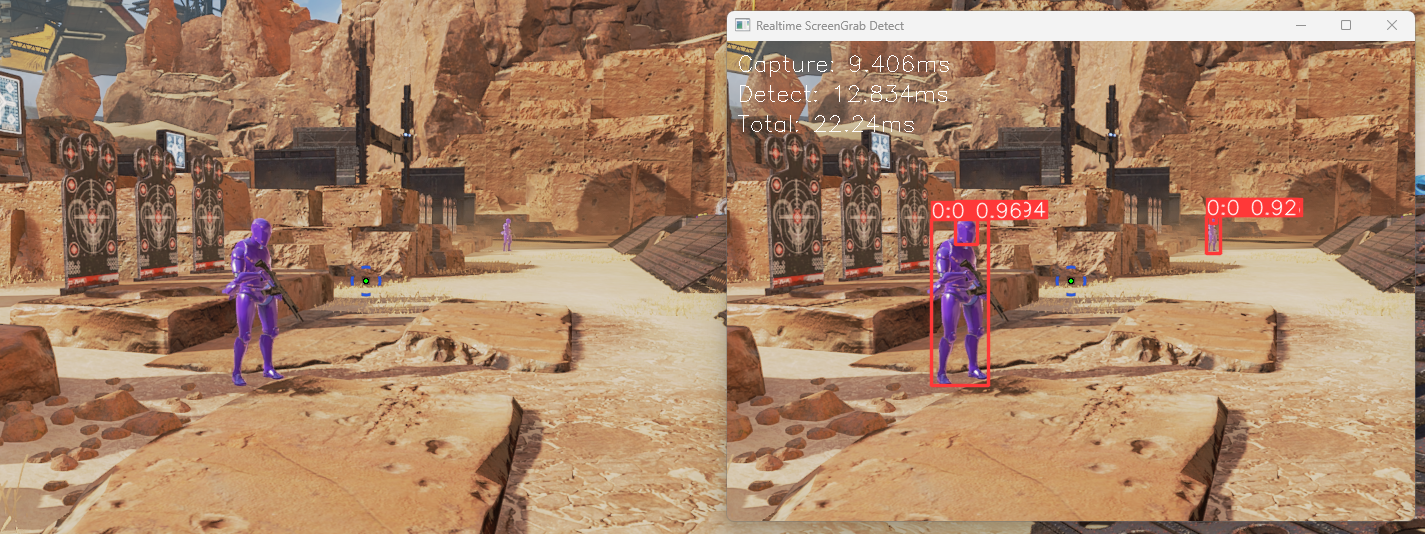
第四阶段 主功能代码
键鼠监听
注意调试回调方法的时候, 不要打断点, 不然会卡死IO, 导致鼠标键盘失效
回调方法如果返回 False, 监听线程就会自动结束, 所以不要随便返回 False
键盘的特殊按键采用 keyboard.Key.tab 这种写法,普通按键用 keyboard.KeyCode.from_char('c') 这种写法, 有些键不知道该怎么写, 可以 print(key) 查看信息
钩子函数本身是阻塞的。也就是说钩子函数在执行的过程中,用户正常的键盘/鼠标操作是无法输入的。所以在钩子函数里面必须写成有限的操作(即O(1)时间复杂度的代码),也就是说像背包内配件及枪械识别,还有下文会讲到的鼠标压枪这类时间开销比较大或者持续时间长的操作,都不适合写在钩子函数里面。这也解释了为什么在检测到Tab(打开背包)、鼠标左键按下时,为什么只是改变信号量,然后把这些任务丢给别的进程去做的原因。
操纵键鼠
大多FPS游戏都屏蔽了操作鼠标的Win函数, 要想在游戏中用代码操作鼠标, 需要一些特殊的办法, 其中罗技驱动算是最简单方便的了
代码直接控制罗技驱动向操作系统(游戏)发送鼠标命令, 达到了模拟鼠标操作的效果, 这种方式是鼠标无关的, 任何鼠标都可以使用这种方法
我们不会直接调用罗技驱动, 但是有大佬已经搭过桥了, 有现成的调用驱动的dll, 只是需要安装指定版本的罗技驱动配合才行
罗技驱动分 LGS (老) 和 GHub (新)
- LGS, 需要使用 9.02.65 版本
- GHub, 需要使用 2021.11 版本之前的, 因 2021.11 版本存在无法屏蔽自动更新的问题, 所以暂时建议选 2021.3 版本
如果有安装较新版本的 GHub, 需要运行 C:\Program Files\LGHUB\lghub_uninstaller.exe 卸载, 然后重新安装旧版本 GHub
装好驱动后, 需在设置中 取消 勾选 启用自动更新, 可运行 屏蔽GHUB更新.exe 防止更新(不一定有效)
另外需要确保 控制面板-鼠标-指针选项 中下面两个设置
- 提高指针精确度 选项去掉, 不然会造成实际移动距离变大
- 选择指针移动速度 要在正中间, 靠右会导致实际移动距离过大, 靠左会导致指针移动距离过小
运行 logitech.test.py 查看效果, 确认安装是否成功, End 键 结束程序, Home 键 移动鼠标, 自行测试效果, 如无效果, 则按上述步骤检查
主功能代码 详见 apex.py
键盘监听和鼠标监听分别启用了不同进程
截图和检测启用了一个进程作为生产者, 目标分析与鼠标移动启用了一个进程作为消费者, 通过队列做数据传递
部分代码说明
FOV 详见 apex.fov.py (FOV 我觉得比较鸡肋, 已放弃)
鼠标灵敏度, ADS鼠标灵敏度加成, FOV视角, 位移像素之间的关系
- 鼠标灵敏度: 鼠标灵敏度是鼠标物理移动距离与游戏内视角旋转角度的倍数关系. 假设鼠标灵敏度为 1 时, 鼠标向右移动 100 像素, 游戏内向右转动 2°. 则鼠标灵敏度为 2 时, 鼠标向右移动 100 像素, 游戏内向右转动 (2×鼠标灵敏度)°
- ADS鼠标灵敏度加成: 开镜后的鼠标灵敏度, 灵敏度=基本灵敏度×ADS加成
- FOV: 第一人称角色视角范围? 可近似认为就是视线角度? 包括水平和垂直两种
- DPI: 物理调整鼠标的移动幅度
如何求 鼠标从中心跳到敌人位置对应的鼠标物理水平移动像素
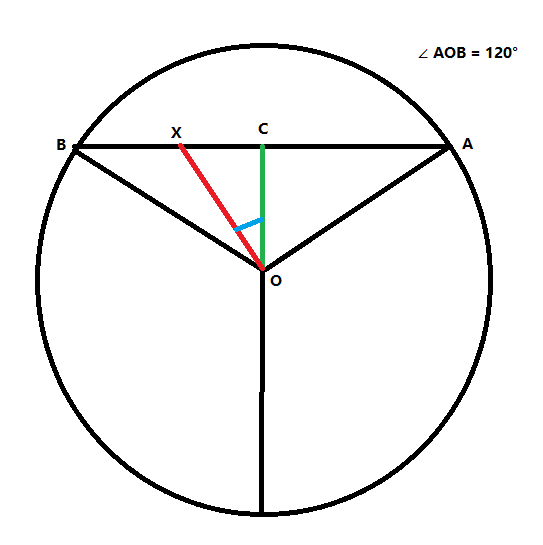
假设 AB 是屏幕, ∠AOB 是角色视角(即 FOV), C 是屏幕中心(准星), X是敌人位置(已知, 目标检测得到的坐标), 求鼠标向左移动多少像素能让准星正好落在敌人 X 身上?
假设当前游戏设置的 FOV 是 120, 即水平视角是 120°, 即 ∠AOB 是 120°, 可知 ∠ AOC 是 60°
因为 OC 垂直于 AB 所以三角形 AOC 是直角三角形, 根据三角函数可知, AC/OC=tan60°, 可得 OC=AC/tan60°
AB 的长度就是游戏的水平分辨率, 可知 AC 长度为 AB 的一半, 由此可得 OC=AB/2/tan60°
CX 可以由目标检测的结果算出来, OC 也知道了, 又因为三角形 OCX 是直角三角形, 可知 CX/OC=tan∠COX, 可得 ∠COX
当然, 计算角度的正切值和反正切值, 需要将角度转换为弧度, 才能代入函数. 角度=弧度×π/180, 弧度=角度×180/π
tan60°=tan(60×π/180), ∠COX=atan(CX/OC)×180/π
假设游戏内水平旋转 360°, 对应的鼠标需要水平移动 a 像素, 我们称之为 一周移动量, 即鼠标每移动 a/360 像素, 视角水平旋转 1°
求出了 ∠COX, 再乘以视角旋转 1° 需要移动的鼠标距离, 就可以求出让准星落在 OX 这条线上需要移动的鼠标距离了
所以, 鼠标移动的距离=∠COX*a/360
接下来就该测 一周移动量 了, 拿到这个值即可计算需要的 鼠标移动量
算鼠标垂直移动量也是一样的, 但是因为 OC 已经计算出来了, 可以直接使用, 只需要测游戏内垂直方向的 半周移动量 即可
如何测 游戏内水平旋转 360° 对应鼠标水平移动的像素
通常在 FPS 游戏内, 鼠标的位置是固定在屏幕中心的, 我们移动鼠标, 动的不是鼠标位置, 而是游戏内 FOV 视角的朝向, 所以不论如何旋转视角, 取鼠标位置的函数返回的鼠标坐标点, 永远都是屏幕的正中心(全屏游戏时)
所以, 测试游戏内的 一周移动量 得反着来. 记录移动鼠标的距离之和, 当正好旋转了 1 周时, 该值就是需要的距离
需要用本文 工程源码 下 test.measure.palstance.py 部分来测试, 该方法可测试水平和垂直两个方向的像素, 垂直方向通常只能测一半
- 操作说明
- 按右键: 模拟鼠标向右移动 100 像素, 按住 Shift 键再按右键, 模拟鼠标向右移动 10 像素, 反之同理
- 按 Enter 键清零, 可重新测量
- 按 End 键结束程序
- 测试水平距离: 选一个点让准星对准该点, 按右键旋转一周, 让准星正好回到原位, 看日志里向右移动了的距离
- 测试垂直距离: 下拉鼠标到底, 找一个特征点, 让准星对准该点. 然后按上键到视角不再变化, 再多按几次上键, 然后按回车键清零, 然后按下键和 shift+下键, 直到准星与之前选好的特征点刚好重合, 然后看日志里的移动距离. 切记不要按多了, 因为到底后再按下键, 会继续累加移动距离, 但准星受游戏机制影响却是不会动了
游戏内 鼠标灵敏度 与 鼠标移动量的关系

游戏内有鼠标灵敏度的概念, 这是一个倍数, 用于放大移动鼠标旋转视角时的效果. 假设鼠标物理 DPI 全程不会改变
假设我们在 鼠标灵敏度为 2 时测得的 一周移动量 为 b, 可以用来计算准星从中心移动到目标点需要的鼠标移动量. 如果我们调整鼠标灵敏度, 那么移动就不准确了, 假如当前鼠标灵敏度是 4, 需要的移动距离就是 b×2/4
我们设置鼠标灵敏度为 1, 这时候测得 一周移动量 a 可以认为是一个基准, 我们称之为 基准移动量, 后续如果变化了鼠标灵敏度, 则移动距离就是 基准移动量 a 除以 鼠标灵敏度. a×1 基本等于上面的 b×2, 有些许误差是正常的
另外, 我测得 Apex 内, 调整 FOV 的大小, 对 基准移动量 a 是没有影响的
关于 ADS 鼠标灵敏度加成
游戏内 鼠标灵敏度 2 / ADS 鼠标灵敏度加成 1 和 鼠标 DPI 都不变的情况下, 测得 游戏内水平旋转 360° 对应鼠标水平移动的像素
- 腰射: 8400, 8400×2可以认为是 基准移动量
- 一倍镜开镜: 11300
- 二倍镜开镜: 20700
- 三倍镜开镜: 32100
上面我们讨论的鼠标移动量都是基于腰射的, 如果我们用倍镜时, 鼠标移动量是不是会发生变化? 毕竟测得的一周移动量相差这么大
其实没有关系, 因为开镜后, FOV 视角范围其实会变化, 当 ADS 鼠标灵敏度为 1 时, 我们根据腰射 FOV 和对应基准移动量算出来的鼠标移动量 和 当前倍镜下的 FOV 和当前倍镜开镜后对应的一周移动量计算出来的鼠标移动距离, 是一致的
当我们调整 ADS 不为 1 后, 移动反而会不准. 调小会导致移动变慢, 但还是能稳定在目标点, 调大会无限左右横跳
更精准的控制鼠标设计时的稳定性
鼠标移动过程分析
将瞄准生效距离修改为 1000, 用一把没有子弹的武器, 我们来分析鼠标从一个点跳到目标点的过程
将显示和瞄准都打开, 鼠标移动到离目标较远的地方, 按下鼠标直到鼠标稳定在目标的瞄准点上. 观察这个过程, 可以很清晰的看到, 鼠标在到达目标点时, 发生了震荡, 超过目标点, 然后又回来, 来回几次, 幅度逐渐减小, 最后稳定在目标点上
为什么会出现这样的情况? 照我的理解, 鼠标移动函数调用后, 鼠标应该从当前点消失, 然后在目标点出现, 对应画面也应该很突兀的变化一次, 而不是像现在一样, 鼠标移动和画面变化都是一步步逐渐完成的. 为了看的清晰, 我在 while True 循环末尾加了 100ms 延迟, 延迟加在了每波循环的最后, 所以不会对循环内的截图加检测加跳跃造成影响, 只是将每次循环之间的时间分割开了
通过放慢循环流程, 发现一个问题. 鼠标移动指令是直接从当前点跳到目标点, 但实际效果却是无法直接一步跳到位, 在游戏外我们测试过位置是准的, 在游戏内却只能说是向目标点靠近了一步, 移动鼠标的两个参数, 更像是指定了一个方向给出了一个力度, 力度大跳跃的距离就远, 力度小距离就近. 而且很重要的一点, 这个跳跃不是瞬移过去的而是飘过去的, 所以这个跳跃其实是耗时的. 所以, 在游戏内从一个点跳到另一个点, 其实是分拆多次实现的
再分析为什么会震荡, 我们认为跳跃是瞬移的, 但实际上跳跃有一个移动的过程. 循环中的一个流程结束后, 代码认为跳跃已经完成, 点已经在目标点了, 但事实上, 点还在路上, 还在从某点到目标点的中途, 并且还没有落地, 还会继续往目标方向走一段距离. 但是代码已经开始下一个循环, 截图, 截到的是还没完成的上一个跳跃过程, 截图结束后, 上一个跳跃还会继续走, 但是本轮截图后计算出来的新的跳跃力度, 却不考虑上一次跳跃还会继续走这个情况, 所以两者叠加, 导致跳跃超过了目标点. 最终形成了震荡
如何消减鼠标震荡
给移动力度添加一个倍数, 即 ADS, 不断调整这个值, 使准星移动到目标点的过程中, 稳定且精准快速不振荡, 这就找到了合适的倍数
卡尔曼滤波器预测目标轨迹
利用卡尔曼滤波与Opencv进行目标轨迹预测
PySource - Kalman filter, predict the trajectory of an Object
我不清楚其中的原理的, 只是大概知道是根据前几帧的状态预测下一帧的轨迹
找了个预测橘子位置的案例, 然后做了个预测来回摆动的小球的例子 (详见 test.kalman.filter.py), 接着就改吧改吧整合进来了
只移动人物是可以用卡尔曼滤波器来预测敌人位置的, 而调整视角时则不适用卡尔曼滤波器, 因为每次移动鼠标像目标靠近, 都是在人为地破坏卡尔曼滤波器依赖的数据, 会导致预测不准
可以在 B 站搜索 社区服练枪, 照着教程安装好社区服和练枪 Mod, 选好武器, 设置 假人红甲, 假人最快速度, 击中填满弹夹 和 无限训练时间, 然后选训练中的第一项, 单独假人来回移动训练, 就可以用来验证和优化主逻辑
因为社区服和正式服的假人差距有点大, 需要针对社区服的假人再做一波训练 (weights.apex.public.dummy.pt 已做过相关训练)
瞄准效果
The effect of playing static dummy is very good, the effect of playing a little farther and low speed dummy is not bad, but don’t open the mirror when playing face dummy, it has a certain effect
Category of website: technical article > Blog
Author:Rainbow
link:http://www.pythonblackhole.com/blog/article/333/44b0e876f097edd3ba13/
source:python black hole net
Please indicate the source for any form of reprinting. If any infringement is discovered, it will be held legally responsible.
name:
Comment content: (supports up to 255 characters)
no articles
