Detailed process of yolov5s model pruning (v6.0)
posted on 2023-05-07 20:44 read(229) comment(0) like(2) collect(2)
This article refers to the open source pruning project of the great god on github for learning and sharing. The specific link is placed at the end of the article. I hope to communicate with you more!
1. Original model training
Train the yolov5 model on the official source code , support the n/s/m/l model of the v6.0 branch, I use v5s here, and clone the project to the local machine after getting it
git clone https://github.com/midasklr/yolov5prune.gitAfter cd into the folder, create a new runs folder, and put the trained model into runs/your_train/weights/xxx.pt. My original model map0.5:0.95 is about 0.84. After the model and data.yaml are set, you can Sparse training is performed.
2. Sparse training
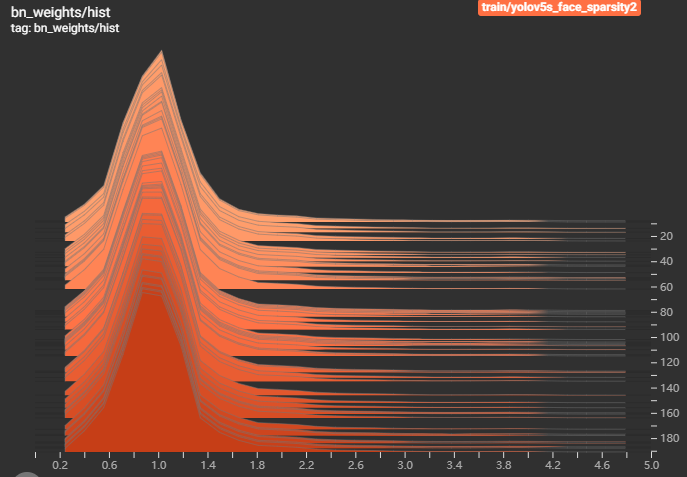
python train_sparity.py --st --sr 0.0002 --weights yolov5s.pt --data data/your_data.yaml --epochs 100 --imgsz 512 --adam ...Note: 1. If adam is not used in the original model training, do not use adam here. 2: Change the data.yaml file to your own dataset file. 3: The sr parameter here is the sparse coefficient. The specific value depends on different data sets and models. Generally, the settings are different. You need to try it yourself. For example, mine is a single-category target detection, and it hardly changes when it is set to 0.0002 ( As shown below).
Here we cd to the path of the runs folder, and then enter tensorboard to monitor the training process in real time, logdir also points to the runs folder, then open the web page and enter your ip, the port number is generally 6006, such as 192.168.xx.xx:6006 Can monitor.
tensorboard --logdir=/home/user2/yinjiacheng/pytorch-ssd/pytorch-ssd/runs --host=0.0.0.0The vertical axis of this histogram represents the number of trainings (the number of trainings increases from top to bottom), and the peak value of the horizontal axis should approach the 0 axis with the number of trainings, which means that most bn has become sparse, and the situation shown in the figure below or When the sparseness is too slow (the process of approaching the 0 axis is slow), it means that the sr value should be increased appropriately.
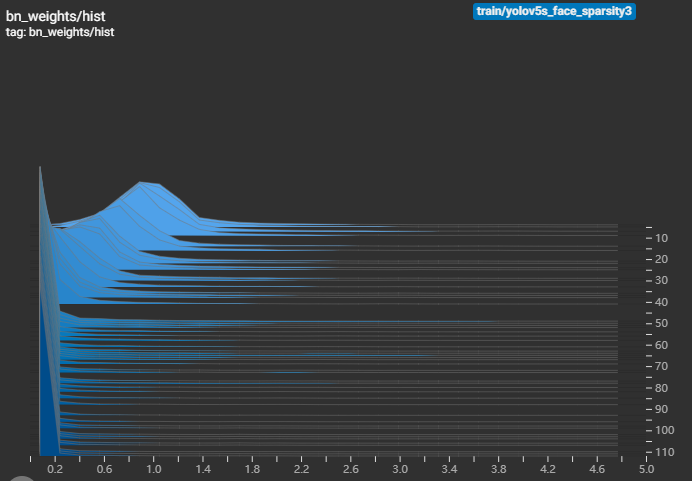
So I adjusted sr to 0.02, but at this time bn converges too fast, and mAP drops seriously. As shown in the figure below, it means that the sr value is adjusted too large and needs to be reduced appropriately until the histogram approaches the 0 axis. At the same time, mAP and The original model is not much different.
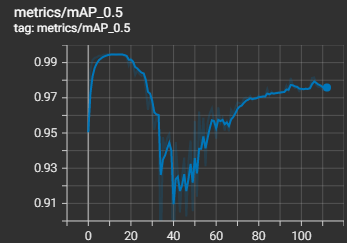
Then I adjusted the sr value to 0.01, and the bn histogram and mAP0.5 curve at this time are shown in the figure below:
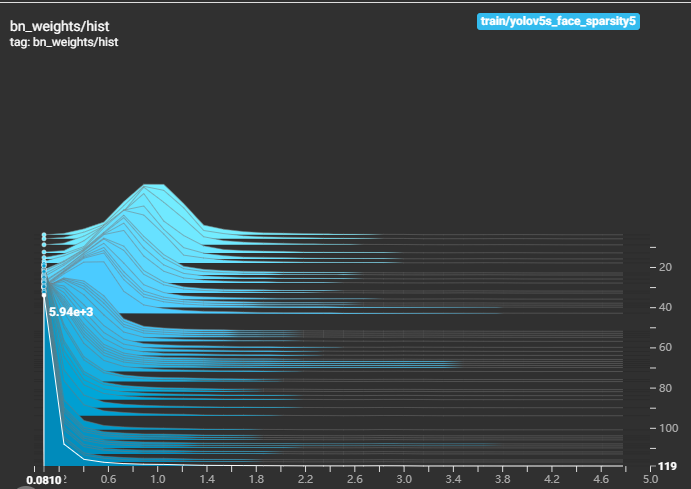
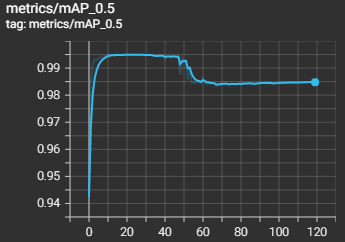
It can be seen that the speed of the bn histogram approaching the 0 axis is neither too fast nor too slow (it seems to be talking nonsense), and although the mAP has a drop point, it is still acceptable. In the end, finetune can return some, so you can choose this sparse The model is pruned in the next step.
3. Pruning
python prune.py --percent 0.5 --weights runs/train/exp/weights/last.pt --data data/your_data.yaml --cfg models/yolov5s.yamlThe percent parameter here is the pruning ratio, weights selects the sparse model that has just been trained, and cfg selects the yaml you use. After the pruning is completed, the pruned_model.pt file will appear in the main folder, which is the pruned model. But you will find that the size of the model does not drop much, because it is still FP32 precision, and the model after our yolov5 training is FP16 precision, so the size actually drops a lot (finally I got 5.8M after fine-tuning, and The original model was 13.6M).
Four, fine-tuning
python finetune_pruned.py --weights pruned_model.pt --data data/your_data.yaml --epochs 150 --imgsz 320 --adamIt’s still the same here, if you didn’t use adam before, don’t use it here, adjust imgsz to your own output size, 200 epochs still come back a lot from finetune.
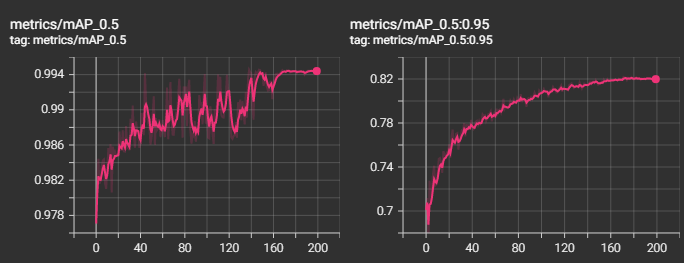
In the end, the model I obtained was 5.48M, the parameter amount Param was 2.74M, and the FLOPs was 2.17G when the input size was 320*320, which was significantly smaller than the original model size of 13.6M, and the FLOPs was 3.9G.
Five, detect
There are some problems with the detect.py and detectpruned.py codes in this project. You can put the fine-tuned pt model into the official project to detect, but there are a few points that need to be changed.
Now we have two projects, one is the pruned yolov5_prune, the other is the official yolov5, copy the yolov5_prune/model/pruned_common.py file to the official yolov5/model/.
Change line 26 of pruned_common.py to
from utils.plots import Annotator, colors, save_one_boxdelete save_one_box, and add it at the end of line 25, because the def save_one_box in the official document is defined in the general under utils.
from utils.general import (LOGGER, check_requirements, check_suffix, check_version, colorstr, increment_path,make_divisible, non_max_suppression, scale_coords, xywh2xyxy, xyxy2xywh,save_one_box)Open the official yolov5/utils/general.py, add the following code after line 43, that is, before declaring the first class
- def set_logging(name=None, verbose=True):
- # Sets level and returns logger
- for h in logging.root.handlers:
- logging.root.removeHandler(h) # remove all handlers associated with the root logger object
- rank = int(os.getenv('RANK', -1)) # rank in world for Multi-GPU trainings
- logging.basicConfig(format="%(message)s", level=logging.INFO if (verbose and rank in (-1, 0)) else logging.WARNING)
- return logging.getLogger(name)
-
-
- LOGGER = set_logging(__name__) # define globally (used in train.py, val.py, detect.py, etc.)
Finally, just run detect.py according to the settings. I added the function of placing false positives and false positives in different folders in detect. Finally, there are dozens more in the 5000 val set, which is acceptable. .
python detect.py --weights runs/train/yolo5s_face_prune/weights/last.pt --conf 0.5 --img-size 320 --source data/your_data/images/val --save-txtReference link: midasklr/yolov5prune at v6.0 (github.com)
Category of website: technical article > Blog
Author:gfg
link:http://www.pythonblackhole.com/blog/article/306/63673a75be02ab5e072c/
source:python black hole net
Please indicate the source for any form of reprinting. If any infringement is discovered, it will be held legally responsible.
name:
Comment content: (supports up to 255 characters)
no articles