Python自动录入ERP系统数据
posted on 2023-05-21 17:29 read(777) comment(0) like(24) collect(0)
Hello everyone, I am Bi Jiasuo.
What I bring to you today is the best posture to use Python to solve Excel problems
Send the book at the end of the article! Send the book at the end of the article! Send the book at the end of the article!

General situation of the project
Software : Pycharm
Environment : Python 3.7.9 (considering that customers may have different operating systems, for compatibility considerations)
Technical library : requests, pandas, Pyqt5, etc. (see dependency files for details)
demand analysis
Through the analysis and communication of customer demand documents, there are roughly the following requirements:
-
Submit data to 3 interfaces in batches according to "single number attribution"
-
Need a GUI interface
-
Support different salesman login
In general, it is a POST data submission and GUI development.
project implementation
1. Post submission
This area mainly uses crawler technology, and the steps that have not changed for thousands of years are to analyze the webpage first.
1.1 Login

Through packet capture, it is found that the password is plain text, and the difficulty is reduced by half, and then the correct password is used to analyze the return after successful login.
- def login(self, username: str, password: str):
- """
- 登录
- """
- url = "http://cloud.tiamaes.com:11349/erp/portal.bootstrap/SSOLoginAction/login.do"
- data = {
- "_tp_data": '{"parameters":{"userName":' + username + ',"pwd":' + password + '},"rowsets":{},"headers":{},"requestComponent":"0"}'
- }
- data = parse.urlencode(data).replace("+", "")
- resp = requests.post(url, headers=self.headers, data=data, verify=False)
- self.IDENTIFIER = resp.json()["headers"]["IDENTIFIER"]
- return self.IDENTIFIER

It is found that after the login is successful, an "IDENTIFIER" parameter will be returned, and the value is an encrypted string, so it is obvious that it must be useful just by looking at the literal meaning, so record it first.
1.2 Interface Analysis
Since I am using a test account, the data submitted by this account must be deleted. In order not to inject too much invalid data into others, I will not actually enter it here, and use business codes to illustrate.
-
Get vehicle information
Through analysis, it is found that although the customer has given some vehicle information, there are still many missing information that need to be supplemented by ourselves. Through packet capture, it is found that after entering the vehicle number, an Ajax request will be initiated, and other information in the form is the data returned by the Ajax request.

- def get_car_details(self, car_no: str, IDENTIFIER: str):
- """
- 获取车辆信息
- """
- # print(self.IDENTIFIER)
- url = "http://cloud.tiamaes.com:11349/money/basis.inter/JwBusAction/getCacheJwBusByNo.do"
- data = {
- '_tp_data': '{"parameters": {"busNo": ' + str(car_no) + ', "dsName": "83"}, "rowsets": {}, "headers": {"IDENTIFIER": ' + IDENTIFIER + '}, "requestComponent": "0"}'
- }
- data = parse.urlencode(data).replace("+", "")
- resp = requests.post(url, headers=self.headers, data=data, verify=False)
- rows = resp.json()["rowsets"]["com.tp.basis.entity.entity.bus.BaJwBus"]["rows"][0]
- return rows
-
Get personnel information
I didn't find the personnel information in the form through packet capture, but later found relevant data on another page.

It's a little troublesome here, and you need to use regular expressions to match the data.
- def get_personal_info(self, IDENTIFIER: str):
- """
- 获取个人信息
- """
- url = "http://cloud.tiamaes.com:11349/money/money.action/CharteredAction/showDetail.do"
- data = {
- '_tp_data': '{"parameters":{"dsName":"83","method":"add","recId":"-1"},"rowsets":{},"headers":{"IDENTIFIER":' + IDENTIFIER + '},"requestComponent":"1"}'
- }
- data = parse.urlencode(data).replace("+", "")
- resp = requests.post(url, headers=self.headers, data=data, verify=False)
- json_data = eval(re.findall(r'<code>.*?"rows":\[(.*?)\]', resp.text)[0])
- return json_data
-
Initiate a request and submit data
After getting the identifier, vehicle information, and personnel information returned by the login, the rest is to combine with the data given by the customer and initiate a request. It should be noted that the request parameters need to be converted to url encoding, and the request parameters are also the most troublesome part of this crawler. Here we will show you the parameters that need to be sent in a request.

There are many parameters, and the format requirements are relatively strict. In the entire development process, debugging here takes the longest time. After debugging, it should be normal to simplify the code. I am too lazy to change the merged merged one after debugging, so this piece of writing is redundant.
- def submit_data(self, i: dict, IDENTIFIER: str):
- """
- 众意数据提交
- """
- personal_info = self.get_personal_info(IDENTIFIER) # 获取个人信息
- personal_info_data = str(personal_info).replace("'", '"') # 将personal_info转换为字符串
- url = "http://cloud.tiamaes.com:11349/money/money.action/CharteredAction/saveForm.do"
- print(f'开始处理--{i["单号归属"]}--数据')
- memo = f'工单号{i["工单号"]}、餐费{i["餐费"]}、住宿{i["住宿"]}、过路过桥费{i["过路过桥费"]}、油费{i["油费"]}、备注{i["备注"]}' # 拼接备注信息
- car_infos = self.get_car_details(str(i["车号"]), IDENTIFIER) # 获取车辆信息
- pay_type = {
- "现金": "3",
- "转账": "2",
- "欠款": "1"
- }
- single_and_double = {
- "单程": "1",
- "双程": "2"
- }
- colType = pay_type[i["结账方式"]] # 获取结账方式编码
- oddEven = single_and_double[i["单双程"]] # 获取单双程编码
- now_date = datetime.datetime.now().date().strftime("%Y-%m-%d") # 获取当前日期
- .......(此处省略)
- data["_tp_data"] = data["_tp_data"].replace('"dsName":"83"', '"dsName":"82"')
- data = parse.urlencode(data).replace("+", "") # 将字典转换成url编码
- resp = requests.post(url, headers=self.headers, data=data, verify=False).json()
- order_id = resp["rowsets"]["com.tp.money.entity.basic.Chartered"]["rows"][0]["recNo"] # 获取订单编号
- i["包车单号"] = order_id
- return data

2. GUI development
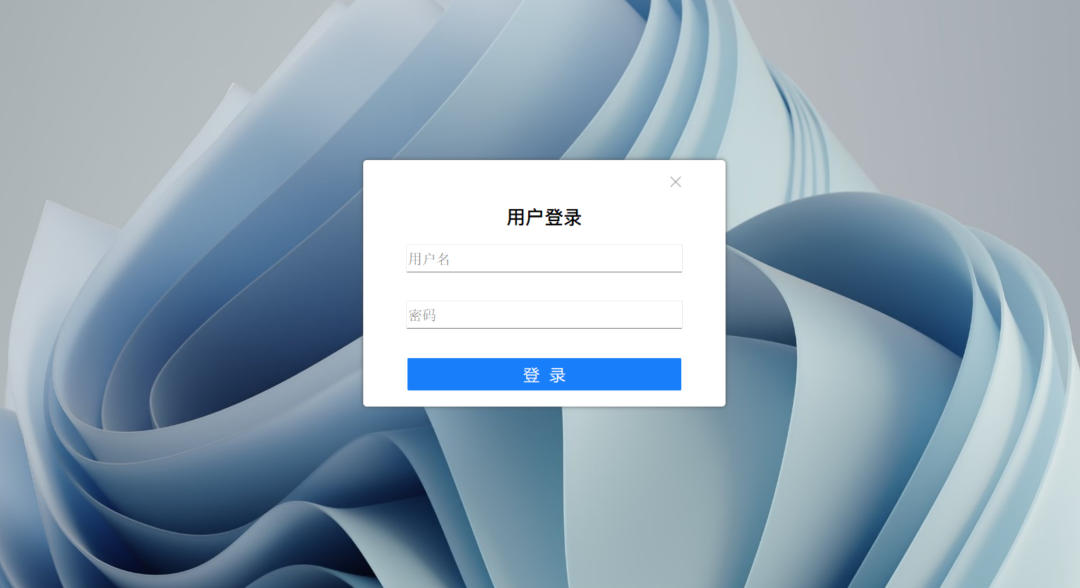
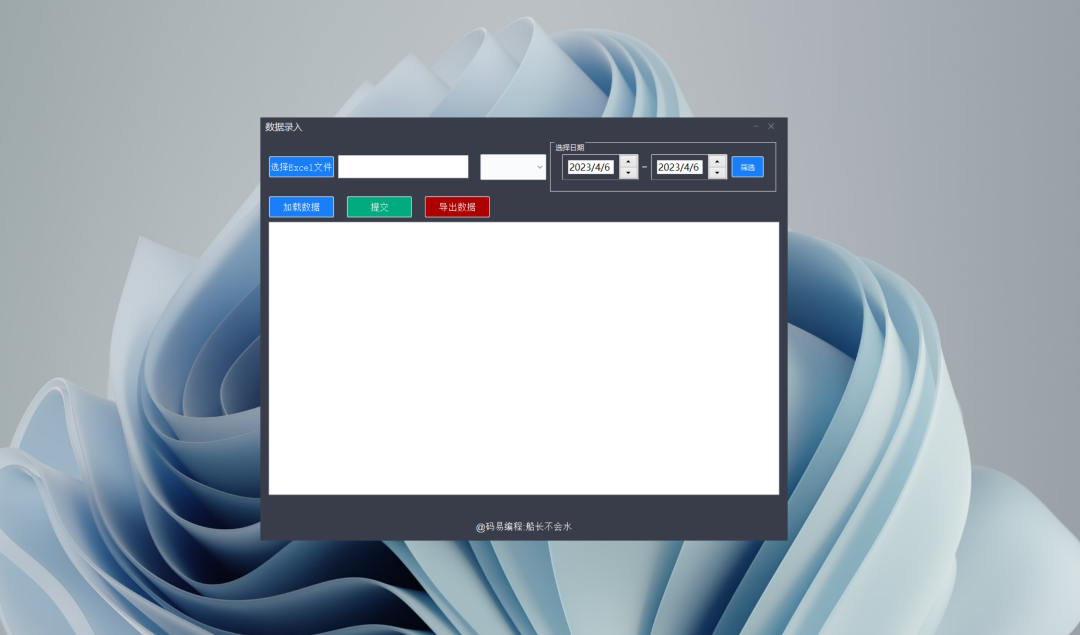
The development of gui is relatively simple. If you don’t want to beautify it, you can use Pyqt’s native plug-in. I borrowed the experience from the previous project and made a borderless interface and proper beautification with the only knowledge I have.
-
Log in

- from PyQt5.QtCore import Qt
- from PyQt5.QtGui import QColor
- from PyQt5.QtWidgets import (QFrame, QMessageBox, QGraphicsDropShadowEffect)
- from Ui import login_ui
- from Ui.submit_ui_main import MySubmitForm
- from submit import TransitSubmit
-
-
- class MyLogin(login_ui.Ui_LoginForm, QFrame):
- def __init__(self, submit: TransitSubmit):
- super().__init__()
- # self.IDENTIFIER = None
- # self.my_main_window = None
- self.setupUi(self)
- self.submit = submit
- # 设置无边框模式
- self.setWindowFlag(Qt.FramelessWindowHint) # 将界面设置为无框
- self.setAttribute(Qt.WA_TranslucentBackground) # 将界面属性设置为半透明
- self.shadow = QGraphicsDropShadowEffect() # 设定一个阴影,半径为10,颜色为#444444,定位为0,0
- self.shadow.setBlurRadius(10)
- self.shadow.setColor(QColor("#444444"))
- self.shadow.setOffset(0, 0)
- self.frame.setGraphicsEffect(self.shadow) # 为frame设定阴影效果
- # ------------------------------------------------
- self.show()
- self.pushButton_3.clicked.connect(self.close) # 关闭按钮
- self.pushButton_login.clicked.connect(self.do_login) # 登录按钮
-
- # 以下是控制窗口移动的代码
- def mousePressEvent(self, event): # 鼠标左键按下时获取鼠标坐标,按下右键取消
- if event.button() == Qt.LeftButton:
- self.m_flag = True
- self.m_Position = event.globalPos() - self.pos()
- event.accept()
- elif event.button() == Qt.RightButton:
- self.m_flag = False
-
- def mouseMoveEvent(self, QMouseEvent): # 鼠标在按下左键的情况下移动时,根据坐标移动界面
- if Qt.LeftButton and self.m_flag:
- self.move(QMouseEvent.globalPos() - self.m_Position)
- QMouseEvent.accept()
-
- def mouseReleaseEvent(self, QMouseEvent): # 鼠标按键释放时,取消移动
- self.m_flag = False
-
- # 登录事件
- def do_login(self):
- username = self.lineEdit_username.text()
- password = self.lineEdit_password.text()
- if not username or not password:
- QMessageBox.warning(self, '警告', '用户名或密码不能为空', QMessageBox.Yes)
- return
- else:
- IDENTIFIER = self.submit.login(username, password)
- if not IDENTIFIER:
- QMessageBox.warning(self, '警告', '用户名或密码错误', QMessageBox.Yes)
- return
- self.hide() # 隐藏登录界面
- my_submit_form = MySubmitForm(self.submit, IDENTIFIER)
- my_submit_form.exec_() # 显示主界面

-
business operations

- class MySubmitForm(submitform_ui.Ui_Dialog_Submit, QDialog):
- def __init__(self, submit: TransitSubmit, IDENTIFIER: str):
- super().__init__()
- ......
- self.setupUi(self)
- ......
- self.progressBar.hide() # 关闭进度条显示
- self.setWindowFlags(Qt.FramelessWindowHint) # 无边框
- self.setAttribute(Qt.WA_TranslucentBackground) # 设置窗口透明
- self.pushButton_mini.clicked.connect(self.showMinimized) # 实现最小化
- self.pushButton_close.clicked.connect(self.close) # 实现关闭功能
- ......
- self.show()
-
- # 实现鼠标拖拽功能
- def mousePressEvent(self, event):
- self.pressX = event.x() # 记录鼠标按下的时候的坐标
- self.pressY = event.y()
-
- def mouseMoveEvent(self, event):
- x = event.x()
- y = event.y() # 获取移动后的坐标
- moveX = x - self.pressX
- moveY = y - self.pressY # 计算移动了多少
- positionX = self.frameGeometry().x() + moveX
- positionY = self.frameGeometry().y() + moveY # 计算移动后主窗口在桌面的位置
- self.move(positionX, positionY) # 移动主窗口
- ......

Let me say more here. At the beginning, I used the same method as login, using QFrame, but it does not have an exec() method, and it cannot pop up after successful login. It may also be that I have limited knowledge and cannot do it. By analyzing the source code, I found that QDialog has this method, which can realize pop-up, and later changed it to use QDialog to make a borderless interface.
I won’t say much about the rest of the packaging. There are many tutorials on the Internet. I used -D packaging here, used upx compression, changed the icon, and the packaged project has more than 50 M.
write at the end
In general, the code of this project is generally written, basically focusing on practicality, without doing too much packaging and optimization. Anyway, the customer does not need the source code. As long as the project can run, everything will be fine.
"Fan Benefits"
Comment " Life is too short, I learn python " in this comment area to participate in the lucky draw

This book takes the various problems encountered by the author and his virtual girlfriend (Xiaolu) in life as the main line, and introduces various functions, uses, and solutions of design patterns. It systematically introduces 23 design patterns. The code is written and explained in detail in a specific and specific way, so that those readers who don't know much about design patterns, have only a half-knowledge, and only have concepts, can thoroughly understand and master the usage scenarios and usage methods of commonly used design patterns, and master each design pattern. The UML structure and representation of patterns. This book suits process designing abecedarian or the developer that hopes to rise somewhat on object-oriented process designing is read.
Comment " Life is too short, I learn python " in this comment area to participate in the lucky draw
Comment " Life is too short, I learn python " in this comment area to participate in the lucky draw
Comment " Life is too short, I learn python " in this comment area to participate in the lucky draw
Category of website: technical article > Blog
Author:kkkkkkkkkkdsdsd
link:http://www.pythonblackhole.com/blog/article/25312/064c638d78b7e90c16a1/
source:python black hole net
Please indicate the source for any form of reprinting. If any infringement is discovered, it will be held legally responsible.
name:
Comment content: (supports up to 255 characters)
no articles