
pytorch's deep learning environment installation configuration (GPU version)
posted on 2023-05-21 17:03 read(373) comment(0) like(14) collect(3)
Table of contents
0. Anaconda configures domestic mirror sources
1.anaconda creates a new virtual environment
2. Update the graphics card driver CUDA Driver
3.1 Method (1): Use pip to install Pytorch
3.1.1 Method (1) Online pip installation
3.1.2 Method (2) Local pip installation
3.2 Method (1): Use conda to install Pytorch
3.3 Verify that pytorch is installed successfully
4. Pycharm configures the virtual environment
4.1 Configure the virtual environment for the new project
4.2 Configure the virtual environment for the download project
some conceptual understanding
- Graphics card (GPU) : GPU (Graphics Processing Unit), used for displaying images on the screen, and for tasks such as matrix operations related to video and image processing.
- Driver : A plug-in to the operating system (OS). Since the GPU is hardware, we need to install drivers to allow the computer to recognize the specific hardware.
- CUDA : NVIDIA graphics card instruction set, driver extension package. With CUDA, we can operate NVIDIA graphics cards
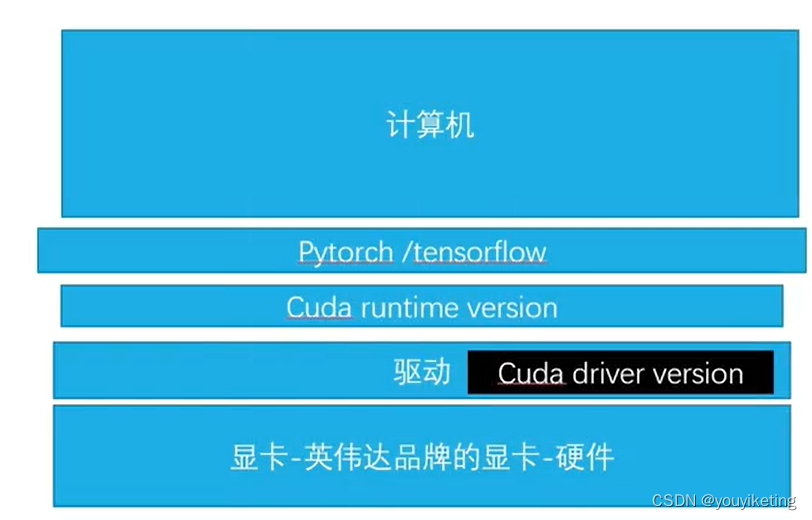
(The picture comes from the powerful up master of station B, I am a mound)
Before installing pytorch, we need to check whether the computer has an NVIDIA graphics card. According to the version of pytorch, whether it is necessary to install and update the corresponding driver and Cuda.
- anaconda : Virtual environment management software that can create different virtual environments.
- pytorch/tensorflow : code framework system for artificial intelligence
- pycharm/jupyter notebook: Python editor, similar to Notepad, editing software, does not have code execution function itself. (The jupyter notebook comes with anaconda)
- The relationship between each software in deep learning:
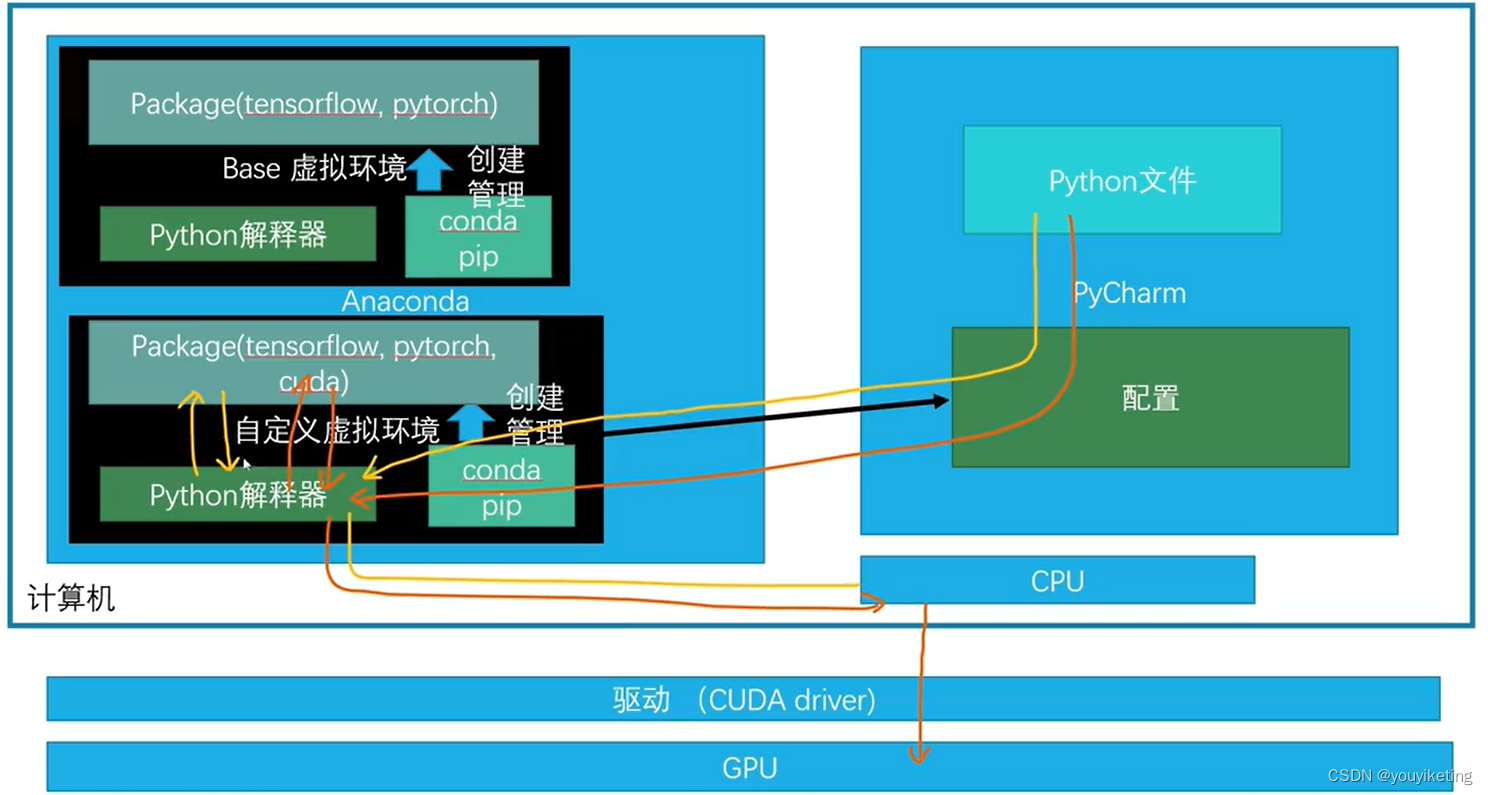
(Picture from the up owner of station B: I am a mound)
We configure which virtual environment to use in Pycharm, and after writing the python code, run the program, the python file finds the corresponding virtual environment through configuration, and passes the python file to the python interpreter in it. The python interpreter parses the python file, calls the required library from the installed package during the parsing process, and translates it into a computer language, sends it to the CPU, and the CPU executes the corresponding instruction. When the CPU finds that we want to transfer some calculation data to the GPU, the CPU sends corresponding instructions, and through the driver, sends the data to the GPU for calculation.
0. Anaconda configures domestic mirror sources
When using anaconda to download various packages, the default source, that is, the server that provides the installation package, is set up by the company itself. The foreign server is slow and unstable. Therefore, we can configure the download source as a domestic mirror source through the following command, Complete the download and installation work at a faster speed (take off).
Copy the following command line in Anaconda Prompt.
- 清华源:
- conda config --add channels https://mirrors.tuna.tsinghua.edu.cn/anaconda/pkgs/free/
- conda config --add channels https://mirrors.tuna.tsinghua.edu.cn/anaconda/cloud/conda-forge
- conda config --add channels https://mirrors.tuna.tsinghua.edu.cn/anaconda/cloud/msys2/
- conda config --set show_channel_urls true
-
- 中科大源:
- conda config --add channels https://mirrors.ustc.edu.cn/anaconda/pkgs/main/
- conda config --add channels https://mirrors.ustc.edu.cn/anaconda/pkgs/free/
- conda config --add channels https://mirrors.ustc.edu.cn/anaconda/cloud/conda-forge/
- conda config --add channels https://mirrors.ustc.edu.cn/anaconda/cloud/msys2/
- conda config --add channels https://mirrors.ustc.edu.cn/anaconda/cloud/bioconda/
- conda config --add channels https://mirrors.ustc.edu.cn/anaconda/cloud/menpo/
- conda config --set show_channel_urls yes
You can use the following command to check whether the image source is configured successfully.
conda config --get
Among them, "defaults" is the default channel (download address) of anaconda, which is the lowest priority, and the new channel (domestic mirror address) we added is the highest priority. Therefore, when we download a package, anaconda first searches for the required package in the added domestic channel, and if not, then goes to the default foreign channel to search.
PS: If you want to delete the image acceleration channel, change "add channels" to "remove channels"
conda config --remove channels 【通道地址】1.anaconda creates a new virtual environment
(anaconda creates a virtual environment exclusively using pytorch)
Understanding: Create a new room using the pytorch tool in the anaconda building. The base can be understood as the lobby of the anaconda building. We can install different packages and execute different projects by building different rooms.
step:
step1. Open Anaconda Promp, the command line interface control terminal of Anaconda, and enter the following command to create a new environment
conda create -n 【name_of_new_environment】python=【python_version】
The address of the new virtual environment pytorch:

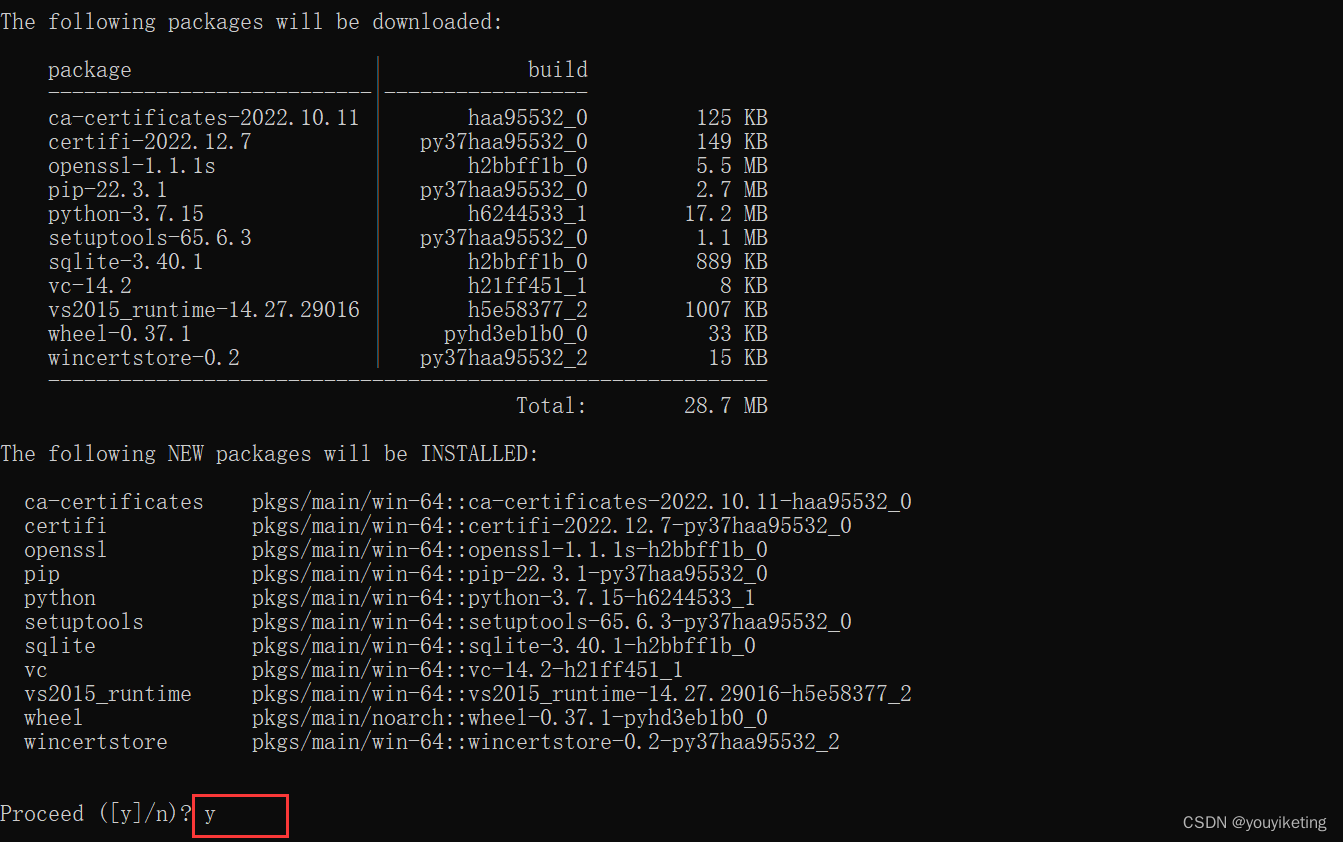
step2. Enter "y" to download the new packages suggested above in the new environment.
After the installation is successful, there will be a folder named pytorch in Anaconda's envs directory.

Other instructions:
(1) Entering a new environment
conda activate 【虚拟环境名】(2) View the packages downloaded in this environment
conda list(3) Delete the created virtual environment
conda remove -n 【虚拟环境名字】 --all2. Update the graphics card driver CUDA Driver
(Picture from station B: I am a mound of dirt)
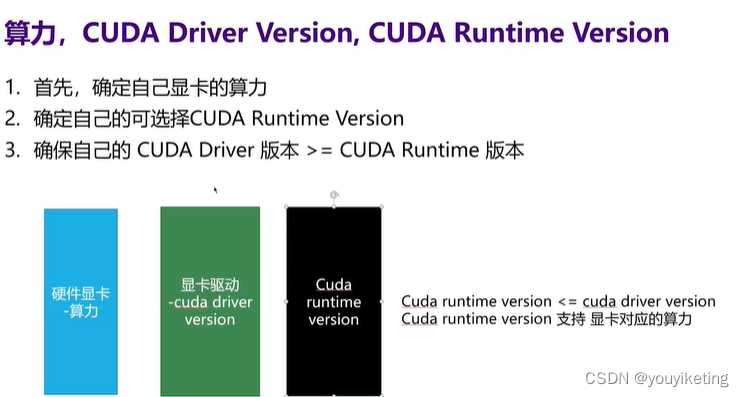
step1. Determine the model (computing power) of your graphics card
Check the NVIDIA graphics card model in the task manager, my computer is NVIDIA GeForce MX150

step2. Install/update the latest version of CUDA Driver
(If the computer has a graphics card driver, you can skip this step, but it is recommended to update it. For example, the version of the driver that comes with my computer is very low (391.25), which leads to the highest CUDA Runtime version (9.1) supported by my driver is also very low. As a result, the version of pytorch I can install is very low)
Open NVIDIA official website and download the official driver according to your graphics card model:
https://www.nvidia.cn/Download/index.aspx?lang=cn
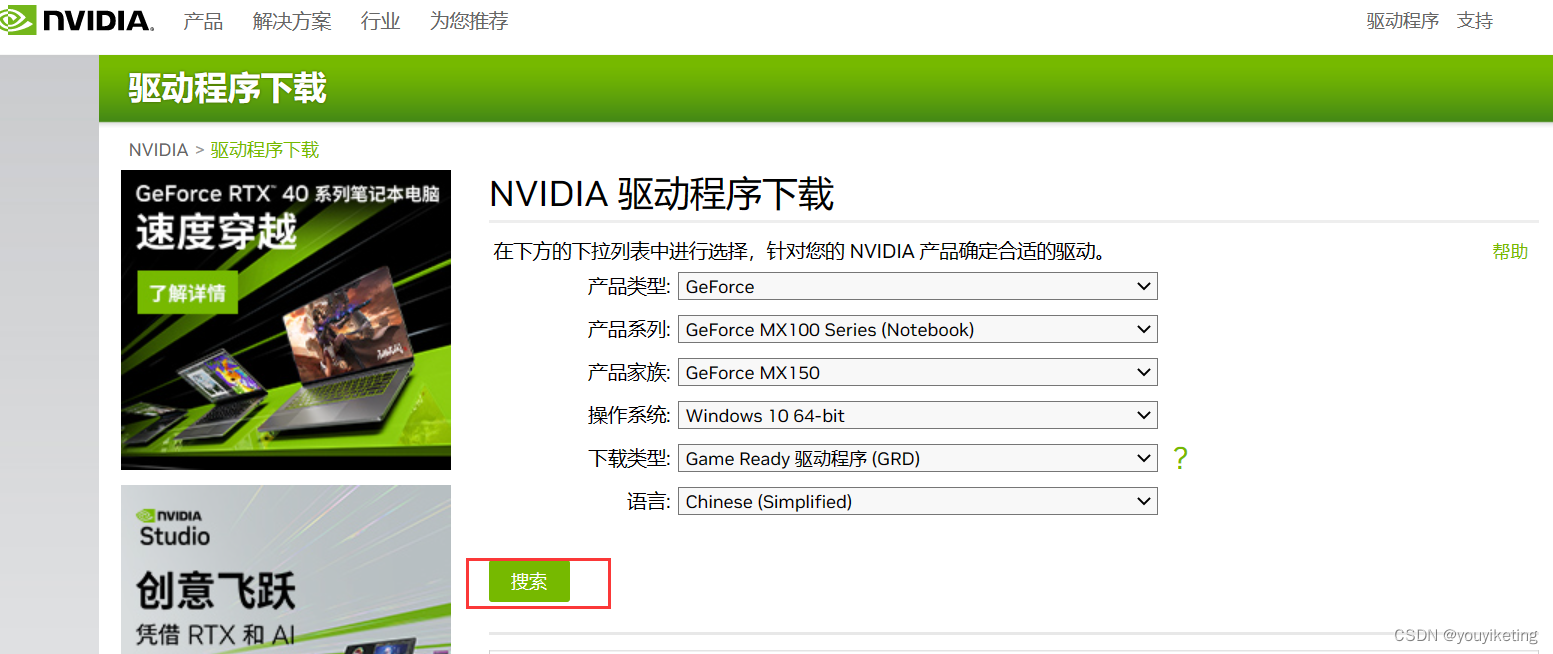
All the way to install the default next on the line.
step3. Check your own driver CUDA Driver version, which is the highest supported CUDA Runtime version (I am 12.0 here)
Method (1) : Enter the following command in the Dos window to check the graphics card driver version
nvidia-smi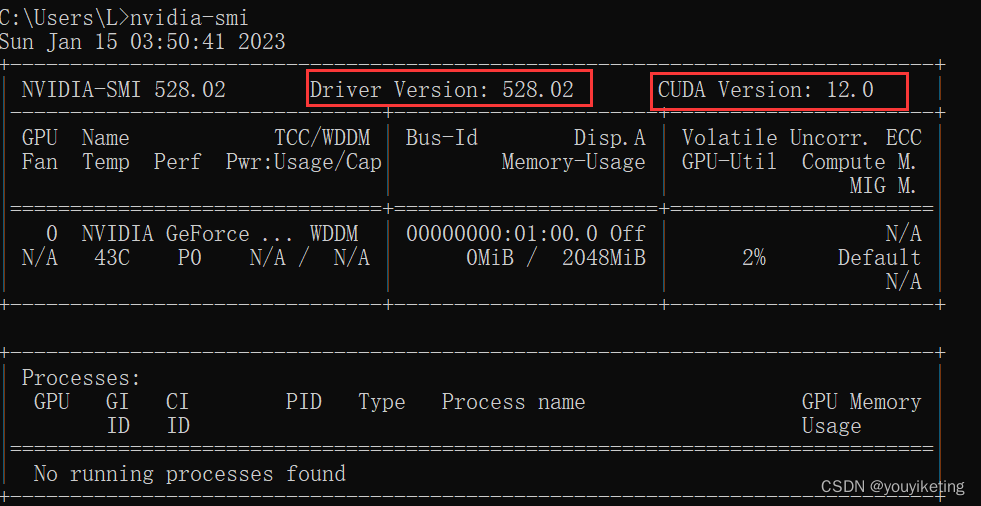
Method (2): Right-click to open the NVIDIA Control Panel -> View (lower left corner) system information

step4. Open the Pytorch official website, and select the corresponding pytorch version according to the highest CUDA Runtime version supported by your computer (just smaller than the CUDA driver, make sure that the CUDA Driver version>=CUDA Runtime version)
3. Install pytorch
PyTorch official website![]() https://pytorch.org/The latest stable version currently supported is 1.13.1, which supports CUDA11.6 and CUDA11.7 (<12.0).
https://pytorch.org/The latest stable version currently supported is 1.13.1, which supports CUDA11.6 and CUDA11.7 (<12.0).
Including 4 packages:
pytorch: core package, integrating the core functions of pytorch
torchvision: a package for image processing
torchaudio: a package for language processing
pytorch-cuda=11.6: some tools of CUDA
3.1 Method (1): Use pip to install Pytorch

pip3 install torch torchvision torchaudio --extra-index-url https://download.pytorch.org/whl/cu116Command analysis: use the address "https://download.pytorch.org/whl/cu116" to install the following three packages.
- torch: core package, integrating the core functions of pytorch
- torchvision: a package for image processing
- torchaudio: a package for language processing
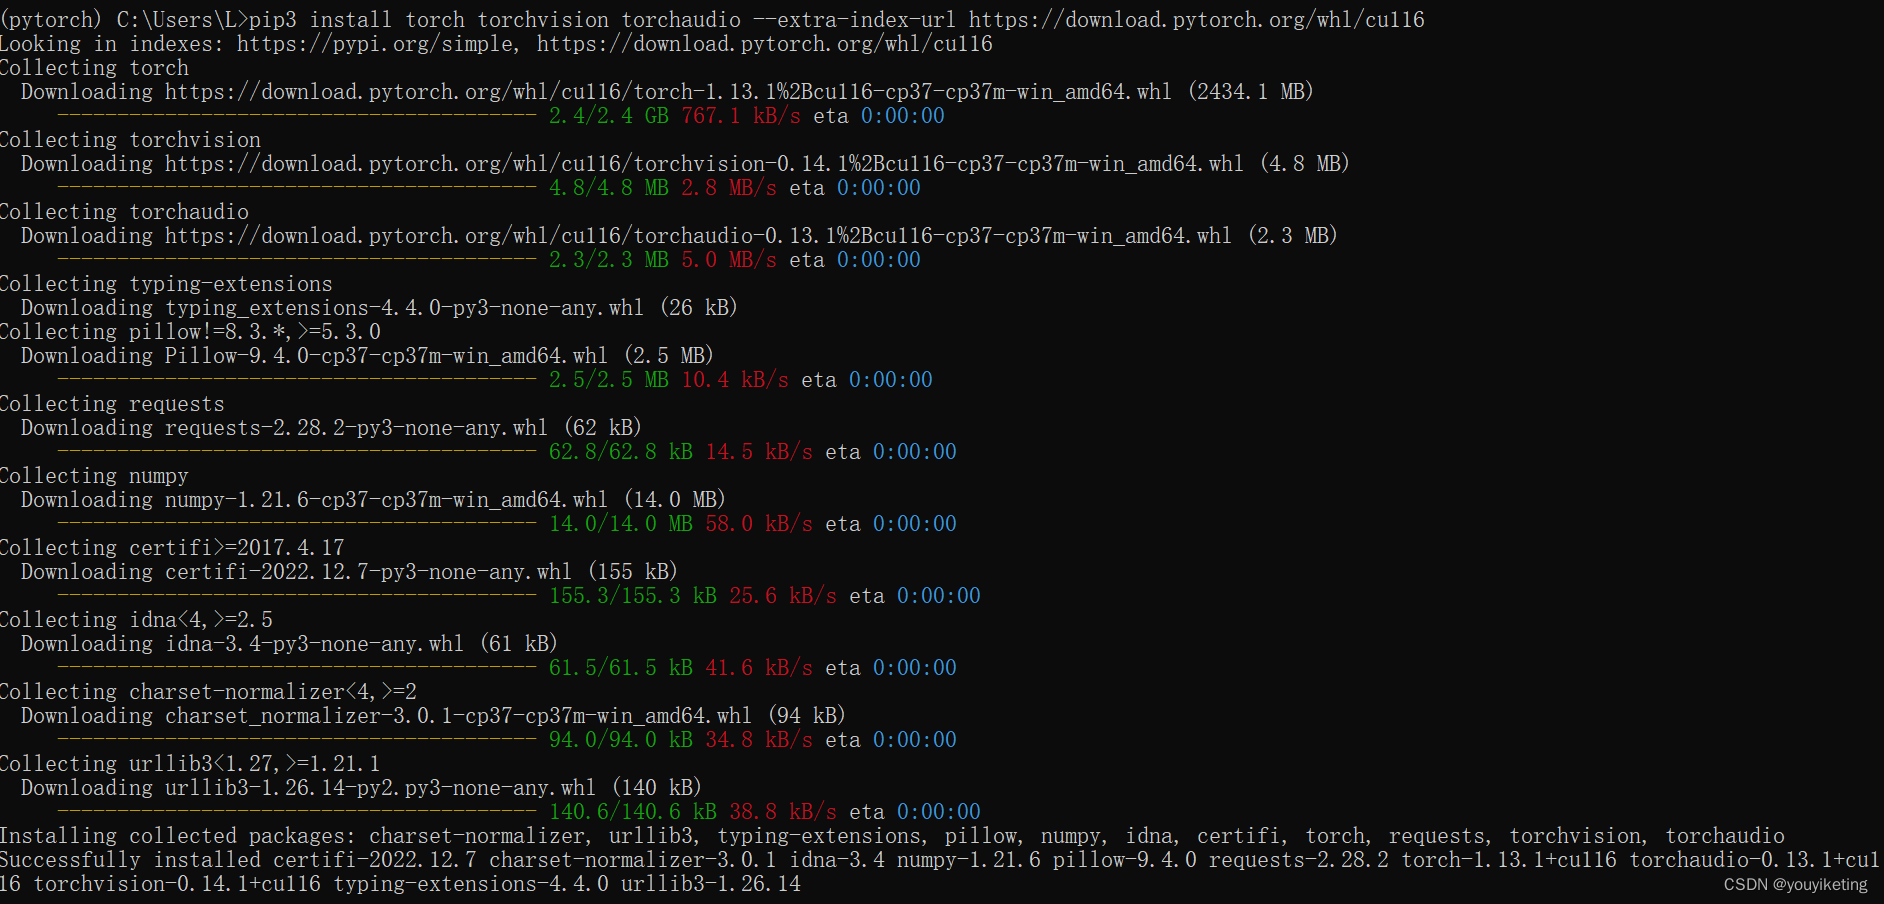
3.1.1 Method (1) Online pip installation
step1. Enter the newly created pytorch virtual environment

step2. Directly copy the pip command from the official website to the command line window to download

(It's still pretty fast.)
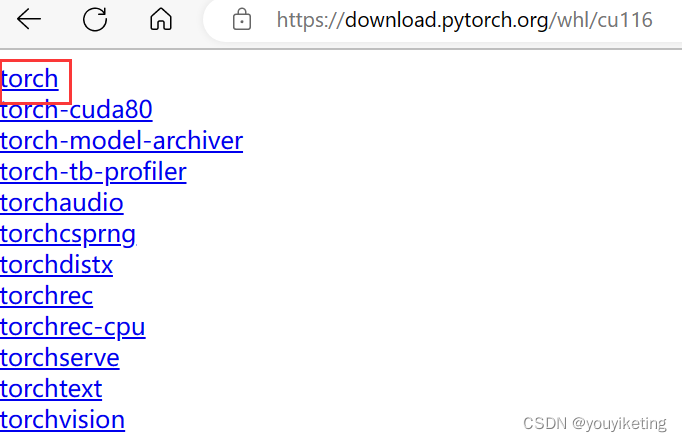
3.1.2 Method (2) Local pip installation
step1. Download the torch package from the address "https://download.pytorch.org/whl/cu116" (Xunlei download fast)
step2. Use pip install to install torch package locally
pip install 【torch package的下载路径地址】step3. After the local installation is complete, copy the pip command from the official website to the command line window, and install the remaining packages. The package is small and the download will be fast.
(It will automatically detect and skip the installed torch package)
3.2 Method (1): Use conda to install Pytorch

conda install pytorch torchvision torchaudio pytorch-cuda=11.6 -c pytorch -c nvidiaCommand analysis: use the pytorch channel to download and install the following 4 packages (what does -c nvidia mean? nvidia channel?)
- pytorch: core package, integrating the core functions of pytorch
- torchvision: a package for image processing
- torchaudio: a package for language processing
- pytorch-cuda=11.6: cuda tools
Copy the official website conda download command and use the command line to download (it’s so slow, you can add a mirror address)
3.3 Verify that pytorch is installed successfully
step1. In our newly created pytorch virtual environment, enter the following command to check if there is a corresponding package
conda list
step2. Enter python to enter the python interpreter
step3. Enter import torch to call the torch package
step4. Enter the following command to check whether the GPU can be used
torch.cuda.is_available()
4. Pycharm configures the virtual environment
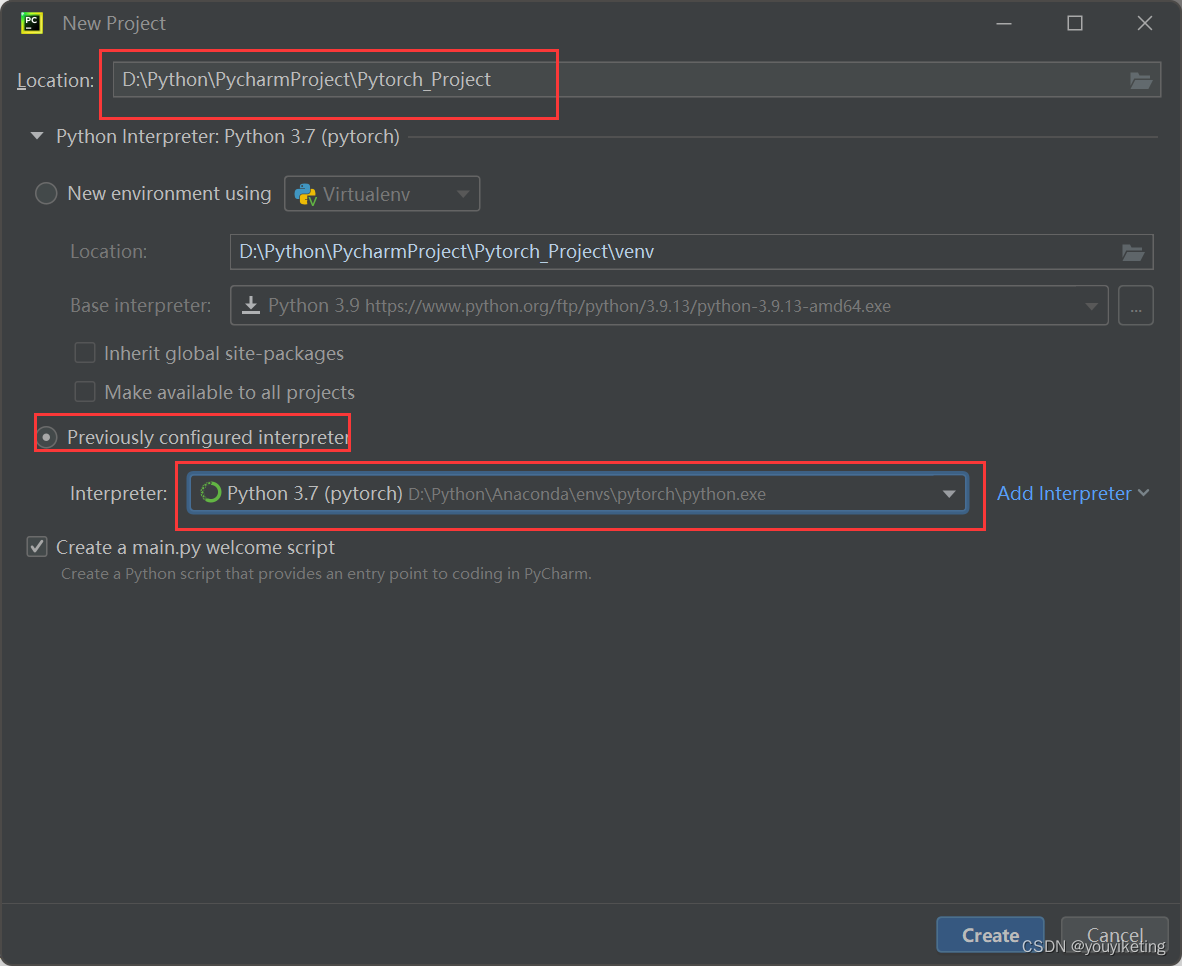
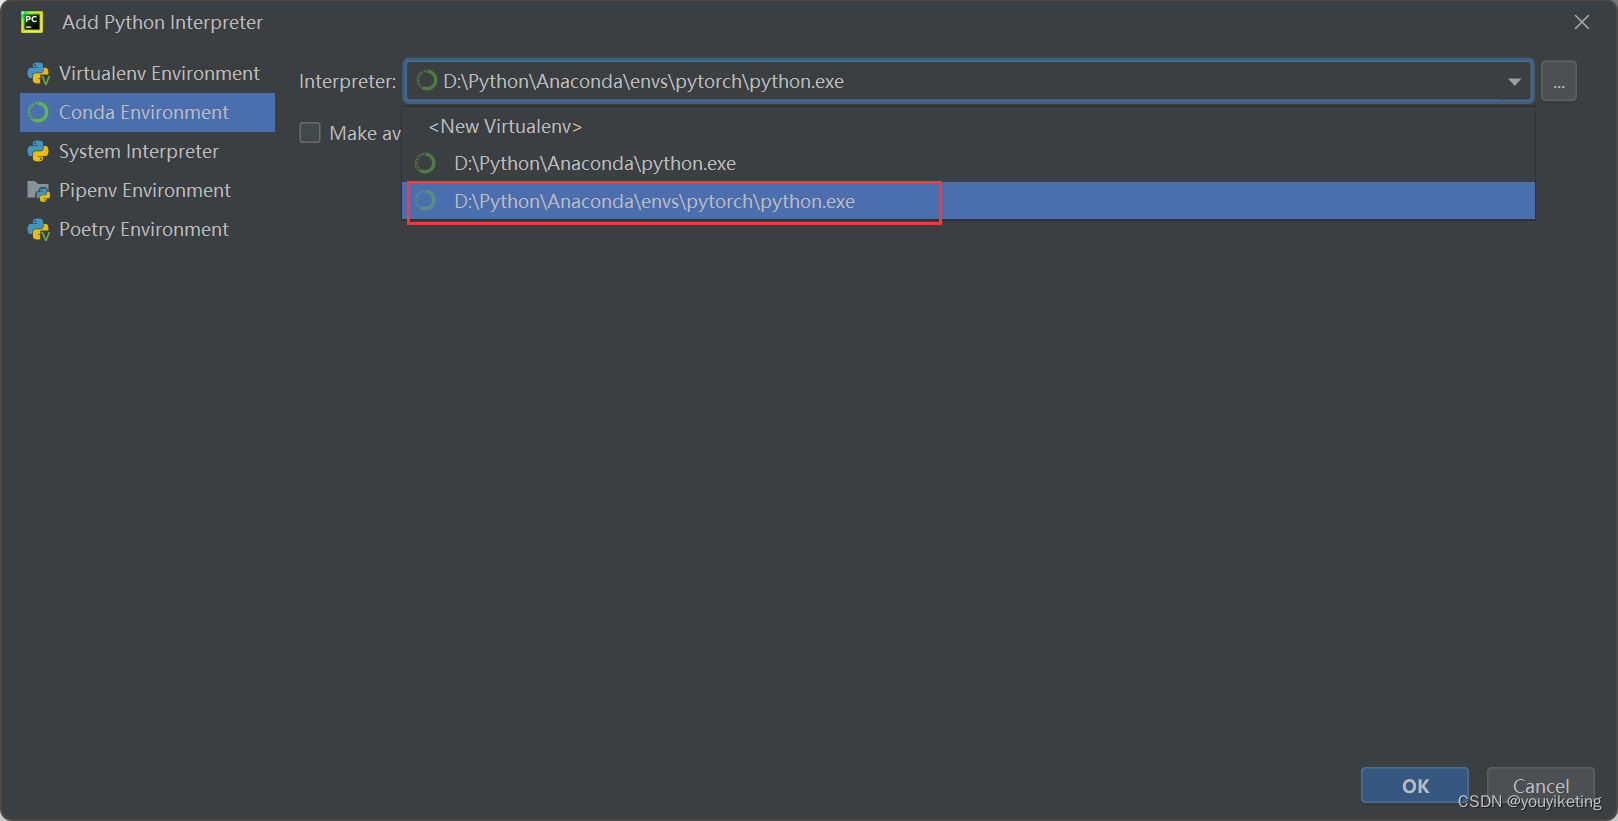
4.1 Configure the virtual environment for the new project
Create a new project --> configure the path of the project --> configure the python interpreter of the project --> find the python interpreter under the conda virtual environment (the previously created pytorch virtual environment).
PS: The python interpreter of anaconda's base virtual environment is in the root directory of the anaconda installation directory; the newly created virtual environment is in the envs directory of the anaconda installation directory.
Verify that the GPU is available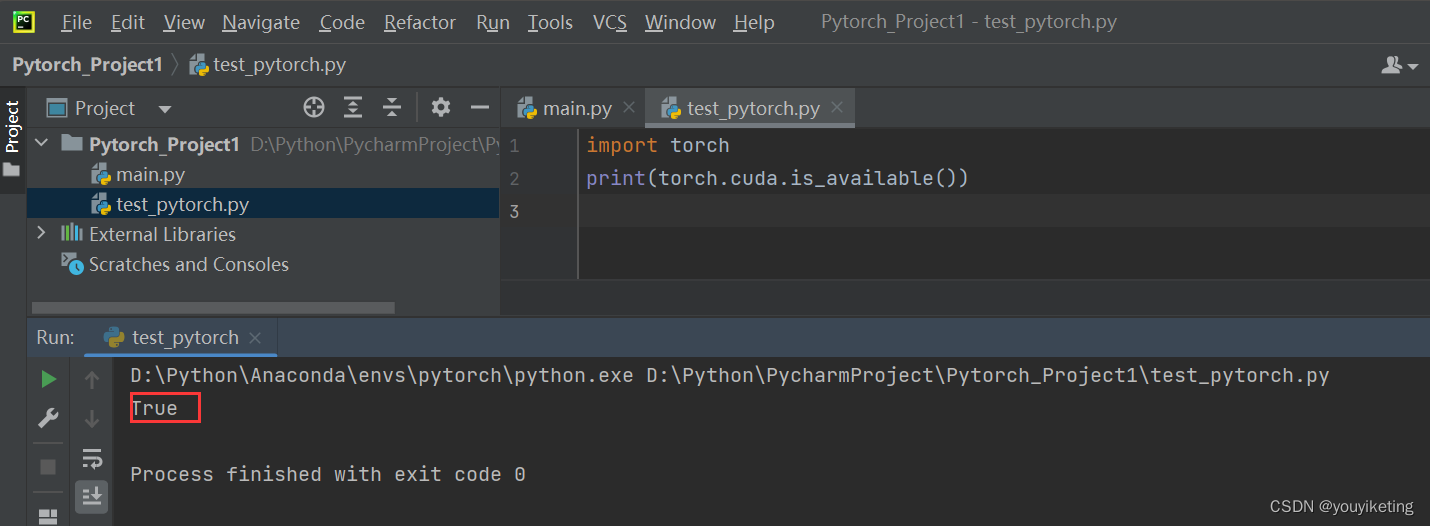
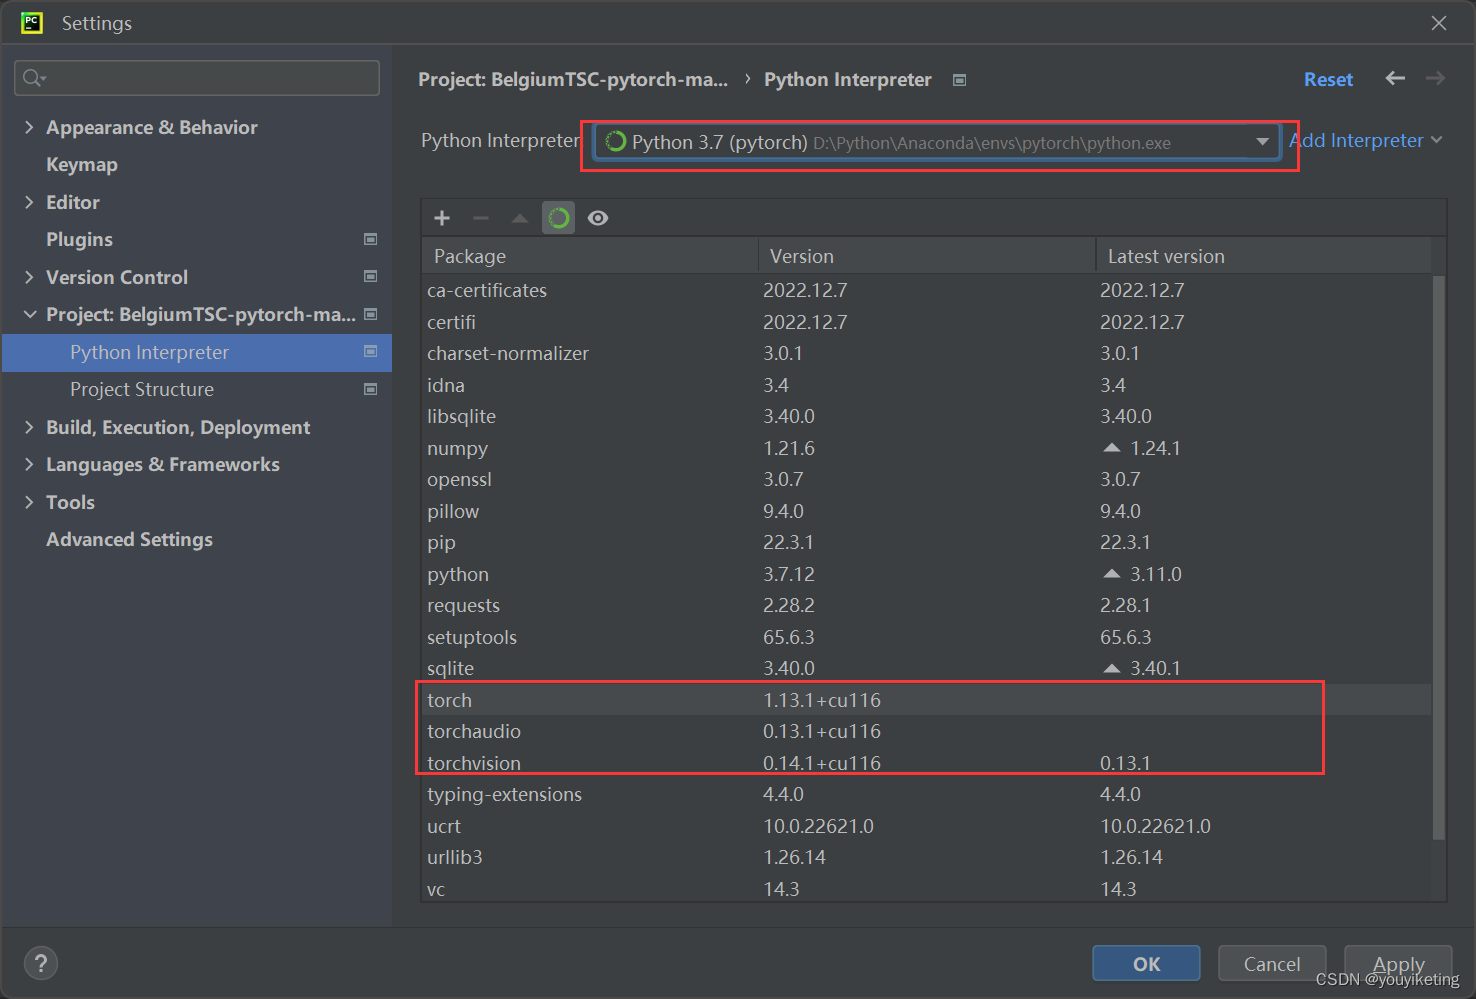
4.2 Configure the virtual environment for the download project
Import the downloaded project -->File-->Settings-->Project:-->Python Interpreter-->select the virtual environment required by the project
refer to:
https://www.bilibili.com/video/BV1S5411X7FY?p=1
When wandering around in various tutorial blogs, I found this tutorial, the magical station B, the powerful up master, it is too detailed! How does he know what confusion I have, thank you thank you! The above are my learning and understanding record notes.
Category of website: technical article > Blog
Author:Believesinkinto
link:http://www.pythonblackhole.com/blog/article/25281/c40cdb2760c3de2f497b/
source:python black hole net
Please indicate the source for any form of reprinting. If any infringement is discovered, it will be held legally responsible.
name:
Comment content: (supports up to 255 characters)
no articles